Printable Version of Topic
Click here to view this topic in its original format
Initial D World - Discussion Board / Forums > Automotive Discussion > My Dragons! (Evo IV Coupe build and WRX DD)


Posted by: Alchem1st Nov 9 2012, 05:23 AM
Well, the guys who posted in my welcome thread wanted me to make a thread about my cars; so here it is! I own two cars; a 2000 Mitsubishi Mirage Coupe and a 2012 Subaru WRX. The WRX is mostly stock as it's my daily and I want to keep it that way for now and the Mirage...well I wouldn't call it stock haha. I'll just post some pictures of the cars in their current form and post a link to my build thread on Evom to make it easier. There's so much done already to the Mirage that posting all of it would take forever; so here's a rundown of the major work done to it:

2000 Mitsubishi Mirage (and what I can remember off the top of my head of the mod list)

user posted image
user posted image
Image size reduced, original size: 1024 x 768. http://i379.photobucket.com/albums/oo236/crlpcguy/IMG_0844.jpg to view the image in its original dimension.

user posted image
Image size reduced, original size: 1024 x 768. http://i379.photobucket.com/albums/oo236/crlpcguy/IMG_0843.jpg to view the image in its original dimension.

user posted image
Image size reduced, original size: 1024 x 768. http://i379.photobucket.com/albums/oo236/crlpcguy/IMG_0851.jpg to view the image in its original dimension.

user posted image
Image size reduced, original size: 1024 x 768. http://i379.photobucket.com/albums/oo236/crlpcguy/P8230024.jpg to view the image in its original dimension.

user posted image
Image size reduced, original size: 1024 x 768. http://i379.photobucket.com/albums/oo236/crlpcguy/20120823_201703.jpg to view the image in its original dimension.

user posted image
Image size reduced, original size: 1024 x 768. http://i379.photobucket.com/albums/oo236/crlpcguy/20121101_185608.jpg to view the image in its original dimension.

user posted image
Image size reduced, original size: 1024 x 768. http://i379.photobucket.com/albums/oo236/crlpcguy/20121101_185621.jpg to view the image in its original dimension.


Evo IV front test fit (long way off still, lotta work to do there. Need to switch to the Evo core support and build custom fenders to match the coupe door line)
user posted image
Image size reduced, original size: 1024 x 768. http://i379.photobucket.com/albums/oo236/crlpcguy/IMG_0803.jpg to view the image in its original dimension.


Exterior:

Evo IV rear bumper w/ lip and support
Evo IV tails
Evo IV badging
Mirage Asti side skirts
Evo IV amber sidemarkers (installed but not pictured, need some up to date shots)
17x8 +35 Enkei RPF1's with 215/40/17 tires

Suspension/Brakes:

Front:

Evo IV front knuckles (5lug)
Evo IV front lower control arms
Evo IV front swaybar
Superpro poly bushings for Evo IV front swaybar
Evo 8 Brembo front brakes with ebay D/S rotors (street use only)
EBC Yellowstuff pads


Rear:

AWD system is being worked on for installation this Winter, but here's the current setup:

92 Mirage Turbo rear hubs (4x114.3) redrilled to 5x114.3
1G DSM rear calipers and rotors mounted via 89Miragemans bracket kit
custom ebrake adapter

Go check out my Evom build thread for some vids of the rear end project! (link further down in thread)


Interior:

Evo IV Momo steering wheel
Evo IV gauge cluster
Evo IV automatic climate control swap (totally custom and required drilling new holes in the firewall. See my build thread for more info as it's quite the extensive conversion)
Evo IV LHD under dash trim piece with pocket (rare)
Evo IV center console with intercooler sprayer button
Evo IV power folding mirror switch
Lancer GSR optional secondary glove compartment (über rare! Only the third in the US)
Evo 8 MR factory gauge pack
Defi Link gauge set (installed in GSR glove compartment)
Evo 8 short shifter and suede boot
Blitz Evo IV aluminum shifter base bushings
Harness bar (not installed in pictures)

Engine:

Stock 4G93 temporary engine swap
Odyssey PC 680 mini battery with custom mount
Cheapo custom intake
Ebay header

Building a 2.3 forged bottom end good for 1000hp and shooting for 600hp on 93oct, but it's in parts right now and I still need internals. The stock 4G15 (1.5L 12V) snapped it's timing belt and I ended up scoring a deal on a 4G93 (1.8L 16V) locally for a good price. (Swap cost me out of pocket only $200 after I sold the parts from the stock setup happy.gif ) Here's a pic of the bay after the swap.

user posted image
Image size reduced, original size: 1024 x 768. http://i379.photobucket.com/albums/oo236/crlpcguy/20120807_182527.jpg to view the image in its original dimension.


For a more extensive and less sleep deprived thread, here's my build thread on Evom!
http://forums.evolutionm.net/evo-show-shine/535138-alchem1sts-evo-iv-coupe-conversion-project.html


Ok, on to the WRX! This ones a bit easier hahaha. It's a 2012 Subaru WRX in World Rally Blue.
I added RallyArmor Urethane mudflaps, SPT oil cap and battery tie down, an SPT turbo heat shield, a Grimmspeed front plate delete, yellow fog tints, a Prosport boost gauge, and a Kartboy short shifter with front and rear poly stay bushings as well as a clear bra and rustproofing/undercoating. That's it and probably all I'm gonna do to it for several years. Here's a few pics!

user posted image
Image size reduced, original size: 1024 x 768. http://i379.photobucket.com/albums/oo236/crlpcguy/2012%20WRX%20pics/P5170235.jpg to view the image in its original dimension.

user posted image
Image size reduced, original size: 1024 x 768. http://i379.photobucket.com/albums/oo236/crlpcguy/2012%20WRX%20pics/P5170241.jpg to view the image in its original dimension.

user posted image
Image size reduced, original size: 1024 x 768. http://i379.photobucket.com/albums/oo236/crlpcguy/2012%20WRX%20pics/2012-05-24202949.jpg to view the image in its original dimension.

user posted image
Image size reduced, original size: 1024 x 768. http://i379.photobucket.com/albums/oo236/crlpcguy/2012%20WRX%20pics/2012-05-24203000.jpg to view the image in its original dimension.

user posted image
Image size reduced, original size: 1024 x 768. http://i379.photobucket.com/albums/oo236/crlpcguy/2012%20WRX%20pics/2012-06-11181112.jpg to view the image in its original dimension.

Best plate EVAR.

So that's it, it's WAY past my bedtime LOL so if the thread is incoherent I'll fix it later today when I get up haha. Hope you guys enjoy! Also these are all old pics and I don't have a gallon of milk or a loaf of bread to prove they're mine lol but my username is the same here as Evom if that helps. Maybe I'll manage to get those things and snap some newer pics soon haha.

Posted by: Boost1995 Nov 9 2012, 06:17 AM
Welcome and beautiful cars! As a fellow mitsu fan I can't wait to watch the Evo IV come alive.

[ Post made via Mobile Device ]

Posted by: Spaz Nov 9 2012, 09:05 AM
O hai! I'm pretty sure I've seen you around EvoM, as big as that place is, strangely I haven't seen your build thread, I'll have to go take a look at it.

I've got a buddy with an Evo3 conversion on a '95 Mirage, but it's torn apart right now in the garage. He went through and did all the stitch welding and everything, so much work, but it's totally worth it as nuts as that car was (and more so will be). He's shooting for over 600hp on the next build with a 2.4, and it only weighs like 2500lbs.

Posted by: Alchem1st Nov 9 2012, 02:31 PM
Thanks guys! Hey Spaz your friend wouldn't be named Mark would he? Black and silver 3 with a pink valve cover? (well, had. I think it's all apart right now) I'm friends with him on facebook haha. I know most of the guys with Evo conversions personally actually.

Posted by: Spaz Nov 9 2012, 03:07 PM
QUOTE (Alchem1st @ 34 minutes, 10 seconds ago)
Thanks guys!  Hey Spaz your friend wouldn't be named Mark would he?  Black and silver 3 with a pink valve cover?  (well, had.  I think it's all apart right now)  I'm friends with him on facebook haha.  I know most of the guys with Evo conversions personally actually.

It sure is. I go out for beers with him and his wife every month or so. Shame I don't see him more, despite us living 5 minutes from each other. I always find it funny how small the Mitsu world really is, it's hard to find someone who's over 2 degrees of separation from you these days. Though I must admit, knowing people like Scheides and Kracka doesn't hurt that either. tongue.gif

And I'm pretty sure that pink valve cover is on his AWD Talon Spyder now, unless he has two (I honestly don't remember how many of those things he painted).

Posted by: Alchem1st Nov 9 2012, 03:12 PM
Haha yeah. Oh, yeah you're right he did. He doesn't post on Mirageforums so much anymore though so hard to remember what he's up to. Wish he'd get another engine in that car; it's awesome!

Posted by: Spaz Nov 9 2012, 03:28 PM
QUOTE (Alchem1st @ 16 minutes, 15 seconds ago)
Haha yeah. Oh, yeah you're right he did. He doesn't post on Mirageforums so much anymore though so hard to remember what he's up to. Wish he'd get another engine in that car; it's awesome!

It's time and money, neither of which are ever as plentiful as one would like. It's next on his list though once he's got the Spyder squared away. That car is indeed awesome though, it's been quite some time but that car's always been something else when it's running. 5 different colors or not, it's impressive to say the least.

Posted by: sometrueno Nov 9 2012, 03:33 PM
I like the WRX plate haha

[ Post made via Mobile Device ]

Posted by: RedsunsF1 Nov 11 2012, 09:02 PM
Nice Evo. I would like to have an Evo III one day once I finish College ha. (Almost done!!)

[ Post made via Mobile Device ]

Posted by: Takumi Trueno Nov 11 2012, 10:17 PM
I do really like the early EVO. Cant wait to see how this turns out.

Posted by: Alchem1st Nov 12 2012, 12:28 AM
Thanks guys! Yeah my favorite Evo is the IV. Did you guys spot the Emperor decal on the upper left corner of the back window? smile.gif

Posted by: Scuba Steve Nov 12 2012, 01:26 PM
I love these mirage coupe evo conversions.

Posted by: Fast Nov 13 2012, 01:53 PM
Mirage-Evo conversions are always awesome builds to follow. They make an 2.5RS-STi conversions look like cake walks. laugh2.gif

Posted by: Alchem1st Nov 13 2012, 02:29 PM
Yeah, they're a huge amount of work! Between my Dad's welding skill and my electrical skill the conversion hasn't been a big deal so far. It's not like we have to re-engineer anything so that makes it much easier.

Posted by: sometrueno Nov 13 2012, 02:45 PM
So what's the deal with these evo conversions? Why do people pick the mirage to work off of? I was checking wikipedia and some of the years have the same/similar roof(s) as the lancer, are they the same chassis?

[ Post made via Mobile Device ]

Posted by: Spaz Nov 13 2012, 06:47 PM
QUOTE (sometrueno @ 4 hours, 1 minutes ago)
So what's the deal with these evo conversions? Why do people pick the mirage to work off of? I was checking wikipedia and some of the years have the same/similar roof(s) as the lancer, are they the same chassis?

Yep, the Lancer was sold as the Mirage here in the 'States.

Having helped with an RS->STi conversion, there's no comparison. Mitsubishi really did build two completely different cars.

[ Post made via Mobile Device ]

Posted by: Alchem1st Nov 13 2012, 10:01 PM
Well the 4G Mirage sedan is the same bare chassis as the evo 1 to 3 but everything else is different. I'm not an expert on the 4G though. The 5G sedan bare chassis only has three structural differences to the Evo 4 chassis (A few more for the Evo 5/6 to fit the widebody) and aestheticly they are the same. Essentially all you need to do is swap to the Evo rear floorpan to a 5G lancer/mirage sedan bare chassis and swap all the parts from a real Evo 4-6 over. Here's the kicker for my build. There was never an Evo coupe from Mitsubishi, however they shortened the standard lancer sedan chassis (remember it's the same bare chassis as the evo except for the floorpan and the other two strengthener pieces) to make the lancer coupe. Its exactly the same underneath though; so if you swap floorpans to a coupe you can build a perfect Evocoupe they way it would've been if Mitsubishi had actually made one! Also I have the other two strengthener pieces on mine as well. cool.gif

Posted by: backalleyracer Nov 14 2012, 01:42 AM
Love the Evo - just like everyone else

Nice to see someone put some work into a car smile.gif


Posted by: chillined Dec 11 2012, 09:31 PM
Want updates! What's the status on this?

Posted by: Spaz Dec 12 2012, 05:24 AM
QUOTE (chillined @ 7 hours, 52 minutes ago)
Want updates! What's the status on this?

I could answer that question, but I think I'll leave it up to Alchem1st to post it.

Posted by: chillined Dec 13 2012, 12:04 AM
That doesn't sound very positive, but then again can be very positive...

Anyways, I hope it's good news man.

Posted by: lolsoul? Jan 19 2013, 02:13 PM
Good choice in wheels. Keep us updated!

Posted by: chillined Jan 19 2013, 10:06 PM
QUOTE (Spaz @ Dec 12 2012, 08:24 AM)
I could answer that question, but I think I'll leave it up to Alchem1st to post it.

Okay, you might as well post up what happened. This thread hasn't been updated in a while.

Posted by: Spaz Jan 20 2013, 08:58 AM
QUOTE (chillined @ Today, 1:06 AM)
Okay, you might as well post up what happened. This thread hasn't been updated in a while.

He had it listed for sale, but I think he backed out, I haven't read his thread for a while but I do know the entire project and all associated parts were up for grabs at one point.

Posted by: chillined Jan 20 2013, 02:12 PM
Damn, that really sucks to hear.

[ Post made via Mobile Device ]

Posted by: Alchem1st Feb 21 2013, 05:58 PM
Been forever since I posted here lol. Sorry about that. I think the emails have been going to my spam folder. rolleyes.gif You want an update huh? Can do!

Manley forged 100mm stroker crank!
user posted image
Image size reduced, original size: 1024 x 768. http://i379.photobucket.com/albums/oo236/crlpcguy/20130129_195912.jpg to view the image in its original dimension.


PTE 6262 billet dual ceramic ball bearing turbo with the anti-surge housing
user posted image
Image size reduced, original size: 1024 x 768. http://i379.photobucket.com/albums/oo236/crlpcguy/20130216_194959_zpsbd2d7e82.jpg to view the image in its original dimension.

user posted image
Image size reduced, original size: 1024 x 768. http://i379.photobucket.com/albums/oo236/crlpcguy/20130216_170707_zpscdcf6601.jpg to view the image in its original dimension.


Other than that, I did post the car for sale for a while but since I acquired the turbo stuff I'm not selling it. Also, it's all ripped apart at the moment as the heater core sprung a leak. One of the fittings cracked. I fixed it tonight though and will pressure test it tomorrow. Hope to have the dash back in and everything back together this weekend! Any local members wanna drop by and give a hand? LOL

P.S. I will check back tomorrow or later tonight to see if there has been more replies I missed. Gotta figure out why I didn't get any emails for the last 10 or so posts. sad.gif

Posted by: chillined Feb 21 2013, 10:11 PM
Awesome to hear dude! Wow, what an update. This thing is going to be a beast!

Posted by: Alchem1st Feb 22 2013, 03:55 AM
Thanks! Yeah, I didn't really want to let it go and there was no way I'd get anywhere near even the worth of the parts out of it let alone the work haha so I decided to keep it.
I was considering getting a Factory Five 818 which was why I posted it for sale in the first place. Hmm, didn't get an email saying there was a reply again. Not in my spam folder
either. ermm2.gif Changed some email settings so hopefully that fixes it! Also, just finished pressure testing the new heater core fitting so it's good to go back together today!

Posted by: Alchem1st Jul 4 2013, 12:38 PM
Hey guys just checking in. Won't be around as much probably now that S5 is over and done crying2.gif ; but here's an update on the "Evo":

http://s379.photobucket.com/user/crlpcguy/media/P5250042_zps0002cab2.jpg.html
Image size reduced, original size: 4288 x 3216. http://i379.photobucket.com/albums/oo236/crlpcguy/P5250042_zps0002cab2.jpg~original to view the image in its original dimension.

http://s379.photobucket.com/user/crlpcguy/media/MPF%20forum%20archive%20shots%20DO%20NOT%20MOVE/20130704_140823_zps41600ae1.jpg.html
Image size reduced, original size: 3264 x 2448. http://i379.photobucket.com/albums/oo236/crlpcguy/MPF%20forum%20archive%20shots%20DO%20NOT%20MOVE/20130704_140823_zps41600ae1.jpg~original to view the image in its original dimension.


Interior more or less done. All that's left is the harness bar, harness's, and a camera mount on the bar! Any Indiana members or members visiting Indiana should hit me up sometime! Would love to have someone to chat ID with sometime haha.

Interior parts list:

Evo 8 Recaros on Evo 5 Bride brackets
Evo 6 non-TME Blue stitch steering wheel
Evo 4 center console w/ intercooler sprayer switch
Evo 4 lower kick panel with cubby
Ebay blue stitch suede shift boot
Evo 8 short shifter mounted in an Evo 4 shift base
Blitz Evo 4 aluminum shifter base bushings
Ebay CTR shift knob
Evo 4 gauge cluster
USDM Mirage cluster surround gauge pod
CM5A Lancer GSR secondary storage upper glovebox (SUPER rare)
Evo 4 auto climate control system (only working LHD system in the US custom modded by yours truly:) )
Evo 4 power folding mirror switch and fog light switch
Oreilly auto parts volt gauge
AEM UEGO wideband
Defi Link System gauges (Boost, Water Temp, Oil Temp, and Oil Pres)
Montero windshield wiper stalk with intermittent wipers (Same as Evo 4 but LHD)
JVC double DIN DVD unit


My Evo 4 RS rear end is almost ready to go in the car now so after Mitsu Owners Day in Bloomington, IL this year the cars going under the knife to become an Evo for real haha!

WAY old vid, but for those that missed it:
http://www.youtube.com/watch?v=Cv72VsYV8uI

Posted by: Spaz Jul 5 2013, 07:59 AM
I saw that on Facebook, looking good!

I can't wait to see this finished.

Posted by: Alchem1st Jul 5 2013, 08:02 AM
Thanks! I don't hate driving it anymore now LOL! I think some of the most important aspects of a car are the surfaces you touch as a driver and my rear end hated the stock seats hahaha! You coming to MOD this year?

Posted by: Spaz Jul 5 2013, 01:36 PM
QUOTE (Alchem1st @ 5 hours, 33 minutes ago)
Thanks! I don't hate driving it anymore now LOL! I think some of the most important aspects of a car are the surfaces you touch as a driver and my rear end hated the stock seats hahaha! You coming to MOD this year?

The feel of the car is everything. Always has been for me. I really liked the '06 STi I test drove before the Evo, and because of the intertwined history and motorsports standings the Evo and the STi have, I wanted to find even more things to like... But I couldn't get into it, I just couldn't feel connected to the car. I don't know if it was just that car, but while the end result was razor sharp handling and response, the inputs were disconnected and vague. There was no catering to driver feel, and I just couldn't get excited about it. What I feel, sitting in the driver's seat, is everything to me about a car. It doesn't have to make the most horsetorques, it doesn't have to be the most balanced. It has to feel good.

I had planned to actually make it to Factory MOD this year (I somehow made it to TX MOD last year), but with the work and parts that need to go into the car to have it done for the latter half of the racing season, the money won't be there. I might even skip the trans if I have to and put it on the docket for next year, since it's just worn out and not actually broken, and I can still, at least for the time being, force 3rd at high revs if the fluid isn't too hot.

Posted by: Banken Jul 5 2013, 05:22 PM
...interesting build.

So, you drive around with the glove box open? That's... a little goofy.

I understand you're going for a clean look, but if your gauges are that far out of your line of sight they're not really doing their job. They need to be within your line of sight so you can catch them when they go past the safe zone. Ideally you want the operating temperature to be when the needle is pointing straight up, so you can check them with just a glance.


I would have thought for the money you'd be better off just...um, buying an Evo 8 and having a stock Mirage (a Mivec Mirage is no slouch).

But I don't mean to judge people's hobbies.

Posted by: Alchem1st Jul 5 2013, 08:27 PM
QUOTE (Banken @ 3 hours, 5 minutes ago)
...interesting build.

So, you drive around with the glove box open?  That's... a little goofy.

I understand you're going for a clean look, but if your gauges are that far out of your line of sight they're not really doing their job.  They need to be within your line of sight so you can catch them when they go past the safe zone.  Ideally you want the operating temperature to be when the needle is pointing straight up, so you can check them with just a glance.


I would have thought for the money you'd be better off just...um, buying an Evo 8 and having a stock Mirage (a Mivec Mirage is no slouch).

But I don't mean to judge people's hobbies.


Don't hate! ras.gif 
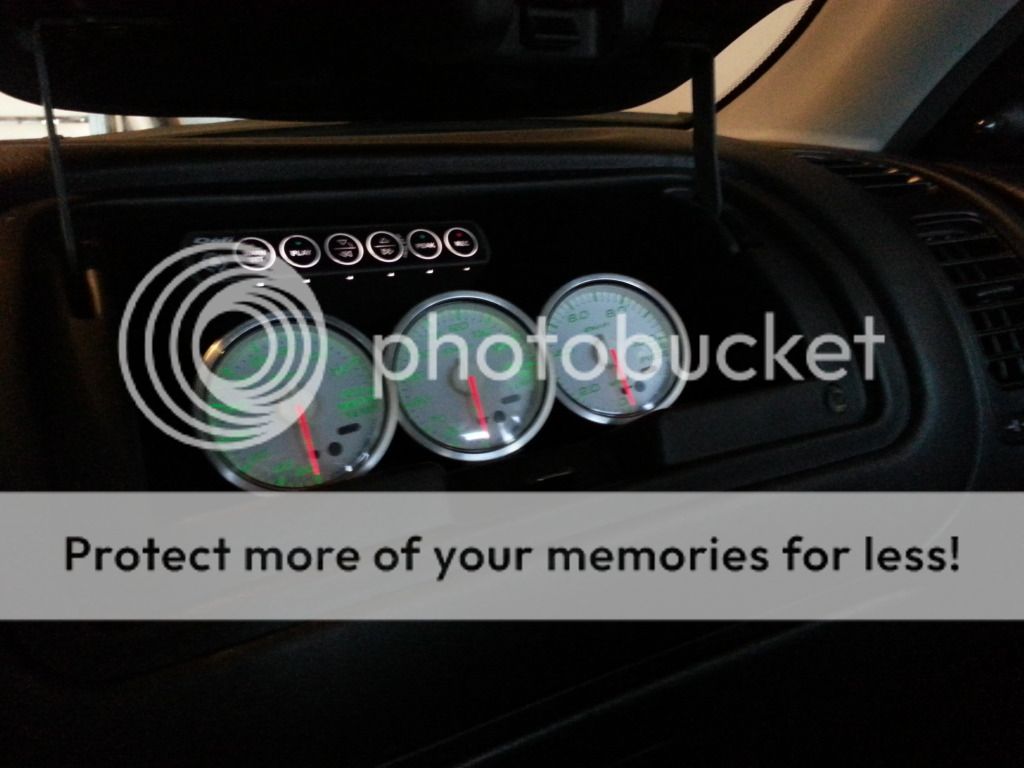
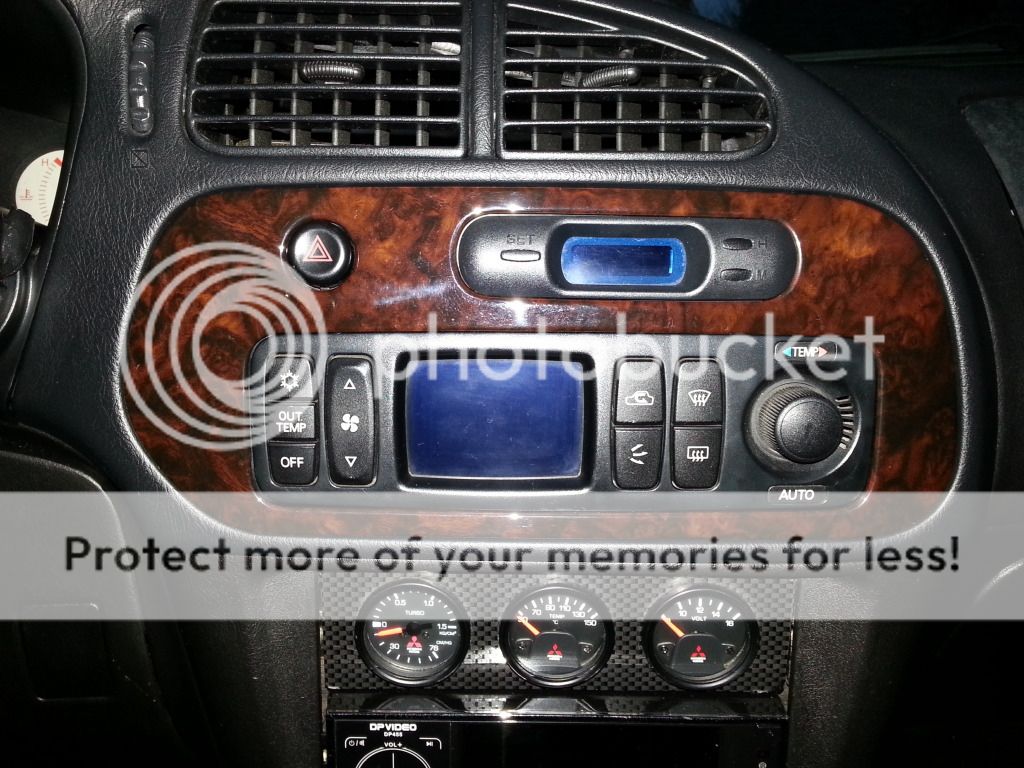
It's pretty out of the way actually. Most everyone who has seen it in person can tell you. It doesn't open high enough to affect your field of vision through the windshield but is high enough you can see the guages. Doesn't protrude awkwardly either. Anyway, whether you like it or not I'm happy with it so that's how it's staying. You must have never driven a Mirage... They are tiny cars. I don't have to even turn my head to see the readouts and they're angled toward me enough that it works out perfectly. You would be correct if the car was as big inside as my WRX, but it's not. It's as small or smaller than an EG civic. Also, being Link gauges they have adjustable alarms on them so if something does happen and I don't see the gauge in time, I will still hear it. Believe me when I say I've done a lot of gauge installs and these are in as good of a spot as any. This build is an Evo 4 conversion more so than a modified Mirage. Sure I could build an Evo 8 but then I'd just have the same thing as every other Evo driver. (No offense Spaz, love your car! thumbsup.gif) You've missed the point of this build. My favorite Evo has always been the IV which we didn't get in the US; but we did get the Mirage which is the same base chassis. (only three major structural differences which I've added to my car already. (well one to go this Winter but still...) Also, I prefer coupes for sports cars and there is no Evo coupe. Why not build one and have something nobody else does? I think total there are three documented complete Evo 4 coupes in the world. All that's saying nothing about my cars stock curb weight of 2,200 lbs. When it's done it should be around 2,500-2,600lbs with around 600whp on tap on 93oct pump gas. Love it or hate it; it's gonna be a rocket!


Anyway, I agree Spaz. I used to be all about more power and better handling, but I think the number one most important aspect of the car now is the surfaces you interface with as the driver. Comfortable seats, good feeling and properly weighted shift knob, good steering wheel position, etc are all important to a proper build! No MOD then? sad.gif That's too bad.

Posted by: Spaz Jul 5 2013, 09:04 PM
You being the second person I know (the first being Mark) who is doing/has done a full swap like this, it makes sense to me. It's about reaching that end goal and all the satisfaction that comes with it. Mark has the entire chassis complete, but yet again has no motor in it after getting the convertible running. It's simply not a project you do for others, it's a build you do solely because you want to, and nothing more.

Sure, an Evo 8 is cheaper, and is ready to go out of the box, but it's not unique or special. And I'm not afraid to admit that.

Posted by: backalleyracer Jul 5 2013, 11:17 PM
this build is good, and keep it up, don't mind baken too much, he thinks being in jdm land makes him special or something.

uniqueness cannot be bought cool.gif

Posted by: Alchem1st Sep 4 2013, 09:05 AM
^Thanks! More parts on the way! Also, I'll be at the Factory Mitsubishi Owners Day in Normal, IL on September 21. If anyone from here is thinking of going hit me up!

Posted by: Spaz Sep 4 2013, 09:08 PM
QUOTE (Alchem1st @ Yesterday, 12:05 PM)
^Thanks! More parts on the way! Also, I'll be at the Factory Mitsubishi Owners Day in Normal, IL on September 21. If anyone from here is thinking of going hit me up!

Bah, wish I could afford it. Gotta save to fix less important stuff on the car to make it easier to sell. I'll make it next year in something much more... Stand-out, if all goes to plan. tongue.gif

Posted by: Ganso Fan Sep 5 2013, 12:11 AM
Haha love the license plate on your WRX! laugh2.gif Good job on the Evolution build. I don't think I've ever seen any successful and clean conversion on the Mirage yet. The car's got potential but unfortunately the few I've seen have all been really ghetto or rice.

Posted by: silverromeo Sep 6 2013, 08:35 AM
Wow an Evo coupe will definitely be a unique build. Will follow on thread.
Just a personal opinion, would be even nicer if it has the evo fender flares or some sort of fender arches.. but of course, only if it's feasible.

Posted by: Alchem1st Sep 18 2013, 07:20 PM
Yeah, I actually won't be going either now Spaz. Mirage is still on stands. Whiteline really failed with the KCA429 kit. :/ Fitment is complete crap. Oh well it'll work with some heavy modification so we're just going with it. Hope you're back in tip top shape soon!


Thanks Ganso Fan! I get a lot of laughs about that plate. happy.gif Yeah, not many people stick them out or do them right. Even I've been considering selling it once it's done so I can buy my dream machine; the 93/94 BNR32 GT-R V-Spec/V-Spec II. Not sure what I'm gonna do yet though and we're still four/five years from getting them here legally so it's staying for the moment.


Haha thanks! I only check in here once in a while though. Following on Evom will keep you up to date a bit better! smile.gif As for the flares; only the 5/6 had them. The IV had minorly flared fenders though and I have a set that will go on eventually; but the front conversion is last on the list after the engine swap. thumbsup.gif Things should start progressing quickly now though! As soon as Dad finishes the repairs on the frame rails we can start tearing down my car to install the fresh floorpan! (See the Evom thread for more details! cool.gif )


Since I'm here; here's a video update that shows recent progress and the last pre swap engine bay "makeover".

http://www.youtube.com/watch?v=TR6eWfPC3HU

Posted by: Alchem1st Feb 7 2014, 08:51 AM
Been a minute since I checked in back here. Saw there's a movie coming out! Can't wait! So anyway, we finished the final repairs are finished on the awd floorpan. All that's left is a final sandblasting, a coat of rust treatment, a coat of weld through primer, and a bit of paint in the middle to seal in while we're welding it in! Hoping to start the conversion early next month! (hoping lol)

http://s379.photobucket.com/user/crlpcguy/media/Floorpan%20progress/20140111_123635_zps48c1757f.jpg.html
Image size reduced, original size: 3264 x 2448. http://i379.photobucket.com/albums/oo236/crlpcguy/Floorpan%20progress/20140111_123635_zps48c1757f.jpg~original to view the image in its original dimension.

http://s379.photobucket.com/user/crlpcguy/media/Floorpan%20progress/20140111_123753_zps7762f13f.jpg.html
Image size reduced, original size: 3264 x 2448. http://i379.photobucket.com/albums/oo236/crlpcguy/Floorpan%20progress/20140111_123753_zps7762f13f.jpg~original to view the image in its original dimension.

http://s379.photobucket.com/user/crlpcguy/media/Floorpan%20progress/20140111_123814_zps4ec529f1.jpg.html
Image size reduced, original size: 3264 x 2448. http://i379.photobucket.com/albums/oo236/crlpcguy/Floorpan%20progress/20140111_123814_zps4ec529f1.jpg~original to view the image in its original dimension.

http://s379.photobucket.com/user/crlpcguy/media/Floorpan%20progress/20140111_123657_zps928c286c.jpg.html
Image size reduced, original size: 2448 x 3264. http://i379.photobucket.com/albums/oo236/crlpcguy/Floorpan%20progress/20140111_123657_zps928c286c.jpg~original to view the image in its original dimension.

http://s379.photobucket.com/user/crlpcguy/media/Floorpan%20progress/20140111_123710_zps80f742f9.jpg.html
Image size reduced, original size: 3264 x 2448. http://i379.photobucket.com/albums/oo236/crlpcguy/Floorpan%20progress/20140111_123710_zps80f742f9.jpg~original to view the image in its original dimension.

http://s379.photobucket.com/user/crlpcguy/media/Floorpan%20progress/20140111_123826_zps85495ee6.jpg.html
Image size reduced, original size: 3264 x 2448. http://i379.photobucket.com/albums/oo236/crlpcguy/Floorpan%20progress/20140111_123826_zps85495ee6.jpg~original to view the image in its original dimension.

http://s379.photobucket.com/user/crlpcguy/media/Floorpan%20progress/20140111_123834_zps7b74af82.jpg.html
Image size reduced, original size: 3264 x 2448. http://i379.photobucket.com/albums/oo236/crlpcguy/Floorpan%20progress/20140111_123834_zps7b74af82.jpg~original to view the image in its original dimension.


Here she is no longer lowered and now sitting on stock Evo 4 suspension until the floor is swapped and my coilovers get here.

http://s379.photobucket.com/user/crlpcguy/media/20131106_223911_zpsca27db92.jpg.html
Image size reduced, original size: 3264 x 2448. http://i379.photobucket.com/albums/oo236/crlpcguy/20131106_223911_zpsca27db92.jpg~original to view the image in its original dimension.

Posted by: Spaz Feb 7 2014, 01:34 PM
Is that out of a CT9A? I know the chassis are fairly similar.

Also, MAPerformance is parting out my old car if you need any OE stuff. Figured I'd mention it if you hadn't seen that!

Posted by: Alchem1st Feb 7 2014, 11:54 PM
Nope, this is true CN9A! It's unique as it's non wide body where all the CP9A/CT9A were wide. Took a while to track down and was a rusted out piece of trash. Thankfully my Dad is a sheetmetal guy or I'd have been out of a lot of cash. Yeah, I saw! I have nearly everything now though haha! Nothing OEM left to buy! It's all aftermarket from here on! laugh2.gif

Posted by: Spaz Feb 8 2014, 07:35 AM
QUOTE (Alchem1st @ 7 hours, 40 minutes ago)
Nope, this is true CN9A! It's unique as it's non wide body where all the CP9A/CT9A were wide. Took a while to track down and was a rusted out piece of trash. Thankfully my Dad is a sheetmetal guy or I'd have been out of a lot of cash. Yeah, I saw! I have nearly everything now though haha! Nothing OEM left to buy! It's all aftermarket from here on! laugh2.gif

Awesome! That's a good place to be for sure. smile.gif

Posted by: Lonely_Driver Feb 8 2014, 08:09 PM
Loving this build, are you the first to do such a thing?

Posted by: Spaz Feb 10 2014, 09:32 AM
QUOTE (Lonely_Driver @ Feb 8 2014, 11:09 PM)
Loving this build, are you the first to do such a thing?

He and I have a mutual friend (local to me) with a home-built Evo 3. There are a few others as well.

Posted by: awddrifter Apr 17 2014, 06:43 AM
I can't wait to see this done. WE NEED UPDATES! rant.gif grin2.gif

Posted by: Alchem1st Apr 18 2014, 08:24 AM
Haha I didn't forget about you guys! I pretty much post updates here, Mirageforums,
and Evolutionm so it's easy to remember. I still don't get notifications from replies to this thread
though for some reason... Anyway, got some work done on the pan! Sandblasted and rust treated!
It has to cure over the weekend and then we can shoot
some primer and a little bit of paint and it'll be ready to swap in!

Sandblasted!
http://s379.photobucket.com/user/crlpcguy/media/20140417_111106_zpsf7739cd8.jpg.html
Image size reduced, original size: unknown. http://i379.photobucket.com/albums/oo236/crlpcguy/20140417_111106_zpsf7739cd8.jpg~original to view the image in its original dimension.

http://s379.photobucket.com/user/crlpcguy/media/20140417_111118_zps458b9f36.jpg.html
Image size reduced, original size: unknown. http://i379.photobucket.com/albums/oo236/crlpcguy/20140417_111118_zps458b9f36.jpg~original to view the image in its original dimension.

http://s379.photobucket.com/user/crlpcguy/media/20140417_111113_zpseb31e140.jpg.html
Image size reduced, original size: unknown. http://i379.photobucket.com/albums/oo236/crlpcguy/20140417_111113_zpseb31e140.jpg~original to view the image in its original dimension.

http://s379.photobucket.com/user/crlpcguy/media/20140417_111125_zpsb809dad3.jpg.html
Image size reduced, original size: unknown. http://i379.photobucket.com/albums/oo236/crlpcguy/20140417_111125_zpsb809dad3.jpg~original to view the image in its original dimension.


Rust treated!
http://s379.photobucket.com/user/crlpcguy/media/20140417_153417_zps1e5844a8.jpg.html
Image size reduced, original size: unknown. http://i379.photobucket.com/albums/oo236/crlpcguy/20140417_153417_zps1e5844a8.jpg~original to view the image in its original dimension.


This stuff is great!
http://s379.photobucket.com/user/crlpcguy/media/20140417_135411_zpseb64936d.jpg.html
Image size reduced, original size: 3264 x 2448. http://i379.photobucket.com/albums/oo236/crlpcguy/20140417_135411_zpseb64936d.jpg~original to view the image in its original dimension.

Posted by: Alchem1st Jun 6 2014, 08:57 AM
Look what came in the mail today!!!! biggrin.gif

http://s379.photobucket.com/user/crlpcguy/media/20140606_124603_zps3a00124c.jpg.html
Image size reduced, original size: 3264 x 2448. http://i379.photobucket.com/albums/oo236/crlpcguy/20140606_124603_zps3a00124c.jpg~original to view the image in its original dimension.

http://s379.photobucket.com/user/crlpcguy/media/20140606_125227_zps4374d9da.jpg.html
Image size reduced, original size: unknown. http://i379.photobucket.com/albums/oo236/crlpcguy/20140606_125227_zps4374d9da.jpg~original to view the image in its original dimension.


Fortune Auto 500 coilovers for an Evo IV with 8Kg Swift springs front and rear and radial bearings preinstalled. Had them valved for street use.

Posted by: sideways Jun 7 2014, 12:05 AM
I must say this is looking to be quite interesting

Posted by: Spaz Jun 7 2014, 10:42 AM
You will LOVE THE SHIT out of an 8k sprung softer-valved coilover, and those Swift springs are awesome.

Posted by: Alchem1st Jun 7 2014, 11:22 AM
Fronts installed! Still on the borrowed rear AGX/H&R set from a fellow Mirager until we can start the floor swap; but it looks pretty slick!

http://s379.photobucket.com/user/crlpcguy/media/20140607_135248_zps9d91ca4f.jpg.html
Image size reduced, original size: unknown. http://i379.photobucket.com/albums/oo236/crlpcguy/20140607_135248_zps9d91ca4f.jpg~original to view the image in its original dimension.

http://s379.photobucket.com/user/crlpcguy/media/20140607_135308_zps7a2ae9ea.jpg.html
Image size reduced, original size: unknown. http://i379.photobucket.com/albums/oo236/crlpcguy/20140607_135308_zps7a2ae9ea.jpg~original to view the image in its original dimension.

http://s379.photobucket.com/user/crlpcguy/media/20140607_150757_zpsf66b073c.jpg.html
Image size reduced, original size: unknown. http://i379.photobucket.com/albums/oo236/crlpcguy/20140607_150757_zpsf66b073c.jpg~original to view the image in its original dimension.


A spider and a fly were having a standoff on my rear bumper lol.

http://s379.photobucket.com/user/crlpcguy/media/20140607_151041_zps8d52fec7.jpg.html
Image size reduced, original size: 3264 x 2448. http://i379.photobucket.com/albums/oo236/crlpcguy/20140607_151041_zps8d52fec7.jpg~original to view the image in its original dimension.


Car needs an alignment bad. The steering wheel is straight in the picture lol. I bet it'll be super sketchy to drive as is. Might see about getting a lifetime alignment at a local place so it's not just
wasting money doing now only a few weeks before the awd swap starts. Free alignments forever would be awesome too. Charging up the battery now so I'll take it around the block here in a bit!

Posted by: Spaz Jun 7 2014, 12:48 PM
Lifetime alignments are where it's at, I've used mine 3 times so far on the IX, soon to be 4.

Posted by: Alchem1st Jul 5 2014, 07:21 PM
It's time. Progress will be VERY slow as I still don't have a garage to work in; but starting the floor conversion as of today.

http://s379.photobucket.com/user/crlpcguy/media/20140705_162911_zps88d14d76.jpg.html
Image size reduced, original size: unknown. http://i379.photobucket.com/albums/oo236/crlpcguy/20140705_162911_zps88d14d76.jpg~original to view the image in its original dimension.

http://s379.photobucket.com/user/crlpcguy/media/20140705_162848_zpsfe08cb3f.jpg.html
Image size reduced, original size: unknown. http://i379.photobucket.com/albums/oo236/crlpcguy/20140705_162848_zpsfe08cb3f.jpg~original to view the image in its original dimension.

http://s379.photobucket.com/user/crlpcguy/media/20140705_145958_zps843611cc.jpg.html
Image size reduced, original size: unknown. http://i379.photobucket.com/albums/oo236/crlpcguy/20140705_145958_zps843611cc.jpg~original to view the image in its original dimension.

http://s379.photobucket.com/user/crlpcguy/media/20140705_162748_zps0b3eb48b.jpg.html
Image size reduced, original size: unknown. http://i379.photobucket.com/albums/oo236/crlpcguy/20140705_162748_zps0b3eb48b.jpg~original to view the image in its original dimension.

Posted by: Alchem1st Jul 14 2014, 06:28 PM
Doing work!

https://www.youtube.com/watch?v=yERBlYeYBjg

Posted by: sideways Jul 15 2014, 10:59 AM
Looks like its all about to get real. Ill be keeping an eye on this

Posted by: Wufei Jul 16 2014, 09:20 AM
As a fellow Evo & DSM owner, love this! Definitely keep up the great work.

Posted by: Alchem1st Jul 31 2014, 09:46 PM
Thanks guys! I'm making a bit of progress with my 30min to an hour a day of working on it. Hopefully I'll be able to get several hours work in Saturday. Vid:

https://www.youtube.com/watch?v=QrM3_znzDQA


Posted by: Spaz Aug 1 2014, 08:47 AM
I expect a video of you flinstoning it around the garage on dolleys. awesome.gif

Posted by: Alchem1st Aug 1 2014, 09:35 AM
QUOTE (Spaz @ 48 minutes, 17 seconds ago)
I expect a video of you flinstoning it around the garage on dolleys. awesome.gif

LOL that would be awesome! Garage is a bit too small for that though! laugh2.gif Some pics of the current progress. I think tomorrow I'll be able to get a few hours in on it instead of 30min to an hour a day
like I have been through the week. It'd be incredible if I could get it completely removed tomorrow; but that's pushing it lol.

http://s379.photobucket.com/user/crlpcguy/media/20140801_131930_zpsd508c66b.jpg.html
Image size reduced, original size: unknown. http://i379.photobucket.com/albums/oo236/crlpcguy/20140801_131930_zpsd508c66b.jpg~original to view the image in its original dimension.

http://s379.photobucket.com/user/crlpcguy/media/20140801_131353_zpsac353e91.jpg.html
Image size reduced, original size: unknown. http://i379.photobucket.com/albums/oo236/crlpcguy/20140801_131353_zpsac353e91.jpg~original to view the image in its original dimension.

Posted by: Spaz Aug 2 2014, 10:40 AM
Nice progress, keep it up, even if it is little-by-little. You'll get there. smile.gif

Posted by: Alchem1st Aug 2 2014, 03:10 PM
Welp, managed to get one side pretty much done today and got started on the other side. You can see there is some rust repair required; but it's pretty minor really. Just a single layer of sheetmetal near the edge
where the welds will be; so it'll be easy to fix. It's becoming more and more clear why I had water in the passenger side footwell LOL. There's a rust hole all the way through the body in the passenger side wheel well!
(You can see it in the last pic) I'll do some more work on the drivers side tomorrow afternoon probably.

http://s379.photobucket.com/user/crlpcguy/media/Mobile%20Uploads/20140802_154602_zpsw4xgrsmb.jpg.html
Image size reduced, original size: unknown. http://i379.photobucket.com/albums/oo236/crlpcguy/Mobile%20Uploads/20140802_154602_zpsw4xgrsmb.jpg~original to view the image in its original dimension.

http://s379.photobucket.com/user/crlpcguy/media/Mobile%20Uploads/20140802_154608_zpsdtsjy2sr.jpg.html
Image size reduced, original size: unknown. http://i379.photobucket.com/albums/oo236/crlpcguy/Mobile%20Uploads/20140802_154608_zpsdtsjy2sr.jpg~original to view the image in its original dimension.

http://s379.photobucket.com/user/crlpcguy/media/Mobile%20Uploads/20140802_154623_zpso16xbee2.jpg.html
Image size reduced, original size: unknown. http://i379.photobucket.com/albums/oo236/crlpcguy/Mobile%20Uploads/20140802_154623_zpso16xbee2.jpg~original to view the image in its original dimension.

Posted by: Alchem1st Aug 3 2014, 08:43 PM
Whaaaaaaaaaaaaaaaaaat?
http://s379.photobucket.com/user/crlpcguy/media/Floorpan%20progress/10582937_10204342832074451_7352185781535988912_o_zps7f1bbb51.jpg.html
Image size reduced, original size: 2048 x 1152. http://i379.photobucket.com/albums/oo236/crlpcguy/Floorpan%20progress/10582937_10204342832074451_7352185781535988912_o_zps7f1bbb51.jpg~original to view the image in its original dimension.


https://www.youtube.com/watch?v=p0UhYkNlnGQ

Posted by: Wufei Aug 7 2014, 11:47 AM
Awesome work! Just noticed you're in Indy. My folks are in Carmel lol.

Posted by: Alchem1st Aug 7 2014, 07:50 PM
QUOTE (Wufei @ 8 hours, 3 minutes ago)
Awesome work! Just noticed you're in Indy. My folks are in Carmel lol.

Hey, nice! Hit me up if you come into town!

Posted by: Alchem1st Aug 13 2014, 09:05 AM
Floorpan is officially home!

http://s379.photobucket.com/user/crlpcguy/media/Floorpan%20progress/20140813_122428_zpso0d7fmsq.jpg.html
Image size reduced, original size: unknown. http://i379.photobucket.com/albums/oo236/crlpcguy/Floorpan%20progress/20140813_122428_zpso0d7fmsq.jpg~original to view the image in its original dimension.

Posted by: 207 Aug 13 2014, 06:36 PM
very cool build Alchem1st, an EVO is also a car id love to have myself. you're lucky to have the chance to have one.

one a similar note, is a Mirage based evo build possible on later generations ie 2000 + or the respective starter car?

Posted by: Alchem1st Aug 13 2014, 06:53 PM
Thanks! The 5G Mirage platform is the same base as the Evo 4-6.5 TME; so any of those are possible to build with this platform! I highly suggest buying one though as it will be a lot cheaper in the long run.

[ Post made via Mobile Device ]

Posted by: 207 Aug 14 2014, 03:18 PM
ty Alchem1st, the 6.5 TME is a nice car but my interest in evolutions is marginally more in the evo7. there's something in its bodystyle that get my attention a bit more than previous generations. its the front face/bumper and hood that catches my attention the most. though seeing that the Mirage stops somewhere after 2000, regular Lancers are the likely base cars to start with 7+gen EVOs. I like all evos up to the 9th generation. im not much for the large mouth on evo10, but its still nice regardless.

id love to get a 2nd gen RX-7, Sileighty or EVO7 not in the exact order of preference. like most people, I just don't have the time or money for such a project so it remains a pipe dream. imo you're very lucky to even have a JDM or built JDM based car. I can squarely blame Initial D for my interest in drifting RWD cars.

an SVX is also a nice car but its mechanical issues rules out even considering one for me. I've long since settled for a regular 2011 Ford Fiesta hatch.

if im correct evo1-9 are not allowed in Canada due to damage that can be incurred in low speed accidents.

Posted by: Alchem1st Aug 22 2014, 09:18 AM
QUOTE (207 @ Aug 14 2014, 03:18 PM)
ty Alchem1st, the 6.5 TME is a nice car but my interest in evolutions is marginally more in the evo7. there's something in its bodystyle that get my attention a bit more than previous generations. its the front face/bumper and hood that catches my attention the most. though seeing that the Mirage stops somewhere after 2000, regular Lancers are the likely base cars to start with 7+gen EVOs. I like all evos up to the 9th generation. im not much for the large mouth on evo10, but its still nice regardless.

id love to get a 2nd gen RX-7, Sileighty or EVO7 not in the exact order of preference. like most people, I just don't have the time or money for such a project so it remains a pipe dream. imo you're very lucky to even have a JDM or built JDM based car. I can squarely blame Initial D for my interest in drifting RWD cars.

an SVX is also a nice car but its mechanical issues rules out even considering one for me. I've long since settled for a regular 2011 Ford Fiesta hatch.

if im correct evo1-9 are not allowed in Canada due to damage that can be incurred in low speed accidents.

Yeah, Evo 7-9 are based on the Cedia platform. I'm pretty sure you guys can get early Evo's there already. If I'm not mistaken you can import any car that's older than 15 years.

Posted by: Alchem1st Sep 27 2014, 06:29 PM
Small update!

https://www.youtube.com/watch?v=oP_GKOKPqzw

Posted by: Gunma's 34 Oct 1 2014, 09:35 PM
looking good as always with the updates @Alchem1st. Can't wait to see the underbody / wheel splash shields / wheel well completed.

Posted by: Alchem1st Oct 1 2014, 09:58 PM
Thanks! Same here lol. Should be able to do a test fit of the floor Saturday I think. Not sure when we'll be able to start the welding though. Hopefully somewhat soon.

Posted by: APX Oct 1 2014, 10:34 PM
I post on this section very rarely, but... I actually want to see the finished product. Parent had a red mirage, 99 or so, and I always thought of it as a evo. (Yeah, funny!) So I can't wait, keep it up. smile.gif

Posted by: Rudy Nov 13 2014, 09:36 AM
Wow, how did I miss this thread? The IV build is downright awesome. I'd love to see that car in person but it's so damn far away. I'm a puss who knows jack about mechanics, so my game plan is simply to save money and wait - and when the I/II/III, WRX STi or ER33 are available to import, just go with one of those. But all this Mitsu love is pushing my bias toward the Evo camp. Can't forget the FTO either. Such awesome cars!

[ Post made via Mobile Device ]

Posted by: Alchem1st Nov 28 2014, 06:42 PM
QUOTE (APX @ Oct 1 2014, 10:34 PM)
I post on this section very rarely, but... I actually want to see the finished product. Parent had a red mirage, 99 or so, and I always thought of it as a evo. (Yeah, funny!) So I can't wait, keep it up. smile.gif


Thanks man! Still working on it! I can't wait to see it finished either! happy.gif


QUOTE (Rudy @ Nov 13 2014, 09:36 AM)
Wow, how did I miss this thread? The IV build is downright awesome. I'd love to see that car in person but it's so damn far away. I'm a puss who knows jack about mechanics, so my game plan is simply to save money and wait - and when the I/II/III, WRX STi or ER33 are available to import, just go with one of those. But all this Mitsu love is pushing my bias toward the Evo camp. Can't forget the FTO either. Such awesome cars!


Thanks! If you're ever in town let me know! I live somewhat close to the Indianapolis airport haha. Can't go wrong with any of those cars!


Quick video update for you guys!

https://www.youtube.com/watch?v=oP_GKOKPqzw

Posted by: Rudy Nov 29 2014, 08:17 AM
The Brickyard 400 is on my bucket list, so I'll bump into you sooner or later. cool.gif

Posted by: Alchem1st Nov 29 2014, 09:57 AM
QUOTE (Rudy @ 1 hour, 39 minutes ago)
The Brickyard 400 is on my bucket list, so I'll bump into you sooner or later. cool.gif

Yeah, the Speedway is a pretty amazing place for sure. It's amazing that we have so many good racetracks so close! Indiana is the best state to live in if you're a gearhead imo. Only downside is that we're in the rust belt... (obvious from my build LOL) and that we have like six months of Winter LOL.

Posted by: Spaz Nov 29 2014, 06:06 PM
QUOTE (Alchem1st @ 8 hours, 9 minutes ago)
Yeah, the Speedway is a pretty amazing place for sure. It's amazing that we have so many good racetracks so close! Indiana is the best state to live in if you're a gearhead imo. Only downside is that we're in the rust belt... (obvious from my build LOL) and that we have like six months of Winter LOL.

I wish we had an abundance of road courses. sad.gif

And rust sucks, that's why I picked up a southern car with little winter driving on it. Hoping to keep it that way.

Posted by: Alchem1st Nov 29 2014, 06:31 PM
We have two local road courses here. Putnam Park Raceway and the road course at ORP. (or IRP or whatever they call it now lol) We also have the drag strip at ORP and the Speedway. Pretty great state! I don't think the Mirage will see another Winter now. Pretty much a garage queen haha!


Boom! (Don't miss the video at the bottom either!)
http://s379.photobucket.com/user/crlpcguy/media/Floorpan%20progress/20141129_195826_zpsskilagnw.jpg.html
Image size reduced, original size: unknown. http://i379.photobucket.com/albums/oo236/crlpcguy/Floorpan%20progress/20141129_195826_zpsskilagnw.jpg~original to view the image in its original dimension.

http://s379.photobucket.com/user/crlpcguy/media/Floorpan%20progress/20141129_195845_zpsqwb11yzd.jpg.html
Image size reduced, original size: unknown. http://i379.photobucket.com/albums/oo236/crlpcguy/Floorpan%20progress/20141129_195845_zpsqwb11yzd.jpg~original to view the image in its original dimension.


https://www.youtube.com/watch?v=3U7JoKCVlZk

Posted by: Spaz Nov 29 2014, 10:29 PM
The progress is real.

Good shit, dude!

Posted by: Alchem1st Nov 30 2014, 02:42 PM
Yeah, finally getting somewhere haha!

Posted by: Alchem1st Dec 9 2014, 08:50 AM
Welds in the front pockets where the frame meets are done! Look pretty good too!

http://s379.photobucket.com/user/crlpcguy/media/Floorpan%20progress/20141209_112354_zpsn3cj8reu.jpg.html
Image size reduced, original size: unknown. http://i379.photobucket.com/albums/oo236/crlpcguy/Floorpan%20progress/20141209_112354_zpsn3cj8reu.jpg~original to view the image in its original dimension.

http://s379.photobucket.com/user/crlpcguy/media/Floorpan%20progress/20141209_113327_zpsmi4bj7kj.jpg.html
Image size reduced, original size: unknown. http://i379.photobucket.com/albums/oo236/crlpcguy/Floorpan%20progress/20141209_113327_zpsmi4bj7kj.jpg~original to view the image in its original dimension.

http://s379.photobucket.com/user/crlpcguy/media/Floorpan%20progress/20141209_112450_zpszp7l8ylo.jpg.html
Image size reduced, original size: unknown. http://i379.photobucket.com/albums/oo236/crlpcguy/Floorpan%20progress/20141209_112450_zpszp7l8ylo.jpg~original to view the image in its original dimension.

http://s379.photobucket.com/user/crlpcguy/media/Floorpan%20progress/20141209_113338_zpslgf13k8m.jpg.html
Image size reduced, original size: unknown. http://i379.photobucket.com/albums/oo236/crlpcguy/Floorpan%20progress/20141209_113338_zpslgf13k8m.jpg~original to view the image in its original dimension.


Hoping to finish welding on the lower brackets and get the vertical welds done on the crossmember tonight. Then we'll be able to weld across the front of the floor and that whole section will be buttoned up and done!

Posted by: Rudy Dec 9 2014, 10:43 AM
Look in' good! Keep up the great work smile.gif

Posted by: Alchem1st Dec 12 2014, 10:20 AM
Another small progress update!

https://www.youtube.com/watch?v=tu7D9-1weMY

Posted by: Alchem1st Dec 14 2014, 01:26 PM
This weekends progress:

Painted the inside of the frame rails and the crossmember to seal it from rusting again. (They didn't do this at the factory)
http://s379.photobucket.com/user/crlpcguy/media/Floorpan%20progress/20141214_160504_zps41kw5geu.jpg.html
Image size reduced, original size: unknown. http://i379.photobucket.com/albums/oo236/crlpcguy/Floorpan%20progress/20141214_160504_zps41kw5geu.jpg~original to view the image in its original dimension.

http://s379.photobucket.com/user/crlpcguy/media/Floorpan%20progress/20141214_160607_zpsagdgvt7z.jpg.html
Image size reduced, original size: unknown. http://i379.photobucket.com/albums/oo236/crlpcguy/Floorpan%20progress/20141214_160607_zpsagdgvt7z.jpg~original to view the image in its original dimension.


Dad started welding on the drivers side wheel well. This is after I ground the welds flat, but it's still in it's early stage of work.
(the black spots are just shiny metal reflecting the floor)
http://s379.photobucket.com/user/crlpcguy/media/Floorpan%20progress/20141214_160646_zpsuknbqs9u.jpg.html
Image size reduced, original size: unknown. http://i379.photobucket.com/albums/oo236/crlpcguy/Floorpan%20progress/20141214_160646_zpsuknbqs9u.jpg~original to view the image in its original dimension.


Some placed need touched up where there are pinholes through the metal still and we haven't made the patch for the rusted out spot yet
(though we did make the template today) or welded the panels on the inside of the car; but it's a start! With me grinding the welds down flat
and Dad rewelding the pinholes shut this floor install will really look factory to the untrained eye. No weld boogers to be seen! (Unless you look
REALLY hard lol) Based on our progress so far I think we will have the floor install 100% complete with the rear end mounted and the car back on
the ground by the end of January! Then the front of the car goes in the air and the engine comes out! (After we run new brake lines and fuel lines)

Posted by: Rudy Dec 14 2014, 02:52 PM
Man, that's awersome. You're sparing no effort or expense. I think when it's done it'll be the best 2 door LanEvo out there. biggrin.gif

Posted by: Spaz Dec 15 2014, 11:58 AM
Awesome time frame, sounds like this may be an actual Evo come the start of this season!

Posted by: Alchem1st Dec 16 2014, 09:35 PM
QUOTE (Rudy @ Dec 14 2014, 02:52 PM)
Man, that's awersome. You're sparing no effort or expense. I think when it's done it'll be the best 2 door LanEvo out there. biggrin.gif


Thanks! I don't know if it'll be the best overall; but it'll be in the top 5 for sure. To me it'll be the best though since we're building it exactly the way I've seen it in my head these last 6 years since I bought the car!


QUOTE (Spaz @ Dec 16 2014, 11:58 AM)
Awesome time frame, sounds like this may be an actual Evo come the start of this season!


That's what I'm hoping for! I'm gonna hold off on building the 4G63 for now though I think. Scouring Craigslist everyday for a cheap stock 4G64 to drop for the time being. It'll bolt up and run with the Evo ECU (with some tuning) and wiring and can be used with the Evo trans and stock Evo clutch I have laying here. I can run it in NA for now to get the car on the road (hoping to drive it to the DSM Shootout that way) and take my time building the 4G63. Also, I can toss my 6262 kit on the 4G64 and use it to mock up my exhaust and get that done. (Can't run it that turbo though lol) Pretty much will use that engine to get the car prepped and ready for when the 4G63 is done. I think the 4G63 build will have to wait until next Winter as I don't have the kind of cash needed for it right now and I'm not willing to cut corners on parts selection. May turbo the 4G64 with stock Evo stuff though and may even toss a junkyard Kia DOHC head on it with my stock Evo head internals since all of it is minor bolt on stuff and all that's required is some tune alterations with the Evo 5 ECU. We'll see. laugh2.gif

Posted by: Alchem1st Dec 20 2014, 06:38 PM
Lots of progress today! Got the drivers side wheel well almost done and got a good start on the passengers side!

Here's a pic of the spot that was rusted off:
http://s379.photobucket.com/user/crlpcguy/media/Floorpan%20progress/20141220_113607_zpswkzy2mfr.jpg.html
Image size reduced, original size: unknown. http://i379.photobucket.com/albums/oo236/crlpcguy/Floorpan%20progress/20141220_113607_zpswkzy2mfr.jpg~original to view the image in its original dimension.


And here's the patch Dad made:
http://s379.photobucket.com/user/crlpcguy/media/Floorpan%20progress/20141220_113628_zpsbcnciqd1.jpg.html
Image size reduced, original size: unknown. http://i379.photobucket.com/albums/oo236/crlpcguy/Floorpan%20progress/20141220_113628_zpsbcnciqd1.jpg~original to view the image in its original dimension.


Here's how I finished the day: (just now lol)
http://s379.photobucket.com/user/crlpcguy/media/Floorpan%20progress/20141220_211735_zpsxcu1fm2r.jpg.html
Image size reduced, original size: unknown. http://i379.photobucket.com/albums/oo236/crlpcguy/Floorpan%20progress/20141220_211735_zpsxcu1fm2r.jpg~original to view the image in its original dimension.


The Evo 4 RS floor brace is on and done! All that's left is to weld the patch in place, weld the brake line bracket on, and touch up
a few spots and the drivers side is finished! Both sides will be done Christmas weekend and hopefully the front and back will be welded
up as well. I think it'll be back on the ground by the end of January or the beginning of February! I think I'm going to paint the underside
and then coat it with epoxy based truck bed liner instead of undercoat. Should last longer and give better protection; but it'll be a bit
noisier. (It's already gonna be noisier so as Ken Block would say, #aintcare laugh.gif)

Posted by: Alchem1st Dec 27 2014, 03:55 PM
Another quick video update on the welding for ya'll!

https://www.youtube.com/watch?v=Dfut-bj_KLs

Posted by: Rudy Dec 27 2014, 08:05 PM
Man that's one involved project. Props to you, man!

Posted by: Alchem1st Jan 10 2015, 08:26 PM
More progress!

Dad doing some welding:
http://s379.photobucket.com/user/crlpcguy/media/Floorpan%20progress/20150101_155619_zpsoyio90na.jpg.html
Image size reduced, original size: unknown. http://i379.photobucket.com/albums/oo236/crlpcguy/Floorpan%20progress/20150101_155619_zpsoyio90na.jpg~original to view the image in its original dimension.


Minimal panel gaps compared to stock! (Looked like crap from the factory. Also, ignore the bent floor on the left in the pic as it's been beaten back into shape and welded up now smile.gif )
http://s379.photobucket.com/user/crlpcguy/media/Floorpan%20progress/20150101_162256_zpsalqc3pap.jpg.html
Image size reduced, original size: unknown. http://i379.photobucket.com/albums/oo236/crlpcguy/Floorpan%20progress/20150101_162256_zpsalqc3pap.jpg~original to view the image in its original dimension.


More welding action and preparing to clamp the v-brace into position with a ratchet strap! laugh.gif
http://s379.photobucket.com/user/crlpcguy/media/Floorpan%20progress/20150101_181934_zpsukymu0wi.jpg.html
Image size reduced, original size: unknown. http://i379.photobucket.com/albums/oo236/crlpcguy/Floorpan%20progress/20150101_181934_zpsukymu0wi.jpg~original to view the image in its original dimension.

http://s379.photobucket.com/user/crlpcguy/media/Floorpan%20progress/20150101_181920_zpsb1lkz7iv.jpg.html
Image size reduced, original size: unknown. http://i379.photobucket.com/albums/oo236/crlpcguy/Floorpan%20progress/20150101_181920_zpsb1lkz7iv.jpg~original to view the image in its original dimension.


Bolted in and ready to start welding!
http://s379.photobucket.com/user/crlpcguy/media/Floorpan%20progress/20150101_192830_zps59zajvt2.jpg.html
Image size reduced, original size: unknown. http://i379.photobucket.com/albums/oo236/crlpcguy/Floorpan%20progress/20150101_192830_zps59zajvt2.jpg~original to view the image in its original dimension.


Almost there... (welds look huge because of burnt paint around them, but where the welds are was ground off first and the welds had excellent penetration and ground perfectly flat with no pinholes in them 8))
http://s379.photobucket.com/user/crlpcguy/media/Floorpan%20progress/20150103_105100_zps3suy6a4y.jpg.html
Image size reduced, original size: unknown. http://i379.photobucket.com/albums/oo236/crlpcguy/Floorpan%20progress/20150103_105100_zps3suy6a4y.jpg~original to view the image in its original dimension.


Done!
http://s379.photobucket.com/user/crlpcguy/media/Floorpan%20progress/20150110_173919_zpsumoaxhwr.jpg.html
Image size reduced, original size: unknown. http://i379.photobucket.com/albums/oo236/crlpcguy/Floorpan%20progress/20150110_173919_zpsumoaxhwr.jpg~original to view the image in its original dimension.

http://s379.photobucket.com/user/crlpcguy/media/Floorpan%20progress/20150107_230828_zpsiab7iiz2.jpg.html
Image size reduced, original size: unknown. http://i379.photobucket.com/albums/oo236/crlpcguy/Floorpan%20progress/20150107_230828_zpsiab7iiz2.jpg~original to view the image in its original dimension.

http://s379.photobucket.com/user/crlpcguy/media/Floorpan%20progress/20150107_230840_zpsj1vjx9in.jpg.html
Image size reduced, original size: unknown. http://i379.photobucket.com/albums/oo236/crlpcguy/Floorpan%20progress/20150107_230840_zpsj1vjx9in.jpg~original to view the image in its original dimension.


Plan to do a little seam sealing tomorrow afternoon around the interior and paint the interior side throughout the week. All the welding is complete except for touching up the rear where I haven't ground yet.
(ran out of sanding belts, but will have more on Monday laugh.gif) Next Saturday will mark the welding/grinding complete Lord willing and All the pre-seamsealer priming as well. I'll try to get all the seam sealing
done next Sunday afternoon and do the painting throughout next week. If everything goes as planned I'll be able to start reinstalling some of the interior next weekend and the rear end and the rest of the interior
the weekend after! Progress will start happening FAST after the seam sealing and painting is done! Then I'll start focusing on the engine side of the build. awesome.gif

Posted by: Banken Jan 10 2015, 11:43 PM
By the time you're done the EVO is going to be import-legal.

Posted by: Alchem1st Jan 11 2015, 06:18 AM
QUOTE (Banken @ 6 hours, 34 minutes ago)
By the time you're done the EVO is going to be import-legal.

Nah, we still have 6 years before the Evo 4 can be brought in legally. I'll have had this car finished and probably gotten my own house and another project car in the stable by then. Even still, a coupe is something that Mitsubishi didn't build, so it'll still be very unique here.

Posted by: Alchem1st Jan 18 2015, 01:02 PM
Welding and grinding are officially done!!! Just finished spraying the first coat of primer as well. Turned out great!

http://s379.photobucket.com/user/crlpcguy/media/Floorpan%20progress/20150118_144845_zpskvoemelb.jpg.html
Image size reduced, original size: unknown. http://i379.photobucket.com/albums/oo236/crlpcguy/Floorpan%20progress/20150118_144845_zpskvoemelb.jpg~original to view the image in its original dimension.

http://s379.photobucket.com/user/crlpcguy/media/Floorpan%20progress/20150118_151111_zps8mlrphgp.jpg.html
Image size reduced, original size: unknown. http://i379.photobucket.com/albums/oo236/crlpcguy/Floorpan%20progress/20150118_151111_zps8mlrphgp.jpg~original to view the image in its original dimension.

http://s379.photobucket.com/user/crlpcguy/media/Floorpan%20progress/20150118_151133_zpsgxhl73fn.jpg.html
Image size reduced, original size: unknown. http://i379.photobucket.com/albums/oo236/crlpcguy/Floorpan%20progress/20150118_151133_zpsgxhl73fn.jpg~original to view the image in its original dimension.


Here's the panel that needed replaced. We ended up just modifying the Evo one to work and closed off the unneeded AYC wiring pass through holes.
http://s379.photobucket.com/user/crlpcguy/media/Floorpan%20progress/20150118_151140_zpsiu5orlkn.jpg.html
Image size reduced, original size: unknown. http://i379.photobucket.com/albums/oo236/crlpcguy/Floorpan%20progress/20150118_151140_zpsiu5orlkn.jpg~original to view the image in its original dimension.


All that's left is to get everything seam sealed, shoot another coat of primer on top of that, and then shoot paint. Then it's pretty much ready for reassembly!
Would be nice if I was able to get all that stuff done through the week; but we're still working noon to 10pm every day so it doesn't leave much time. If I do
manage to get it done, the interior will all go in next weekend and I'll start installing some of the rear end!

Posted by: Alchem1st Jan 24 2015, 09:46 PM
Be forewarned, you are about to see some no holds barred sexyness pictures. I got a lot done today lol.

Spatter paint like old school muscle cars used to get from the factory!
http://s379.photobucket.com/user/crlpcguy/media/Floorpan%20progress/20150122_112119_zps3et25gkr.jpg.html
Image size reduced, original size: unknown. http://i379.photobucket.com/albums/oo236/crlpcguy/Floorpan%20progress/20150122_112119_zps3et25gkr.jpg~original to view the image in its original dimension.

http://s379.photobucket.com/user/crlpcguy/media/Floorpan%20progress/20150124_171503_zpshvdv6huh.jpg.html
Image size reduced, original size: unknown. http://i379.photobucket.com/albums/oo236/crlpcguy/Floorpan%20progress/20150124_171503_zpshvdv6huh.jpg~original to view the image in its original dimension.

http://s379.photobucket.com/user/crlpcguy/media/Floorpan%20progress/20150124_171550_zpsogbuxgii.jpg.html
Image size reduced, original size: unknown. http://i379.photobucket.com/albums/oo236/crlpcguy/Floorpan%20progress/20150124_171550_zpsogbuxgii.jpg~original to view the image in its original dimension.

http://s379.photobucket.com/user/crlpcguy/media/Floorpan%20progress/20150125_000536_zpsometsh9m.jpg.html
Image size reduced, original size: unknown. http://i379.photobucket.com/albums/oo236/crlpcguy/Floorpan%20progress/20150125_000536_zpsometsh9m.jpg~original to view the image in its original dimension.


awesome.gif awesome.gif awesome.gif

Posted by: Rudy Jan 24 2015, 11:26 PM
That post needs to be spoilered with an NSFW warning.

Posted by: Spaz Jan 27 2015, 09:37 AM
ALL OF THE YES.

It's amazing how little has changed on these cars over the years, even between chassis. If not for the exhaust hanger being on the driver's side, if you showed me those photos, I'd tell you with zero doubt in my mind that that's the underside of a CT9A.

Posted by: Alchem1st Jan 27 2015, 04:30 PM
Yep, they are so close it's crazy! Actually though, I've upgraded my car with a handful of CT9A parts that are just straight swap out bits. It's got CT9A aluminum lower control arms with new spherical bushings and of course I ditched the AYC rear diff in favor of a USDM Evo 8 rear diff/mustache bar/hanger bar. It is amazing that everything is essentially unchanged though. I even used Energy Suspensions Master Bushing Kit for the Evo 8 haha. The only notable difference is the subframe and frame rail cups where the upper control arms bolt in are around an inch or two narrower.

[ Post made via Mobile Device ]

Posted by: Alchem1st Jan 30 2015, 10:31 PM
Race car parts! biggrin.gif

http://s379.photobucket.com/user/crlpcguy/media/Mirage%20build%20process%20pictures/20150127_221458_zpsfsdgyarm.jpg.html
Image size reduced, original size: unknown. http://i379.photobucket.com/albums/oo236/crlpcguy/Mirage%20build%20process%20pictures/20150127_221458_zpsfsdgyarm.jpg~original to view the image in its original dimension.


HEL steel braided brake lines for pedal feel; and Girodisc Titanium brake shims to prevent heat transfer into the steel pistons of the Evo 8 Brembo's.


Ebrake officially done! Required a little bit of modification to get good fitment; but it's done now. The ends
of the ebrake cables were a bit too big to fit in the cable pass-through on the Evo knuckle. A little work with
my mini belt sander and it fits perfect! The Evo lines had an oring to keep water out which I couldn't adapt;
so I coated the ends with blue rtv to create a seal. The pressure of the ebrake cable holds them in place.

No fit.
http://s379.photobucket.com/user/crlpcguy/media/Floorpan%20progress/20150130_225013_zpsywbtyqmu.jpg.html
Image size reduced, original size: unknown. http://i379.photobucket.com/albums/oo236/crlpcguy/Floorpan%20progress/20150130_225013_zpsywbtyqmu.jpg~original to view the image in its original dimension.


Fit!
http://s379.photobucket.com/user/crlpcguy/media/Floorpan%20progress/20150130_224524_zpssuyp5euu.jpg.html
Image size reduced, original size: unknown. http://i379.photobucket.com/albums/oo236/crlpcguy/Floorpan%20progress/20150130_224524_zpssuyp5euu.jpg~original to view the image in its original dimension.


All that's left is to fill the diff with oil, run new brake lines for the rear, and finish a few little things on the interior which I'm hoping to
have finished this weekend. Then I can focus on the next part of the build! (the fuel system)

http://s379.photobucket.com/user/crlpcguy/media/Floorpan%20progress/20150130_124522_zpsvsgcq9re.jpg.html
Image size reduced, original size: unknown. http://i379.photobucket.com/albums/oo236/crlpcguy/Floorpan%20progress/20150130_124522_zpsvsgcq9re.jpg~original to view the image in its original dimension.

Posted by: Alchem1st Feb 1 2015, 02:49 PM
Video progress update! Sorry it cuts off at the end. My SD card was full lol.

https://www.youtube.com/watch?v=W2mM5VII1E0

Posted by: Lonely_Driver Feb 1 2015, 02:57 PM
The fabrication and attention to detail is too much

I love it.

Posted by: Alchem1st Feb 22 2015, 10:54 PM
http://s379.photobucket.com/user/crlpcguy/media/Mirage%20build%20process%20pictures/20150221_150855_zpsigddd5qu.jpg.html
Image size reduced, original size: unknown. http://i379.photobucket.com/albums/oo236/crlpcguy/Mirage%20build%20process%20pictures/20150221_150855_zpsigddd5qu.jpg~original to view the image in its original dimension.


That is all. awesome.gif

Posted by: Alchem1st Mar 1 2015, 10:45 PM
Test fit the transmission and tcase in the modified K-frame today to check clearance. Looks like it'll need to be clearanced just a
bit and then Dad can seam weld it shut and we can hit it with some black paint and install it! Made some more progress on the
wiring today as well. Coming along slowly but surely.

http://s379.photobucket.com/user/crlpcguy/media/Mirage%20build%20process%20pictures/20150301_180707_zps2z45uhaf.jpg.html
Image size reduced, original size: unknown. http://i379.photobucket.com/albums/oo236/crlpcguy/Mirage%20build%20process%20pictures/20150301_180707_zps2z45uhaf.jpg~original to view the image in its original dimension.

http://s379.photobucket.com/user/crlpcguy/media/Mirage%20build%20process%20pictures/20150301_180719_zpsslqutvwe.jpg.html
Image size reduced, original size: unknown. http://i379.photobucket.com/albums/oo236/crlpcguy/Mirage%20build%20process%20pictures/20150301_180719_zpsslqutvwe.jpg~original to view the image in its original dimension.

Posted by: Alchem1st Mar 16 2015, 08:35 AM
Decided instead of extending all of the harness like I had originally planned that I'd just cut an extra hole in the firewall and mount the ECU
in the center of the car under the shifter cables like most of the other guys did. It just makes more sense to do it that way I think. I'd have
liked to extend the harness, but it would have been a huge undertaking and this isn't really doing it the wrong way either so decided this
would be the better option. It also let me use the stock wiring pass through as a dedicated pass through for aftermarket stuff! (Like the red
and blue 10ga wires you can see for fuel pumps 1 and 2) Here's how it turned out!

http://s379.photobucket.com/user/crlpcguy/media/Mirage%20build%20process%20pictures/20150314_161526_zpsdijgnkwi.jpg.html
Image size reduced, original size: unknown. http://i379.photobucket.com/albums/oo236/crlpcguy/Mirage%20build%20process%20pictures/20150314_161526_zpsdijgnkwi.jpg~original to view the image in its original dimension.


This was prior to painting:
http://s379.photobucket.com/user/crlpcguy/media/Mirage%20build%20process%20pictures/20150314_172036_zpsr3wmjaba.jpg.html
Image size reduced, original size: unknown. http://i379.photobucket.com/albums/oo236/crlpcguy/Mirage%20build%20process%20pictures/20150314_172036_zpsr3wmjaba.jpg~original to view the image in its original dimension.


You can see the finished product behind the Evo transmission and tcase that I also fitted this weekend! biggrin.gif
http://s379.photobucket.com/user/crlpcguy/media/Mirage%20build%20process%20pictures/20150315_170720_zpssjjkxmig.jpg.html
Image size reduced, original size: unknown. http://i379.photobucket.com/albums/oo236/crlpcguy/Mirage%20build%20process%20pictures/20150315_170720_zpssjjkxmig.jpg~original to view the image in its original dimension.


All ready for a driveshaft now!
http://s379.photobucket.com/user/crlpcguy/media/Mirage%20build%20process%20pictures/20150315_170835_zpszluy4db5.jpg.html
Image size reduced, original size: unknown. http://i379.photobucket.com/albums/oo236/crlpcguy/Mirage%20build%20process%20pictures/20150315_170835_zpszluy4db5.jpg~original to view the image in its original dimension.


I also picked up a Driven Fabrications vented AN catch can setup and a GFB Response adjustable BOV/BPV. Getting ready for BOOST!
http://s379.photobucket.com/user/crlpcguy/media/Mirage%20parts%20pictures/20150314_125746_zpsm5dkdusg.jpg.html
Image size reduced, original size: unknown. http://i379.photobucket.com/albums/oo236/crlpcguy/Mirage%20parts%20pictures/20150314_125746_zpsm5dkdusg.jpg~original to view the image in its original dimension.

http://s379.photobucket.com/user/crlpcguy/media/Mirage%20parts%20pictures/20150314_125807_zpsip3dykmd.jpg.html
Image size reduced, original size: unknown. http://i379.photobucket.com/albums/oo236/crlpcguy/Mirage%20parts%20pictures/20150314_125807_zpsip3dykmd.jpg~original to view the image in its original dimension.

Posted by: Spaz Mar 17 2015, 08:29 AM
Bravo! It's so close...

Posted by: Alchem1st Mar 17 2015, 09:14 AM
QUOTE (Spaz @ 45 minutes, 0 seconds ago)
Bravo! It's so close...

I know! awesome.gif Hopefully I'll be able to get a driveshaft made next weekend for it and I have a little work on the fuel system to take care of; but after that it's ready for the engine I don't have to go in! laugh2.gif

Posted by: Spaz Mar 18 2015, 08:43 AM
Right? I know that feel, like when I had the block in my VIII prepped for the replacement head that I didn't have. tongue.gif

Posted by: Alchem1st Mar 22 2015, 05:00 PM
Video update! Finished up the wiring and the first stage of the fuel system!

https://www.youtube.com/watch?v=74ZE9Lj6o84

Posted by: Alchem1st Apr 7 2015, 04:04 PM
Engine parts are rolling in! awesome.gif

https://www.youtube.com/watch?v=L9qz4XXm4HE

Posted by: Spaz Apr 9 2015, 08:19 AM
An Evo 8 gasket? The IX gaskets have an extra layer, not sure if you're aware.

Posted by: Alchem1st Apr 9 2015, 09:47 AM
No, I figured the only difference would be the Mivec stuff. Well, that's alright. It'll have lower compression anyway with the pistons I have.

[ Post made via Mobile Device ]

Posted by: Spaz Apr 10 2015, 09:44 AM
I didn't either until MAP made me aware when I was building the head on my VIII. The gasket is notably heavier and it is thicker, so it's got more crush room and will seal up a bit better, at the cost of lower compression. Not that the VIII gasket isn't good, they hold up very well, but the IX gasket is the way I'll always go from now on for OEM.

And MIVEC uses an external line so there's no provisions for it in the gasket. wink2.gif

Posted by: Alchem1st Apr 10 2015, 09:51 AM
QUOTE (Spaz @ 6 minutes, 55 seconds ago)
I didn't either until MAP made me aware when I was building the head on my VIII. The gasket is notably heavier and it is thicker, so it's got more crush room and will seal up a bit better, at the cost of lower compression. Not that the VIII gasket isn't good, they hold up very well, but the IX gasket is the way I'll always go from now on for OEM.

And MIVEC uses an external line so there's no provisions for it in the gasket. wink2.gif

Ah man I wish they would have told me! I bought my gasket from MAP as well and I would've gone that route for sure if I knew. I'm just gonna use it for now and get a IX gasket next time I have the head off the car. I'll probably see about changing it out this coming Winter when I do the 6262 as the tune will be changed then anyway. Haha shows ya how much I know about the Mivec stuff. I thought the head had some different oil passages and coolant passages compared to the IV-VIII though?

[ Post made via Mobile Device ]

Posted by: Alchem1st Apr 16 2015, 09:58 PM
Here's how the passengers side frame rail restoration turned out! Next I'll start work on the drivers side. It's not as bad though so it should go quicker.

How it all started:
http://s379.photobucket.com/user/crlpcguy/media/Mirage%20build%20process%20pictures/20150405_132106_zpsk9e3vgtk.jpg.html
Image size reduced, original size: unknown. http://i379.photobucket.com/albums/oo236/crlpcguy/Mirage%20build%20process%20pictures/20150405_132106_zpsk9e3vgtk.jpg~original to view the image in its original dimension.


Several dremel flapper wheels and brass bristle brush wheels, a coat of rust treatment, and a coat of primer later:
http://s379.photobucket.com/user/crlpcguy/media/Mirage%20build%20process%20pictures/20150413_224117_zpsrqdvoe8e.jpg.html
Image size reduced, original size: unknown. http://i379.photobucket.com/albums/oo236/crlpcguy/Mirage%20build%20process%20pictures/20150413_224117_zpsrqdvoe8e.jpg~original to view the image in its original dimension.

http://s379.photobucket.com/user/crlpcguy/media/Mirage%20build%20process%20pictures/20150415_111304_zpswy5adhlq.jpg.html
Image size reduced, original size: unknown. http://i379.photobucket.com/albums/oo236/crlpcguy/Mirage%20build%20process%20pictures/20150415_111304_zpswy5adhlq.jpg~original to view the image in its original dimension.

http://s379.photobucket.com/user/crlpcguy/media/Mirage%20build%20process%20pictures/20150415_112532_zpsgxjbybpk.jpg.html
Image size reduced, original size: unknown. http://i379.photobucket.com/albums/oo236/crlpcguy/Mirage%20build%20process%20pictures/20150415_112532_zpsgxjbybpk.jpg~original to view the image in its original dimension.


Another donation from the half cut!
http://s379.photobucket.com/user/crlpcguy/media/Mirage%20build%20process%20pictures/20150415_225622_zpsprvq6tfo.jpg.html
Image size reduced, original size: unknown. http://i379.photobucket.com/albums/oo236/crlpcguy/Mirage%20build%20process%20pictures/20150415_225622_zpsprvq6tfo.jpg~original to view the image in its original dimension.


As opposed too:
http://s379.photobucket.com/user/crlpcguy/media/Mirage%20build%20process%20pictures/20150415_225650_zps15eyfj48.jpg.html
Image size reduced, original size: unknown. http://i379.photobucket.com/albums/oo236/crlpcguy/Mirage%20build%20process%20pictures/20150415_225650_zps15eyfj48.jpg~original to view the image in its original dimension.


Bam!
http://s379.photobucket.com/user/crlpcguy/media/Mirage%20build%20process%20pictures/20150415_231539_zpsgzej325l.jpg.html
Image size reduced, original size: unknown. http://i379.photobucket.com/albums/oo236/crlpcguy/Mirage%20build%20process%20pictures/20150415_231539_zpsgzej325l.jpg~original to view the image in its original dimension.

Posted by: Alchem1st Apr 18 2015, 04:08 PM
Bam

Manley Turbo Tuff I-beam rods with ARP 625+ rod bolts and Wiseco 1400HD pistons!
http://s379.photobucket.com/user/crlpcguy/media/Mirage%20build%20process%20pictures/20150418_131711_zpsnur3o4y9.jpg.html
Image size reduced, original size: unknown. http://i379.photobucket.com/albums/oo236/crlpcguy/Mirage%20build%20process%20pictures/20150418_131711_zpsnur3o4y9.jpg~original to view the image in its original dimension.


Curt Brown #319 handmade for my car!
http://s379.photobucket.com/user/crlpcguy/media/Mirage%20build%20process%20pictures/20150418_143349_zpsmtltknz4.jpg.html
Image size reduced, original size: unknown. http://i379.photobucket.com/albums/oo236/crlpcguy/Mirage%20build%20process%20pictures/20150418_143349_zpsmtltknz4.jpg~original to view the image in its original dimension.

http://s379.photobucket.com/user/crlpcguy/media/Mirage%20build%20process%20pictures/20150418_143411_zpsdc1r5ug3.jpg.html
Image size reduced, original size: unknown. http://i379.photobucket.com/albums/oo236/crlpcguy/Mirage%20build%20process%20pictures/20150418_143411_zpsdc1r5ug3.jpg~original to view the image in its original dimension.

http://s379.photobucket.com/user/crlpcguy/media/Mirage%20build%20process%20pictures/20150418_143357_zpssvdkwzlb.jpg.html
Image size reduced, original size: unknown. http://i379.photobucket.com/albums/oo236/crlpcguy/Mirage%20build%20process%20pictures/20150418_143357_zpssvdkwzlb.jpg~original to view the image in its original dimension.


Had to have him modify the intake manifold as well! It's port matched and cleaned up a bit as well as bored out for more plenum volume
and then he welded a 70mm flange on to accommodate the new Full Blown 70mm throttle body! (which I couldn't help but install right away)
Notice the C and B on the fuel rail mounts? Another little touch added by Curt. thumbsup.gif
http://s379.photobucket.com/user/crlpcguy/media/Mirage%20build%20process%20pictures/20150418_195740_zpsiqxhdbrh.jpg.html
Image size reduced, original size: unknown. http://i379.photobucket.com/albums/oo236/crlpcguy/Mirage%20build%20process%20pictures/20150418_195740_zpsiqxhdbrh.jpg~original to view the image in its original dimension.

http://s379.photobucket.com/user/crlpcguy/media/Mirage%20build%20process%20pictures/20150418_143443_zps7jkthgkn.jpg.html
Image size reduced, original size: unknown. http://i379.photobucket.com/albums/oo236/crlpcguy/Mirage%20build%20process%20pictures/20150418_143443_zps7jkthgkn.jpg~original to view the image in its original dimension.

http://s379.photobucket.com/user/crlpcguy/media/Mirage%20build%20process%20pictures/20150418_143431_zpsxxwvn65y.jpg.html
Image size reduced, original size: unknown. http://i379.photobucket.com/albums/oo236/crlpcguy/Mirage%20build%20process%20pictures/20150418_143431_zpsxxwvn65y.jpg~original to view the image in its original dimension.


Curt always adds a personal touch to each intake manifold he mods. I got a smiley face! My friend Chad got a different part of the human body
drawn on his. laugh.gif
http://s379.photobucket.com/user/crlpcguy/media/Mirage%20build%20process%20pictures/20150418_143453_zps5uzljonp.jpg.html
Image size reduced, original size: unknown. http://i379.photobucket.com/albums/oo236/crlpcguy/Mirage%20build%20process%20pictures/20150418_143453_zps5uzljonp.jpg~original to view the image in its original dimension.

Posted by: Spaz Apr 19 2015, 07:49 AM
BTW, if you ever need another mani, I have a IV mani just taking up space. I'll be scraping a bunch of stuff in the coming weeks, but that I'm keeping.

Posted by: Alchem1st Apr 20 2015, 09:47 PM
QUOTE (Spaz @ Yesterday, 7:49 AM)
BTW, if you ever need another mani, I have a IV mani just taking up space. I'll be scraping a bunch of stuff in the coming weeks, but that I'm keeping.

Cool man I'll keep that in mind! It would be an upgrade for your car tho. What all you scrappin? Hit me up on fb! Another part for the head showed up today as well as an Evo 8 tps sensor for the throttle body. thumbsup.gif

http://s379.photobucket.com/user/crlpcguy/media/Mirage%20build%20process%20pictures/20150420_223844_zpssncc4vma.jpg.html
Image size reduced, original size: 5312 x 2988. http://i379.photobucket.com/albums/oo236/crlpcguy/Mirage%20build%20process%20pictures/20150420_223844_zpssncc4vma.jpg~original to view the image in its original dimension.

Posted by: Spaz Apr 21 2015, 08:49 AM
QUOTE (Alchem1st @ Today, 12:47 AM)
Cool man I'll keep that in mind!  It would be an upgrade for your car tho.  What all you scrappin?  Hit me up on fb!  Another part for the head showed up today as well as an Evo 8 tps sensor for the throttle body.  thumbsup.gif

http://s379.photobucket.com/user/crlpcguy/media/Mirage%20build%20process%20pictures/20150420_223844_zpssncc4vma.jpg.html

MMMmmm... Kiggly HLA.

Also, I6 cap on backwards? Obviously just hanging out there for now, but had to give you shit. tongue.gif

I'll let you know what I'm getting rid of, the big thing is a cracked VIII head and a few other smaller things, brackets and whatnot. Just trying to make space. I can't actually use that mani on the car since there's no port for the MAP sensor... It would have gone on my 8 VIII in a heartbeat if I could have.

Posted by: Alchem1st Apr 21 2015, 12:13 PM
Haha yeah I noticed the cap was on backwards as well after I took the shot. That's how it came from Curt lol. Yeah, for sure let me know what all you have. I've been tracking down misc brackets and whatnot the last few days. Stuff has gone missing in the last 4 years since I disassembled the half cut lol. Ah, bummer. You should just tap it for the map sensor. That's what I'll be doing I think. Not actually sure how the 4-6 logged boost. I didn't realize they didn't have a map sensor until last week. Something I have to look into.

[ Post made via Mobile Device ]

Posted by: Alchem1st May 4 2015, 06:24 AM
Nother video update!

https://www.youtube.com/watch?v=G1ifDmJ243Q

Posted by: Alchem1st May 9 2015, 08:44 PM
Well, I now have the block clearanced for the stroker! Did it all by hand the old fashioned way with a carbide bit and a die grinder. smile.gif (hope I cleaned everything up well enough! ill.gif)
http://s379.photobucket.com/user/crlpcguy/media/Mirage%20build%20process%20pictures/20150509_163637_zpstg0nf1sc.jpg.html
Image size reduced, original size: 5312 x 2988. http://i379.photobucket.com/albums/oo236/crlpcguy/Mirage%20build%20process%20pictures/20150509_163637_zpstg0nf1sc.jpg~original to view the image in its original dimension.


After I finished this I was still hitting on the second from the left cylinder and was confused for a few minutes until I realized the rod wasn't
actually hitting in the cylinder like the rest were haha! Here's the other spot that needed clearancing.
http://s379.photobucket.com/user/crlpcguy/media/Mirage%20build%20process%20pictures/20150509_182934_zpsmcwybfro.jpg.html
Image size reduced, original size: 2988 x 5312. http://i379.photobucket.com/albums/oo236/crlpcguy/Mirage%20build%20process%20pictures/20150509_182934_zpsmcwybfro.jpg~original to view the image in its original dimension.


All clear!
http://s379.photobucket.com/user/crlpcguy/media/Mirage%20build%20process%20pictures/20150509_193621_zpsetkzzzbd.jpg.html
Image size reduced, original size: 2988 x 5312. http://i379.photobucket.com/albums/oo236/crlpcguy/Mirage%20build%20process%20pictures/20150509_193621_zpsetkzzzbd.jpg~original to view the image in its original dimension.


Ooooooo fancy! Tomei crank scraper/windage tray kit. 8)
http://s379.photobucket.com/user/crlpcguy/media/Mirage%20build%20process%20pictures/20150509_200957_zpsnpe8c092.jpg.html
Image size reduced, original size: 5312 x 2988. http://i379.photobucket.com/albums/oo236/crlpcguy/Mirage%20build%20process%20pictures/20150509_200957_zpsnpe8c092.jpg~original to view the image in its original dimension.


Also, I may be changing up my setup a bit due to some life circumstances. For now I've put the 6262 up for sale and am rebuilding my stock frame turbo with an upgraded
thrust bearing kit and a 25G compressor wheel and bigger housing. I'm looking at lowering my power goal from 700whp to around 500whp or so to save some cash on the
build and still be able to finish the engine build and install this year. Still hoping to make it to the DSM Shootout! Tomorrow I'll be checking the oil clearance on the rod
bearings and hopefully gapping the piston rings. Then I need to buy a ring compressor and install everything and I'll have the rotating assembly done!

Posted by: Spaz May 10 2015, 04:24 PM
That thing'll be so light you won't need 700 unless you plan to go to TX2K every year.

Posted by: Alchem1st May 20 2015, 06:48 AM
QUOTE (Spaz @ May 10 2015, 04:24 PM)
That thing'll be so light you won't need 700 unless you plan to go to TX2K every year.

Yeah, that's what I'm hoping man! After some more consideration I think I can still run the 6262 at lower boost for the power level I want so I may end up just keeping it. It'll be a bit more laggy than I want to "only" make 500hp I think, but I already have it so meh. Now for some real progress! Shortblock is assembled and ready to go!

http://s379.photobucket.com/user/crlpcguy/media/Mirage%20parts%20pictures/20150516_163353_zpspt7bkgpf.jpg.html
Image size reduced, original size: 2988 x 5312. http://i379.photobucket.com/albums/oo236/crlpcguy/Mirage%20parts%20pictures/20150516_163353_zpspt7bkgpf.jpg~original to view the image in its original dimension.

http://s379.photobucket.com/user/crlpcguy/media/Mirage%20parts%20pictures/20150516_180108_zpsetdqm1nz.jpg.html
Image size reduced, original size: 5312 x 2988. http://i379.photobucket.com/albums/oo236/crlpcguy/Mirage%20parts%20pictures/20150516_180108_zpsetdqm1nz.jpg~original to view the image in its original dimension.

http://s379.photobucket.com/user/crlpcguy/media/Mirage%20parts%20pictures/20150516_180101_zpsc6jpkus4.jpg.html
Image size reduced, original size: 5312 x 2988. http://i379.photobucket.com/albums/oo236/crlpcguy/Mirage%20parts%20pictures/20150516_180101_zpsc6jpkus4.jpg~original to view the image in its original dimension.


Deck looks like it's got some rust on it, but it's actually 100% clean. Scrubbing it with ATF and a coffee filter the filter comes up clean.
http://s379.photobucket.com/user/crlpcguy/media/Mirage%20parts%20pictures/20150516_163422_zpsi8rjtxsr.jpg.html
Image size reduced, original size: 5312 x 2988. http://i379.photobucket.com/albums/oo236/crlpcguy/Mirage%20parts%20pictures/20150516_163422_zpsi8rjtxsr.jpg~original to view the image in its original dimension.


More engine goodies arrived!
http://s379.photobucket.com/user/crlpcguy/media/Mirage%20parts%20pictures/20150514_224257_zps1reww5yo.jpg.html
Image size reduced, original size: 5312 x 2988. http://i379.photobucket.com/albums/oo236/crlpcguy/Mirage%20parts%20pictures/20150514_224257_zps1reww5yo.jpg~original to view the image in its original dimension.


And here's the new driveshaft thanks to Driveshaftshop! Carbon fiber! Yum!
http://s379.photobucket.com/user/crlpcguy/media/Mirage%20parts%20pictures/20150515_223058_zpscetcmabw.jpg.html
Image size reduced, original size: 5312 x 2988. http://i379.photobucket.com/albums/oo236/crlpcguy/Mirage%20parts%20pictures/20150515_223058_zpscetcmabw.jpg~original to view the image in its original dimension.

http://s379.photobucket.com/user/crlpcguy/media/Mirage%20parts%20pictures/20150515_221925_zpstxswfmuc.jpg.html
Image size reduced, original size: 5312 x 2988. http://i379.photobucket.com/albums/oo236/crlpcguy/Mirage%20parts%20pictures/20150515_221925_zpstxswfmuc.jpg~original to view the image in its original dimension.

http://s379.photobucket.com/user/crlpcguy/media/Mirage%20parts%20pictures/20150515_221849_zpsc90li6xw.jpg.html
Image size reduced, original size: 5312 x 2988. http://i379.photobucket.com/albums/oo236/crlpcguy/Mirage%20parts%20pictures/20150515_221849_zpsc90li6xw.jpg~original to view the image in its original dimension.

Posted by: Spaz May 20 2015, 09:45 AM
Just as a heads up, I'd be worried about underspinning the turbo... There's a lower bound to efficiency ranges for a reason.

This thing going to be at AWD Army at this point or are you bringing the WRX?

Posted by: Alchem1st May 20 2015, 03:31 PM
Nah, it'll be the wrx. Not enough cash flow at this point for the injectors/rail/oil cooler kit/tires I need still. Yeah, 500-600hp should still be enough to keep it in its efficiency range. I just want to use this ACT2100HD and its torque limit is 550ft lbs. Other than it being super laggy I don't know what other issues it could cause. I may use my stock cams to get the car running for break in, but I won't be boosting during that time so it should be ok. Should be running by the time the DSM Shootout rolls around though. You going to that?

[ Post made via Mobile Device ]

Posted by: Spaz May 21 2015, 09:45 AM
Nah, I'm not going to be able to make the shootout this year. There's an AWD Army dyno day that we're still in the stages of planning in the fall that this car would be perfect for... You'd get all of the attention and make solid numbers to boot.

Posted by: Alchem1st May 21 2015, 09:56 AM
That sounds interesting! Where you guys thinking? Fathouse Fabrications? That'd be awesome lol.

[ Post made via Mobile Device ]

Posted by: Spaz May 21 2015, 11:22 AM
Boostin, actually.

Posted by: Alchem1st May 21 2015, 09:52 PM
QUOTE (Spaz @ Today, 11:22 AM)
Boostin, actually.

Should be doable. We'll see if the car is running in time!


Tapping the head bolt holes.
http://s379.photobucket.com/user/crlpcguy/media/Engine%20Build/20150520_232225_zpssvjjviua.jpg.html
Image size reduced, original size: 5312 x 2988. http://i379.photobucket.com/albums/oo236/crlpcguy/Engine%20Build/20150520_232225_zpssvjjviua.jpg~original to view the image in its original dimension.


And...
http://s379.photobucket.com/user/crlpcguy/media/Engine%20Build/20150521_223048_zpsu5nuyve2.jpg.html
Image size reduced, original size: 5312 x 2988. http://i379.photobucket.com/albums/oo236/crlpcguy/Engine%20Build/20150521_223048_zpsu5nuyve2.jpg~original to view the image in its original dimension.

http://s379.photobucket.com/user/crlpcguy/media/Engine%20Build/20150521_234351_zpsjhpbg5fs.jpg.html
Image size reduced, original size: 5312 x 2988. http://i379.photobucket.com/albums/oo236/crlpcguy/Engine%20Build/20150521_234351_zpsjhpbg5fs.jpg~original to view the image in its original dimension.

http://s379.photobucket.com/user/crlpcguy/media/Engine%20Build/20150521_234440_zpsmfh4c7ai.jpg.html
Image size reduced, original size: 5312 x 2988. http://i379.photobucket.com/albums/oo236/crlpcguy/Engine%20Build/20150521_234440_zpsmfh4c7ai.jpg~original to view the image in its original dimension.

http://s379.photobucket.com/user/crlpcguy/media/Engine%20Build/20150521_234427_zpstuamqgno.jpg.html
Image size reduced, original size: 5312 x 2988. http://i379.photobucket.com/albums/oo236/crlpcguy/Engine%20Build/20150521_234427_zpstuamqgno.jpg~original to view the image in its original dimension.


Hoping to drop it in the car Saturday!

Posted by: Alchem1st May 25 2015, 09:25 PM
It's in place! Now to just get it assembled and everything hooked up! Still need to buy cams and cam gears, injectors, a fuel rail, and an oil cooler.

http://s379.photobucket.com/user/crlpcguy/media/Mirage%20build%20process%20pictures/20150525_110910_zpsdyych2xs.jpg.html
Image size reduced, original size: 5312 x 2988. http://i379.photobucket.com/albums/oo236/crlpcguy/Mirage%20build%20process%20pictures/20150525_110910_zpsdyych2xs.jpg~original to view the image in its original dimension.

http://s379.photobucket.com/user/crlpcguy/media/Mirage%20build%20process%20pictures/20150525_125202_zpsga1yhpqj.jpg.html
Image size reduced, original size: 5312 x 2988. http://i379.photobucket.com/albums/oo236/crlpcguy/Mirage%20build%20process%20pictures/20150525_125202_zpsga1yhpqj.jpg~original to view the image in its original dimension.

http://s379.photobucket.com/user/crlpcguy/media/Mirage%20build%20process%20pictures/20150525_193247_zps5rosnpp5.jpg.html
Image size reduced, original size: 5312 x 2988. http://i379.photobucket.com/albums/oo236/crlpcguy/Mirage%20build%20process%20pictures/20150525_193247_zps5rosnpp5.jpg~original to view the image in its original dimension.

Posted by: Alchem1st May 26 2015, 09:31 PM
New video!

https://www.youtube.com/watch?v=T1cQPRTWdCo

Posted by: Alchem1st Jun 13 2015, 05:02 AM
And another video! This is a pretty big update!

https://www.youtube.com/watch?v=swL2l5a_2Zw

Posted by: Spaz Jun 13 2015, 06:40 AM
Question, actually.

Are you going to be running a COP or stock coils? If stock coils, do you need a set of JDM 2-bolt coils? I have a pair floating around. Been selling a ton of parts lately and remembered I had them.

Posted by: Alchem1st Jul 23 2015, 03:49 PM
QUOTE (Spaz @ Jun 13 2015, 06:40 AM)
Question, actually.

Are you going to be running a COP or stock coils? If stock coils, do you need a set of JDM 2-bolt coils? I have a pair floating around. Been selling a ton of parts lately and remembered I had them.

I have a set of JDM 2bolts and a set of USDM Evo 8 coils laying around; but I'll probably end up doing a COP setup fairly soon. Maybe the SpoolinUp setup. Not sure yet tbh. Thanks though!


Crossmember swap all done! Here's the front end installed properly! biggrin.gif

http://s379.photobucket.com/user/crlpcguy/media/Mirage%20build%20process%20pictures/20150705_125608_zpsuedzioui.jpg.html
Image size reduced, original size: 5312 x 2988. http://i379.photobucket.com/albums/oo236/crlpcguy/Mirage%20build%20process%20pictures/20150705_125608_zpsuedzioui.jpg~original to view the image in its original dimension.


First time in the sunlight with the Evo front end on it!
http://s379.photobucket.com/user/crlpcguy/media/Mirage%20build%20process%20pictures/20150712_153302_zpsgv52kjo1.jpg.html
Image size reduced, original size: 5312 x 2988. http://i379.photobucket.com/albums/oo236/crlpcguy/Mirage%20build%20process%20pictures/20150712_153302_zpsgv52kjo1.jpg~original to view the image in its original dimension.

http://s379.photobucket.com/user/crlpcguy/media/Mirage%20build%20process%20pictures/20150712_153205_zpst3bdqrsw.jpg.html
Image size reduced, original size: 5312 x 2988. http://i379.photobucket.com/albums/oo236/crlpcguy/Mirage%20build%20process%20pictures/20150712_153205_zpst3bdqrsw.jpg~original to view the image in its original dimension.

http://s379.photobucket.com/user/crlpcguy/media/Mirage%20build%20process%20pictures/20150712_153324_zpski5htsap.jpg.html
Image size reduced, original size: 5312 x 2988. http://i379.photobucket.com/albums/oo236/crlpcguy/Mirage%20build%20process%20pictures/20150712_153324_zpski5htsap.jpg~original to view the image in its original dimension.


Fender build is in process as well as a few other little projects. Hoping to have the trunk and wing painted soon as well! {thumbup}:mitsu:

Posted by: Alchem1st Aug 6 2015, 06:36 PM
Big update! (imo)

https://www.youtube.com/watch?v=liBxtiemycM

Posted by: Alchem1st Oct 8 2015, 12:53 PM
So it actually takes two coupe fenders and one Evo fender to make everything work! There was a good bit more work put in to massage the metal to just where it needed to be; but it's welded up and ready for bodywork now!

http://s379.photobucket.com/user/crlpcguy/media/Mirage%20build%20process%20pictures/IMG_20150924_163543_zpskimdwdlu.jpg.html
Image size reduced, original size: 4096 x 2304. http://i379.photobucket.com/albums/oo236/crlpcguy/Mirage%20build%20process%20pictures/IMG_20150924_163543_zpskimdwdlu.jpg~original to view the image in its original dimension.

http://s379.photobucket.com/user/crlpcguy/media/Mirage%20build%20process%20pictures/20150924_205336_zpsrsox1bb6.jpg.html
Image size reduced, original size: 5312 x 2988. http://i379.photobucket.com/albums/oo236/crlpcguy/Mirage%20build%20process%20pictures/20150924_205336_zpsrsox1bb6.jpg~original to view the image in its original dimension.


Also made some more progress on it mechanically! Got the wiring harness nearly done and to working order and I've been tinkering on the turbo setup as well! Grabbed some DSM 450cc injectors from a friend for next to nothing and plan to use them to get the car up and running for break-in. Also grabbed a Kinugawa 20G compressor wheel and housing kit that I'll use for now while putting the parts for the 6262 together.

http://s379.photobucket.com/user/crlpcguy/media/Mirage%20build%20process%20pictures/20151006_205400_zpstvn1kcee.jpg.html
Image size reduced, original size: 5312 x 2988. http://i379.photobucket.com/albums/oo236/crlpcguy/Mirage%20build%20process%20pictures/20151006_205400_zpstvn1kcee.jpg~original to view the image in its original dimension.

http://s379.photobucket.com/user/crlpcguy/media/Mirage%20build%20process%20pictures/20151008_141603_zps2dzexlwn.jpg.html
Image size reduced, original size: 2988 x 5312. http://i379.photobucket.com/albums/oo236/crlpcguy/Mirage%20build%20process%20pictures/20151008_141603_zps2dzexlwn.jpg~original to view the image in its original dimension.

http://s379.photobucket.com/user/crlpcguy/media/Mirage%20build%20process%20pictures/20151008_141612_zpsresmuoat.jpg.html
Image size reduced, original size: 2988 x 5312. http://i379.photobucket.com/albums/oo236/crlpcguy/Mirage%20build%20process%20pictures/20151008_141612_zpsresmuoat.jpg~original to view the image in its original dimension.

http://s379.photobucket.com/user/crlpcguy/media/Mirage%20build%20process%20pictures/20151008_161306_zpsvfakdsmf.jpg.html
Image size reduced, original size: 5312 x 2988. http://i379.photobucket.com/albums/oo236/crlpcguy/Mirage%20build%20process%20pictures/20151008_161306_zpsvfakdsmf.jpg~original to view the image in its original dimension.

Posted by: Spaz Oct 9 2015, 09:43 AM
MMMmmm Kinugawa.

So the question I have after looking at the engine bay... Looks like you actually intend to run the ALS? What ECU are you tuning on?

Posted by: Alchem1st Oct 9 2015, 09:53 AM
Yep, I have it on the car at least. Tuning with an Evo 5 ecu.

[ Post made via Mobile Device ]

Posted by: Alchem1st Oct 13 2015, 03:22 PM
Another small part showed up today!

http://s379.photobucket.com/user/crlpcguy/media/Mirage%20parts%20pictures/20151013_171648_zpsgqlzo7en.jpg.html
Image size reduced, original size: 5312 x 2988. http://i379.photobucket.com/albums/oo236/crlpcguy/Mirage%20parts%20pictures/20151013_171648_zpsgqlzo7en.jpg~original to view the image in its original dimension.


Last part I needed to finish up the oil return setup off the turbo! The rest of the fittings came with my 6262 kit I bought. Sucks they were a bit scratched up; but
they'll work. Now just waiting on the fittings for the oil feed to come in! It's equally as trick! Hopefully they'll show up this week. All I need after that is an o2
housing and I can torque the turbo permanently (for now lol) in place!

http://s379.photobucket.com/user/crlpcguy/media/Mirage%20build%20process%20pictures/20151013_184512_zps0x0r3jox.jpg.html
Image size reduced, original size: 5312 x 2988. http://i379.photobucket.com/albums/oo236/crlpcguy/Mirage%20build%20process%20pictures/20151013_184512_zps0x0r3jox.jpg~original to view the image in its original dimension.

Posted by: Spaz Oct 14 2015, 10:53 AM
QUOTE (Alchem1st @ Oct 9 2015, 12:53 PM)
Yep, I have it on the car at least. Tuning with an Evo 5 ecu.

Well that makes it easy! I was curious if you were using an VIII ECU or similar due to availability.

Posted by: Alchem1st Oct 16 2015, 05:27 PM
Nah, I scored this Evo 5 ECU for dirt cheap. Couldn't pass it up! The Evo 8 ECU is a good bit more powerful with a lot more support though. I may make
the switch over to it later down the road. Made some progress on the oil feed line today when my fittings showed up! M10 1.25 to 4an fittings.

http://s379.photobucket.com/user/crlpcguy/media/Mirage%20parts%20pictures/20151016_172938_zpsol47lqu0.jpg.html
Image size reduced, original size: 5312 x 2988. http://i379.photobucket.com/albums/oo236/crlpcguy/Mirage%20parts%20pictures/20151016_172938_zpsol47lqu0.jpg~original to view the image in its original dimension.


Sadly the fitting bottoms out in the head and required a bit of modification and upon further inspection the turbo fitting is a different size from the
cylinder head fitting! facepalm.gif Have to wait until tomorrow and I'll go figure out what size it actually is. I think at this point it's M12 1.25. Anyway, you
can go to about any auto parts store for the crush washers. They're brake line crush washers and easy to come by. Also, since the threading on the
fitting doesn't go all the way down and the crush washer floats around, I used spare HVAC orings from my oring kit to keep the washer from moving
around while I torque it down. Works perfect!

http://s379.photobucket.com/user/crlpcguy/media/Mirage%20parts%20pictures/20151016_192747_zpsxckmfyjp.jpg.html
Image size reduced, original size: 5312 x 2988. http://i379.photobucket.com/albums/oo236/crlpcguy/Mirage%20parts%20pictures/20151016_192747_zpsxckmfyjp.jpg~original to view the image in its original dimension.


Finished product!

http://s379.photobucket.com/user/crlpcguy/media/Mirage%20parts%20pictures/20151016_210746_zpswiraktkd.jpg.html
Image size reduced, original size: 5312 x 2988. http://i379.photobucket.com/albums/oo236/crlpcguy/Mirage%20parts%20pictures/20151016_210746_zpswiraktkd.jpg~original to view the image in its original dimension.

Posted by: Alchem1st Oct 19 2015, 04:15 PM
New video up!

https://www.youtube.com/watch?v=EsQ4jsFAtkQ

Posted by: Alchem1st Nov 3 2015, 01:07 AM
Some more progress!

https://www.youtube.com/watch?v=iXI--QQ-uC4

Posted by: Alchem1st Nov 30 2015, 05:27 PM
Almost ready to fire up! For the time being I've bypassed the turbo and just have my MAF hooked up on an intake pipe to the throttle body. Also went ahead
and blocked off the oil cooler since I haven't got a new one yet. I'll have one on the car before it sees any street use though. Already primed the oil system and
have good oil pressure! Just waiting on a few more fittings to arrive later this week and I'll put a few gallons of fuel in the tank and see if she starts! For now,
here's a pic of the fuel filter to rail line that I made compared to the stock line. Much better imo!

http://s379.photobucket.com/user/crlpcguy/media/Mirage%20build%20process%20pictures/20151130_181159_zpsqusr8zwu.jpg.html
Image size reduced, original size: 5312 x 2988. http://i379.photobucket.com/albums/oo236/crlpcguy/Mirage%20build%20process%20pictures/20151130_181159_zpsqusr8zwu.jpg~original to view the image in its original dimension.


Here's the temporary fuel system:
http://s379.photobucket.com/user/crlpcguy/media/Mirage%20build%20process%20pictures/20151130_175728_zpsz1g5ydjx.jpg.html
Image size reduced, original size: 5312 x 2988. http://i379.photobucket.com/albums/oo236/crlpcguy/Mirage%20build%20process%20pictures/20151130_175728_zpsz1g5ydjx.jpg~original to view the image in its original dimension.


Tossed a set of 450cc DSM injectors in with the stock fuel rail and used MAPerformance -6AN fuel rail fittings to get everything plumbed. The fuel return
comes from the afpr to the stock steel return on the stock rail and then makes it's way back to the stock return line under the car. Pretty clean setup for
just being temporary haha! The rail and injectors will be upgraded before any serious tuning takes place though.

Posted by: Alchem1st Dec 3 2015, 04:18 PM
IT LIVES!!! IT FINALLY LIVES!!!

https://www.youtube.com/watch?v=eO1WynBnD_E

Posted by: Spaz Dec 4 2015, 11:04 AM
Woot! awesome.gif

It certainly sounds like an Evo. Long time coming for sure.

Posted by: Alchem1st Dec 4 2015, 04:01 PM
QUOTE (Spaz @ 4 hours, 57 minutes ago)
Woot! awesome.gif

It certainly sounds like an Evo. Long time coming for sure.

Yeah, that's for sure! Waited way too long for this haha! grin2.gif Fixed the power steering leak today as well. Turns out the Evo uses a different type of fitting than the Mirage line had. Benefit of buying a half cut shows itself again! Had the line laying outside in the shed still on the Evo steering rack haha!

Posted by: Alchem1st Feb 29 2016, 05:15 PM
Alright, time for an update! Lots of new stuff in and on the car since my last post!

Polished and installed the water temp sender block adapter!
http://s379.photobucket.com/user/crlpcguy/media/Mirage%20build%20process%20pictures/20160223_132148_zpszj1htpmv.jpg.html
Image size reduced, original size: 5312 x 2988. http://i379.photobucket.com/albums/oo236/crlpcguy/Mirage%20build%20process%20pictures/20160223_132148_zpszj1htpmv.jpg~original to view the image in its original dimension.

http://s379.photobucket.com/user/crlpcguy/media/Mirage%20build%20process%20pictures/20160223_140215_zpsiucxkqvu.jpg.html
Image size reduced, original size: 5312 x 2988. http://i379.photobucket.com/albums/oo236/crlpcguy/Mirage%20build%20process%20pictures/20160223_140215_zpsiucxkqvu.jpg~original to view the image in its original dimension.


VRSF Muse stock battery route intercooler plumbing kit and JMFab intake came in and are installed!
http://s379.photobucket.com/user/crlpcguy/media/Mirage%20build%20process%20pictures/20160224_171427_zps8v6xrxq2.jpg.html
Image size reduced, original size: 5312 x 2988. http://i379.photobucket.com/albums/oo236/crlpcguy/Mirage%20build%20process%20pictures/20160224_171427_zps8v6xrxq2.jpg~original to view the image in its original dimension.

http://s379.photobucket.com/user/crlpcguy/media/Mirage%20build%20process%20pictures/20160224_174658_zpsd46h1ga7.jpg.html
Image size reduced, original size: 5312 x 2988. http://i379.photobucket.com/albums/oo236/crlpcguy/Mirage%20build%20process%20pictures/20160224_174658_zpsd46h1ga7.jpg~original to view the image in its original dimension.

http://s379.photobucket.com/user/crlpcguy/media/Mirage%20build%20process%20pictures/12697272_10208554046792187_5808245046569080536_o_zpsfy2d4xo7.jpg.html
Image size reduced, original size: 2048 x 1536. http://i379.photobucket.com/albums/oo236/crlpcguy/Mirage%20build%20process%20pictures/12697272_10208554046792187_5808245046569080536_o_zpsfy2d4xo7.jpg~original to view the image in its original dimension.

http://s379.photobucket.com/user/crlpcguy/media/Mirage%20build%20process%20pictures/20160225_145652_zpsnxuodq0w.jpg.html
Image size reduced, original size: 5312 x 2988. http://i379.photobucket.com/albums/oo236/crlpcguy/Mirage%20build%20process%20pictures/20160225_145652_zpsnxuodq0w.jpg~original to view the image in its original dimension.


Got some M8x1.25 fender washers for the rad stays and modified them to fit! Also used them to install the Driven fab oil catch can!
http://s379.photobucket.com/user/crlpcguy/media/Mirage%20build%20process%20pictures/20160229_194225_zpsf7cxqfqz.jpg.html
Image size reduced, original size: 5312 x 2988. http://i379.photobucket.com/albums/oo236/crlpcguy/Mirage%20build%20process%20pictures/20160229_194225_zpsf7cxqfqz.jpg~original to view the image in its original dimension.

http://s379.photobucket.com/user/crlpcguy/media/Mirage%20build%20process%20pictures/20160229_194255_zps0x9uyp1n.jpg.html
Image size reduced, original size: 5312 x 2988. http://i379.photobucket.com/albums/oo236/crlpcguy/Mirage%20build%20process%20pictures/20160229_194255_zps0x9uyp1n.jpg~original to view the image in its original dimension.


Here's the engine bay as it sits!
http://s379.photobucket.com/user/crlpcguy/media/Mirage%20build%20process%20pictures/20160229_194154_zpsghuulr25.jpg.html
Image size reduced, original size: 5312 x 2988. http://i379.photobucket.com/albums/oo236/crlpcguy/Mirage%20build%20process%20pictures/20160229_194154_zpsghuulr25.jpg~original to view the image in its original dimension.


Over the next few weeks I have to finish this list of stuff to get it all where I want it:

Shorten the upper rad hose so it doesn't rub the uicp
Get a hose to plumb the BPV into the intake
Reroute the lower rad hose so the intake isn't smashing it against the transmission
Get some silicone 45degree couplers for the intercooler
Fab up a mounting bracket for the intake and get a 4in MAF adapter


Once all that is done I just need to get an oil cooler, battery, bigger fuel injectors, and a tune and it's ready to be driven!
Still needs fenders and bodywork and such, but it'll at least be done enough that I can get it down to the dyno and Fathouse
Fabrications for tuning!

Posted by: Alchem1st Mar 23 2016, 04:50 PM
Update time!

https://www.youtube.com/watch?v=sFE8gjxOUh0

Posted by: Alchem1st May 25 2016, 12:03 PM
Got some paintwork done! Dad just finished painting the Evo deck lid and we got it installed last weekend!

http://s379.photobucket.com/user/crlpcguy/media/Mirage%20build%20process%20pictures/20160518_180653_zpsopenpjyb.jpg.html
Image size reduced, original size: 5312 x 2988. http://i379.photobucket.com/albums/oo236/crlpcguy/Mirage%20build%20process%20pictures/20160518_180653_zpsopenpjyb.jpg~original to view the image in its original dimension.

http://s379.photobucket.com/user/crlpcguy/media/Mirage%20build%20process%20pictures/20160518_210814_zpsi5iomczj.jpg.html
Image size reduced, original size: 5312 x 2988. http://i379.photobucket.com/albums/oo236/crlpcguy/Mirage%20build%20process%20pictures/20160518_210814_zpsi5iomczj.jpg~original to view the image in its original dimension.

http://s379.photobucket.com/user/crlpcguy/media/Mirage%20build%20process%20pictures/20160519_155116_zpsjigp4jro.jpg.html
Image size reduced, original size: 5312 x 2988. http://i379.photobucket.com/albums/oo236/crlpcguy/Mirage%20build%20process%20pictures/20160519_155116_zpsjigp4jro.jpg~original to view the image in its original dimension.

http://s379.photobucket.com/user/crlpcguy/media/Mirage%20build%20process%20pictures/20160519_163809_zps7d9vj233.jpg.html
Image size reduced, original size: 5312 x 2988. http://i379.photobucket.com/albums/oo236/crlpcguy/Mirage%20build%20process%20pictures/20160519_163809_zps7d9vj233.jpg~original to view the image in its original dimension.


Ignore the paint bubbles on the rear bumper! We didn't get the prep quite right when we originally painted the bumper years ago.
It will be getting a respray along with the rear lip, side skirts, fenders, and front bumper. The wing is in the paint shop currently!
One thing I ran in to that I know others have had issues with in the past is the key tumbler not working. Most assumed the issue
was with the rod that goes from the tumbler to the latch. After some research with Mitsubishi ASA I figured out that the Evo 4-6
latch and the Mirage latches are the same part number. The difference is actually with the rod on the back of the tumbler. I haven't
decided whether or not I'll be making a custom piece or buying a used tumbler to tear apart. I'll post up when I cover that sometime
in the future! Stay tuned!

Posted by: Spaz May 25 2016, 07:24 PM
Moving right along!

How soon until it sees the ground on a more permanent basis?

Posted by: Alchem1st Jun 6 2016, 05:53 PM
It's on the ground and done-ish now. Hopefully soon man! All that's left engine wise is a better intercooler, an oil cooler, the injectors whenever they get here, and an exhaust.

Got a lot more work done on the car this weekend! We made custom replacement gaskets for the wing and Dad painted
all the wing parts on Thursday. We got it all assembled and permanently mounted to the trunk yesterday!

Custom gaskets! (These can be replicated if someone were to want to buy them)
http://s379.photobucket.com/user/crlpcguy/media/Mirage%20build%20process%20pictures/20160605_191247_zpsryapdy02.jpg.html
Image size reduced, original size: 5312 x 2988. http://i379.photobucket.com/albums/oo236/crlpcguy/Mirage%20build%20process%20pictures/20160605_191247_zpsryapdy02.jpg~original to view the image in its original dimension.

http://s379.photobucket.com/user/crlpcguy/media/Mirage%20build%20process%20pictures/20160605_192616_zpsrzjorxzm.jpg.html
Image size reduced, original size: 5312 x 2988. http://i379.photobucket.com/albums/oo236/crlpcguy/Mirage%20build%20process%20pictures/20160605_192616_zpsrzjorxzm.jpg~original to view the image in its original dimension.


Finished product!
http://s379.photobucket.com/user/crlpcguy/media/Mirage%20build%20process%20pictures/20160605_194445_zpsjfy4kdtd.jpg.html
Image size reduced, original size: 5312 x 2988. http://i379.photobucket.com/albums/oo236/crlpcguy/Mirage%20build%20process%20pictures/20160605_194445_zpsjfy4kdtd.jpg~original to view the image in its original dimension.

http://s379.photobucket.com/user/crlpcguy/media/Mirage%20build%20process%20pictures/20160605_194513_zpsju4cwh6q.jpg.html
Image size reduced, original size: 5312 x 2988. http://i379.photobucket.com/albums/oo236/crlpcguy/Mirage%20build%20process%20pictures/20160605_194513_zpsju4cwh6q.jpg~original to view the image in its original dimension.

http://s379.photobucket.com/user/crlpcguy/media/Mirage%20build%20process%20pictures/20160605_194538_zpsk4ta6prm.jpg.html
Image size reduced, original size: 5312 x 2988. http://i379.photobucket.com/albums/oo236/crlpcguy/Mirage%20build%20process%20pictures/20160605_194538_zpsk4ta6prm.jpg~original to view the image in its original dimension.

http://s379.photobucket.com/user/crlpcguy/media/Mirage%20build%20process%20pictures/20160605_194618_zpsz38vagow.jpg.html
Image size reduced, original size: 5312 x 2988. http://i379.photobucket.com/albums/oo236/crlpcguy/Mirage%20build%20process%20pictures/20160605_194618_zpsz38vagow.jpg~original to view the image in its original dimension.

http://s379.photobucket.com/user/crlpcguy/media/Mirage%20build%20process%20pictures/20160605_195605_zpsccjqh8fd.jpg.html
Image size reduced, original size: 5312 x 2988. http://i379.photobucket.com/albums/oo236/crlpcguy/Mirage%20build%20process%20pictures/20160605_195605_zpsccjqh8fd.jpg~original to view the image in its original dimension.


Next focus is respraying the rear bumper and getting the fenders done! Stay tuned!

Posted by: Alchem1st Jul 17 2016, 01:11 PM
New videos!

https://www.youtube.com/watch?v=mZvEWSvIGgM
https://www.youtube.com/watch?v=5nCsGrurGTE

Posted by: Sensation! Jul 17 2016, 01:50 PM
I can see why they call you alchemist..
Absolutely top notch work!

Posted by: Alchem1st Jul 18 2016, 02:17 PM
QUOTE (Sensation! @ Yesterday, 1:50 PM)
I can see why they call you alchemist..
Absolutely top notch work!

Thanks! Much appreciated!

Posted by: Alchem1st Oct 4 2016, 10:30 AM
500 mile inspection time!

https://www.youtube.com/watch?v=zg-vEoHaWfs

Posted by: Alchem1st Jan 11 2017, 12:59 PM
So I've made lots of progress over the last few weeks on the car. It's on speed density now and I've got an Evo 8 ECU in the car now as well as doing an Evo 8 fan controller conversion. It's been a big job with little visual progress, but here's all the video's I've shot since my last update. Lots of technical information. I've been slacking on posting on the forums! laugh.gif

https://www.youtube.com/watch?v=zp6LDYaYFZA&t=199s

https://www.youtube.com/watch?v=nEhatU8gllc

https://www.youtube.com/watch?v=tgBEy31yD5w

https://www.youtube.com/watch?v=6Q1ADpqJAw4&t=208s
(Watch this one with the annotations turned on. I made a few mistakes that I've since corrected and I posted the fixes in the annotations)

https://www.youtube.com/watch?v=72cbRZR7eaA

Posted by: Alchem1st Feb 7 2017, 02:05 PM
Time to update the build thread again! Lots of stuff has been accomplished since the last update! Just finished installing a set of GSC R2 billet camshafts,
ARP cam bolts, and AEM Tru-time cam gears!

http://s379.photobucket.com/user/crlpcguy/media/Mirage%20build%20process%20pictures/20170126_181950_zpssfs12b0i.jpg.html
Image size reduced, original size: 1024 x 768. http://i379.photobucket.com/albums/oo236/crlpcguy/Mirage%20build%20process%20pictures/20170126_181950_zpssfs12b0i.jpg~original to view the image in its original dimension.

http://s379.photobucket.com/user/crlpcguy/media/Mirage%20build%20process%20pictures/20170127_211611_zpsrsjacsrn.jpg.html
Image size reduced, original size: 1024 x 768. http://i379.photobucket.com/albums/oo236/crlpcguy/Mirage%20build%20process%20pictures/20170127_211611_zpsrsjacsrn.jpg~original to view the image in its original dimension.

http://s379.photobucket.com/user/crlpcguy/media/Mirage%20build%20process%20pictures/20170127_211627_zpsvjrce29u.jpg.html
Image size reduced, original size: 1024 x 768. http://i379.photobucket.com/albums/oo236/crlpcguy/Mirage%20build%20process%20pictures/20170127_211627_zpsvjrce29u.jpg~original to view the image in its original dimension.


After I finished that up I dropped the exhaust and driveshaft and pulled the fuel tank for a fuel system build!

Started by cutting the tubes off of the Evo 5 fuel pump hangers:
http://s379.photobucket.com/user/crlpcguy/media/Mirage%20build%20process%20pictures/20170124_153530_zpsaoj9hhki.jpg.html
Image size reduced, original size: 1024 x 768. http://i379.photobucket.com/albums/oo236/crlpcguy/Mirage%20build%20process%20pictures/20170124_153530_zpsaoj9hhki.jpg~original to view the image in its original dimension.


Then I grabbed a 5/16 to -6AN and a 1/4 to -6AN compression fitting and tightened them on to the tube ends. Here's the end result:
http://s379.photobucket.com/user/crlpcguy/media/Mirage%20build%20process%20pictures/20170203_145131_zpsuvc3d0zs.jpg.html
Image size reduced, original size: 1024 x 768. http://i379.photobucket.com/albums/oo236/crlpcguy/Mirage%20build%20process%20pictures/20170203_145131_zpsuvc3d0zs.jpg~original to view the image in its original dimension.


The goal was to make it able to be removed and installed without dropping the tank and also I needed to convert to AN for the fuel pump setup
I'm putting together. Here's the video I shot explaining it:

https://www.youtube.com/watch?v=isIYXOl2bFw&t=4s

And here's a few pictures! (The hoses in the pictures are for the fuel return. The fittings for the feed are currently on the way!)
http://s379.photobucket.com/user/crlpcguy/media/Mirage%20build%20process%20pictures/20170206_171956_zpsnio20gac.jpg.html
Image size reduced, original size: 1024 x 768. http://i379.photobucket.com/albums/oo236/crlpcguy/Mirage%20build%20process%20pictures/20170206_171956_zpsnio20gac.jpg~original to view the image in its original dimension.

http://s379.photobucket.com/user/crlpcguy/media/Mirage%20build%20process%20pictures/20170206_171933_zpsbsnuyniu.jpg.html
Image size reduced, original size: 1024 x 768. http://i379.photobucket.com/albums/oo236/crlpcguy/Mirage%20build%20process%20pictures/20170206_171933_zpsbsnuyniu.jpg~original to view the image in its original dimension.

http://s379.photobucket.com/user/crlpcguy/media/Mirage%20build%20process%20pictures/20170206_171941_zpsvivteynh.jpg.html
Image size reduced, original size: 1024 x 768. http://i379.photobucket.com/albums/oo236/crlpcguy/Mirage%20build%20process%20pictures/20170206_171941_zpsvivteynh.jpg~original to view the image in its original dimension.


Lastly, my Dad finished the bodywork on one of the fenders today! I was in the shop and was able to grab some pictures! Should be getting primed tomorrow!
http://s379.photobucket.com/user/crlpcguy/media/Mirage%20build%20process%20pictures/20170207_110938_zpsccdmoyq6.jpg.html
Image size reduced, original size: 1024 x 768. http://i379.photobucket.com/albums/oo236/crlpcguy/Mirage%20build%20process%20pictures/20170207_110938_zpsccdmoyq6.jpg~original to view the image in its original dimension.

http://s379.photobucket.com/user/crlpcguy/media/Mirage%20build%20process%20pictures/20170207_110946_zpsnroxmrea.jpg.html
Image size reduced, original size: 1024 x 768. http://i379.photobucket.com/albums/oo236/crlpcguy/Mirage%20build%20process%20pictures/20170207_110946_zpsnroxmrea.jpg~original to view the image in its original dimension.


Exciting things are happening guys! It's gonna be more or less done this year Lord willing! All that's left is to finish the fuel system, get an oil cooler,
upgrade the intercooler, get some tires, get the car tuned, and finish the bodywork! That will call the base build finished! From there things will slow
down a bit; but also the work that happens will be much crazier. I have some cool ideas for this car and I can't wait to start tinkering with the setup!
Stay tuned!

Posted by: Spaz Feb 8 2017, 07:41 PM
Sooooo close, I love it!

Posted by: Alchem1st Mar 22 2017, 02:05 PM
QUOTE (Spaz @ Feb 8 2017, 07:41 PM)
Sooooo close, I love it!

Even closer now! Only two weeks till tuning! The last of the parts are rolling in!

So I've made a ton of progress since the last post! The fenders are finished and painted as well as the side skirts! The fuel system is also finished and working great!

Fender test fit after body filler, sanding, and priming:
http://s379.photobucket.com/user/crlpcguy/media/Mirage%20build%20process%20pictures/20170210_163434_zps6txkcpcm.jpg.html
Image size reduced, original size: 1024 x 768. http://i379.photobucket.com/albums/oo236/crlpcguy/Mirage%20build%20process%20pictures/20170210_163434_zps6txkcpcm.jpg~original to view the image in its original dimension.

http://s379.photobucket.com/user/crlpcguy/media/Mirage%20build%20process%20pictures/20170210_163459_zpszgdvqjoy.jpg.html
Image size reduced, original size: 1024 x 768. http://i379.photobucket.com/albums/oo236/crlpcguy/Mirage%20build%20process%20pictures/20170210_163459_zpszgdvqjoy.jpg~original to view the image in its original dimension.

http://s379.photobucket.com/user/crlpcguy/media/Mirage%20build%20process%20pictures/20170210_163518_zpsjyixfidm.jpg.html
Image size reduced, original size: 1024 x 768. http://i379.photobucket.com/albums/oo236/crlpcguy/Mirage%20build%20process%20pictures/20170210_163518_zpsjyixfidm.jpg~original to view the image in its original dimension.

http://s379.photobucket.com/user/crlpcguy/media/Mirage%20build%20process%20pictures/20170210_163629_zpsdntlxtgy.jpg.html
Image size reduced, original size: 1024 x 768. http://i379.photobucket.com/albums/oo236/crlpcguy/Mirage%20build%20process%20pictures/20170210_163629_zpsdntlxtgy.jpg~original to view the image in its original dimension.


Fuel system finished!
http://s379.photobucket.com/user/crlpcguy/media/Mirage%20build%20process%20pictures/20170210_190433_zps0alnfnkc.jpg.html
Image size reduced, original size: 1024 x 768. http://i379.photobucket.com/albums/oo236/crlpcguy/Mirage%20build%20process%20pictures/20170210_190433_zps0alnfnkc.jpg~original to view the image in its original dimension.

http://s379.photobucket.com/user/crlpcguy/media/Mirage%20build%20process%20pictures/20170210_190446_zpsrqswdgcz.jpg.html
Image size reduced, original size: 1024 x 768. http://i379.photobucket.com/albums/oo236/crlpcguy/Mirage%20build%20process%20pictures/20170210_190446_zpsrqswdgcz.jpg~original to view the image in its original dimension.

http://s379.photobucket.com/user/crlpcguy/media/Mirage%20build%20process%20pictures/20170211_214722_zpsgs1hllhv.jpg.html
Image size reduced, original size: 1024 x 768. http://i379.photobucket.com/albums/oo236/crlpcguy/Mirage%20build%20process%20pictures/20170211_214722_zpsgs1hllhv.jpg~original to view the image in its original dimension.

http://s379.photobucket.com/user/crlpcguy/media/Mirage%20build%20process%20pictures/20170215_133958_zpsdcqyrkf2.jpg.html
Image size reduced, original size: 1024 x 768. http://i379.photobucket.com/albums/oo236/crlpcguy/Mirage%20build%20process%20pictures/20170215_133958_zpsdcqyrkf2.jpg~original to view the image in its original dimension.


Old fuel feed converted to return with a nifty little adapter fitting!
http://s379.photobucket.com/user/crlpcguy/media/Mirage%20build%20process%20pictures/20170217_140743_zpsetlbkgnu.jpg.html
Image size reduced, original size: 1024 x 768. http://i379.photobucket.com/albums/oo236/crlpcguy/Mirage%20build%20process%20pictures/20170217_140743_zpsetlbkgnu.jpg~original to view the image in its original dimension.

http://s379.photobucket.com/user/crlpcguy/media/Mirage%20build%20process%20pictures/20170217_140703_zpsoywwtlyi.jpg.html
Image size reduced, original size: 1024 x 768. http://i379.photobucket.com/albums/oo236/crlpcguy/Mirage%20build%20process%20pictures/20170217_140703_zpsoywwtlyi.jpg~original to view the image in its original dimension.


New fuel feed line (-8) vs old fuel feed line (5/16)
http://s379.photobucket.com/user/crlpcguy/media/Mirage%20build%20process%20pictures/20170217_141558_zpsflqjqfnu.jpg.html
Image size reduced, original size: 1024 x 768. http://i379.photobucket.com/albums/oo236/crlpcguy/Mirage%20build%20process%20pictures/20170217_141558_zpsflqjqfnu.jpg~original to view the image in its original dimension.

http://s379.photobucket.com/user/crlpcguy/media/Mirage%20build%20process%20pictures/20170220_184344_zpsq6soznav.jpg.html
Image size reduced, original size: 1024 x 768. http://i379.photobucket.com/albums/oo236/crlpcguy/Mirage%20build%20process%20pictures/20170220_184344_zpsq6soznav.jpg~original to view the image in its original dimension.

http://s379.photobucket.com/user/crlpcguy/media/Mirage%20build%20process%20pictures/20170220_184348_zps1kqjmfxi.jpg.html
Image size reduced, original size: 1024 x 768. http://i379.photobucket.com/albums/oo236/crlpcguy/Mirage%20build%20process%20pictures/20170220_184348_zps1kqjmfxi.jpg~original to view the image in its original dimension.

http://s379.photobucket.com/user/crlpcguy/media/Mirage%20build%20process%20pictures/20170223_155016_zpsls1gboqy.jpg.html
Image size reduced, original size: 1024 x 768. http://i379.photobucket.com/albums/oo236/crlpcguy/Mirage%20build%20process%20pictures/20170223_155016_zpsls1gboqy.jpg~original to view the image in its original dimension.

http://s379.photobucket.com/user/crlpcguy/media/Mirage%20build%20process%20pictures/20170223_155039_zps5c6zogk0.jpg.html
Image size reduced, original size: 1024 x 768. http://i379.photobucket.com/albums/oo236/crlpcguy/Mirage%20build%20process%20pictures/20170223_155039_zps5c6zogk0.jpg~original to view the image in its original dimension.

http://s379.photobucket.com/user/crlpcguy/media/Mirage%20build%20process%20pictures/20170223_155119_zpsa87eheex.jpg.html
Image size reduced, original size: 1024 x 768. http://i379.photobucket.com/albums/oo236/crlpcguy/Mirage%20build%20process%20pictures/20170223_155119_zpsa87eheex.jpg~original to view the image in its original dimension.

http://s379.photobucket.com/user/crlpcguy/media/Mirage%20build%20process%20pictures/20170223_155346_zpsaeykcapl.jpg.html
Image size reduced, original size: 1024 x 768. http://i379.photobucket.com/albums/oo236/crlpcguy/Mirage%20build%20process%20pictures/20170223_155346_zpsaeykcapl.jpg~original to view the image in its original dimension.


Finished the first fender!
http://s379.photobucket.com/user/crlpcguy/media/Mirage%20build%20process%20pictures/20170216_161702_zpsfhftieqv.jpg.html
Image size reduced, original size: 1024 x 768. http://i379.photobucket.com/albums/oo236/crlpcguy/Mirage%20build%20process%20pictures/20170216_161702_zpsfhftieqv.jpg~original to view the image in its original dimension.

http://s379.photobucket.com/user/crlpcguy/media/Mirage%20build%20process%20pictures/20170216_161708_zpsmkppm07v.jpg.html
Image size reduced, original size: 1024 x 768. http://i379.photobucket.com/albums/oo236/crlpcguy/Mirage%20build%20process%20pictures/20170216_161708_zpsmkppm07v.jpg~original to view the image in its original dimension.


Time to start on the second one! Here it is in bare metal for a test fit: (Note the three different sections of fender! It takes three fenders to make one "coudan" fender)
http://s379.photobucket.com/user/crlpcguy/media/Mirage%20build%20process%20pictures/20170223_160542_zps5xhcql5e.jpg.html
Image size reduced, original size: 1024 x 768. http://i379.photobucket.com/albums/oo236/crlpcguy/Mirage%20build%20process%20pictures/20170223_160542_zps5xhcql5e.jpg~original to view the image in its original dimension.

http://s379.photobucket.com/user/crlpcguy/media/Mirage%20build%20process%20pictures/20170223_161244_zpsxnm1vwa7.jpg.html
Image size reduced, original size: 1024 x 768. http://i379.photobucket.com/albums/oo236/crlpcguy/Mirage%20build%20process%20pictures/20170223_161244_zpsxnm1vwa7.jpg~original to view the image in its original dimension.


New fuel rail came in from STM!
http://s379.photobucket.com/user/crlpcguy/media/Mirage%20build%20process%20pictures/20170302_163459_zps6s8zy2fv.jpg.html
Image size reduced, original size: 1024 x 768. http://i379.photobucket.com/albums/oo236/crlpcguy/Mirage%20build%20process%20pictures/20170302_163459_zps6s8zy2fv.jpg~original to view the image in its original dimension.

http://s379.photobucket.com/user/crlpcguy/media/Mirage%20build%20process%20pictures/20170302_163505_zpsxz8wqybe.jpg.html
Image size reduced, original size: 1024 x 768. http://i379.photobucket.com/albums/oo236/crlpcguy/Mirage%20build%20process%20pictures/20170302_163505_zpsxz8wqybe.jpg~original to view the image in its original dimension.


Also took some time to clean up the wiring harness here as it looked terrible
http://s379.photobucket.com/user/crlpcguy/media/Mirage%20build%20process%20pictures/20170303_141907_zps6twrjnj6.jpg.html
Image size reduced, original size: 1024 x 768. http://i379.photobucket.com/albums/oo236/crlpcguy/Mirage%20build%20process%20pictures/20170303_141907_zps6twrjnj6.jpg~original to view the image in its original dimension.


Second fender done!
http://s379.photobucket.com/user/crlpcguy/media/Mirage%20build%20process%20pictures/20170310_124406_zpsteawu2xl.jpg.html
Image size reduced, original size: 1024 x 768. http://i379.photobucket.com/albums/oo236/crlpcguy/Mirage%20build%20process%20pictures/20170310_124406_zpsteawu2xl.jpg~original to view the image in its original dimension.

http://s379.photobucket.com/user/crlpcguy/media/Mirage%20build%20process%20pictures/20170310_124352_zpsxvpeuqr0.jpg.html
Image size reduced, original size: 1024 x 768. http://i379.photobucket.com/albums/oo236/crlpcguy/Mirage%20build%20process%20pictures/20170310_124352_zpsxvpeuqr0.jpg~original to view the image in its original dimension.

http://s379.photobucket.com/user/crlpcguy/media/Mirage%20build%20process%20pictures/20170310_130111_zpsocjfsmkr.jpg.html
Image size reduced, original size: 1024 x 768. http://i379.photobucket.com/albums/oo236/crlpcguy/Mirage%20build%20process%20pictures/20170310_130111_zpsocjfsmkr.jpg~original to view the image in its original dimension.

http://s379.photobucket.com/user/crlpcguy/media/Mirage%20build%20process%20pictures/20170310_130030_zps9vmbgovg.jpg.html
Image size reduced, original size: 1024 x 768. http://i379.photobucket.com/albums/oo236/crlpcguy/Mirage%20build%20process%20pictures/20170310_130030_zps9vmbgovg.jpg~original to view the image in its original dimension.


New meats! 215/45/17 Bridgestone Potenza RE71R's!
http://s379.photobucket.com/user/crlpcguy/media/Mirage%20build%20process%20pictures/20170316_150103_zpsu85gg93l.jpg.html
Image size reduced, original size: 1024 x 768. http://i379.photobucket.com/albums/oo236/crlpcguy/Mirage%20build%20process%20pictures/20170316_150103_zpsu85gg93l.jpg~original to view the image in its original dimension.


Also finished up the exhaust. Will probably add a muffler later; but it's not really loud.
http://s379.photobucket.com/user/crlpcguy/media/Mirage%20build%20process%20pictures/20170318_133726_001_zpsbfcduq3u.jpg.html
Image size reduced, original size: 1024 x 768. http://i379.photobucket.com/albums/oo236/crlpcguy/Mirage%20build%20process%20pictures/20170318_133726_001_zpsbfcduq3u.jpg~original to view the image in its original dimension.

http://s379.photobucket.com/user/crlpcguy/media/Mirage%20build%20process%20pictures/20170318_133748_zpscvgylkaz.jpg.html
Image size reduced, original size: 1024 x 768. http://i379.photobucket.com/albums/oo236/crlpcguy/Mirage%20build%20process%20pictures/20170318_133748_zpscvgylkaz.jpg~original to view the image in its original dimension.


Headlights came in! These will be a base for modding for the future. For now they're a decent inexpensive HID headlight with a
biprojector that handles both high and low beams. (The halos will be ditched later as I don't like the look of them)
http://s379.photobucket.com/user/crlpcguy/media/Mirage%20build%20process%20pictures/20170320_193326_zpswnqhbzrx.jpg.html
Image size reduced, original size: 1024 x 768. http://i379.photobucket.com/albums/oo236/crlpcguy/Mirage%20build%20process%20pictures/20170320_193326_zpswnqhbzrx.jpg~original to view the image in its original dimension.

http://s379.photobucket.com/user/crlpcguy/media/Mirage%20build%20process%20pictures/20170320_193336_zpsryz6iwhr.jpg.html
Image size reduced, original size: 1024 x 768. http://i379.photobucket.com/albums/oo236/crlpcguy/Mirage%20build%20process%20pictures/20170320_193336_zpsryz6iwhr.jpg~original to view the image in its original dimension.

http://s379.photobucket.com/user/crlpcguy/media/Mirage%20build%20process%20pictures/20170320_193400_zpsyd5mpvkq.jpg.html
Image size reduced, original size: 1024 x 768. http://i379.photobucket.com/albums/oo236/crlpcguy/Mirage%20build%20process%20pictures/20170320_193400_zpsyd5mpvkq.jpg~original to view the image in its original dimension.


And this just in today! Side skirts are finished!
http://s379.photobucket.com/user/crlpcguy/media/Mirage%20build%20process%20pictures/20170322_112123_zpstebmqhzb.jpg.html
Image size reduced, original size: 1024 x 768. http://i379.photobucket.com/albums/oo236/crlpcguy/Mirage%20build%20process%20pictures/20170322_112123_zpstebmqhzb.jpg~original to view the image in its original dimension.

http://s379.photobucket.com/user/crlpcguy/media/Mirage%20build%20process%20pictures/20170322_123319_zpsnzmc19jk.jpg.html
Image size reduced, original size: 1024 x 768. http://i379.photobucket.com/albums/oo236/crlpcguy/Mirage%20build%20process%20pictures/20170322_123319_zpsnzmc19jk.jpg~original to view the image in its original dimension.


Two screws and a whole lotta 3M body molding tape lol. I had them installed this way before and they were on the
car for 6 years with no issues and I nearly broke one trying to get them off before lol.
http://s379.photobucket.com/user/crlpcguy/media/Mirage%20build%20process%20pictures/20170322_130012_zpsoirzdyum.jpg.html
Image size reduced, original size: 1024 x 768. http://i379.photobucket.com/albums/oo236/crlpcguy/Mirage%20build%20process%20pictures/20170322_130012_zpsoirzdyum.jpg~original to view the image in its original dimension.


They match the Evo 4 rear bumper and lip perfectly!
http://s379.photobucket.com/user/crlpcguy/media/Mirage%20build%20process%20pictures/20170322_131549_zps8iwf7zel.jpg.html
Image size reduced, original size: 1024 x 768. http://i379.photobucket.com/albums/oo236/crlpcguy/Mirage%20build%20process%20pictures/20170322_131549_zps8iwf7zel.jpg~original to view the image in its original dimension.

Posted by: Sensation! Mar 22 2017, 04:02 PM
The bodywork on those fenders are top notch.
3 pieces and the character line is still sharp and pops without any noticeable breaks on the surface. Seriously excellent stuff.

Posted by: Spaz Mar 23 2017, 04:32 PM
So in for Corbin results. Two weeks can't come soon enough.

Powered by Invision Power Board (http://www.invisionboard.com)
© Invision Power Services (http://www.invisionpower.com)