 Close Topic Options
 | Welcome Guest ( Log In | Register ) | Resend Validation Email |
DJ Panel ( Server Stats ) Song History Initial D World Chat Room (Discord) Broadband Stream RADIO BROADCAST » streaming at 96kbps with 5 unique listeners, playing m.o.v.e - Promised Land~Bless into the Sunshine~ (Album Edit) Important Rules • Please do NOT post knowingly false information. Violators will be issued an actual warning.
• Please do NOT copy and paste articles from other websites. Link and short description is ok, but please do not copy and paste pages of info. Violator will be issued a verbal warning.
• Do NOT post any torrents and/or links to pirated copies of software here. Violator will be issued a verbal warning.
• Discussions about illegal materials such as ROMs, WAREZ and methods of copying copyrighted materials are not encouraged in this subforum.
» FORUM MODERATOR : FORUM MODERATOR
| |
Views: 14,769 · Replies: 8
Panasonic DMC-TZ3 CCD Replacement| khat17 |  Posted: May 25 2011, 05:05 PM Posted: May 25 2011, 05:05 PM |
IDW SIMPLETON  Group: Advanced Members Posts: 1,168 Member No.: 17,668 Joined: May 7th 2006 Location: Mandeville, Jamaica | Hi all. First I wanna thank the staff of IDW as I'm allowed to post as many pics as I want. Sorry for the bandwidth hogging on that, but I'll prolly link other forums to here (increase the traffic). http://www.cameras.co.uk/reviews/panasonic-dmc-tz3.cfm On to it - the DMC-TZ3 (Panasonic Lumix) is a pretty decent camera IMO. The zoom is good for a camera that size (and age), and one of the things that drew me to it is the fact that it has a Leica lens. That's probably a really shallow reason, but it was part of the selling point for me. So I got me a camcorder as a gift - not a very good one (and is now not working properly) but a camcorder none-the-less, and decided to give my still camera to my younger brother. The second day after he got it he tells me it's not working.......Upset was not the word. I had this camera and it was doing FINE till I gave it to him. Anyways. After a bit of checking I found that the problem is the CCD. http://www.dalsa.com/corp/markets/ccd_vs_cmos.aspx The very unfortunate part is that I couldn't seem to find the CCD anywhere online - maybe because I didn't have the right part number or something - but I couldn't find it. Here's a sample of what the pictures were like before I changed the CCD.  Image size reduced, original size: 1024 x 768. Click here to view the image in its original dimension. So I also had done a video about the dis-assembly - but my video camera sux so don't complain much pls. http://www.youtube.com/watch?v=HN96jQ1CZKU So here are some pictures with the dis-assembly so you can follow. The general disclaimer (as usual) is don't complain about problems if you mess it up following this. Firstly remove the screws. 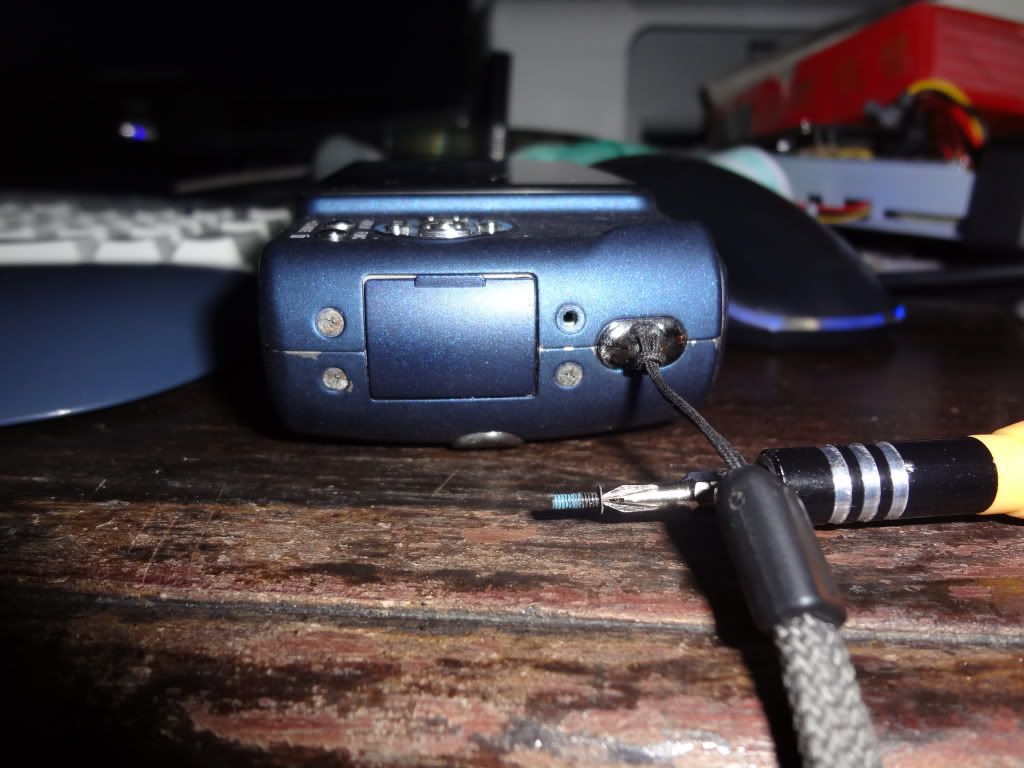 Image size reduced, original size: 1024 x 768. Click here to view the image in its original dimension. 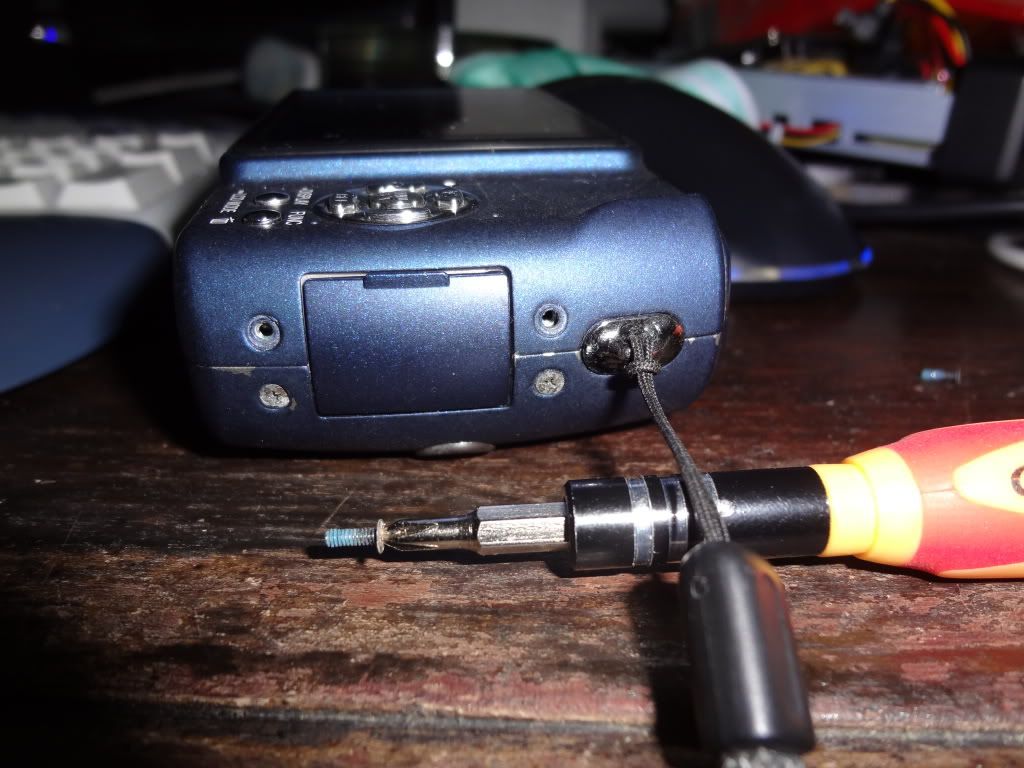 Image size reduced, original size: 1024 x 768. Click here to view the image in its original dimension. Please note that this screw is shorter than the others that we're going to remove. 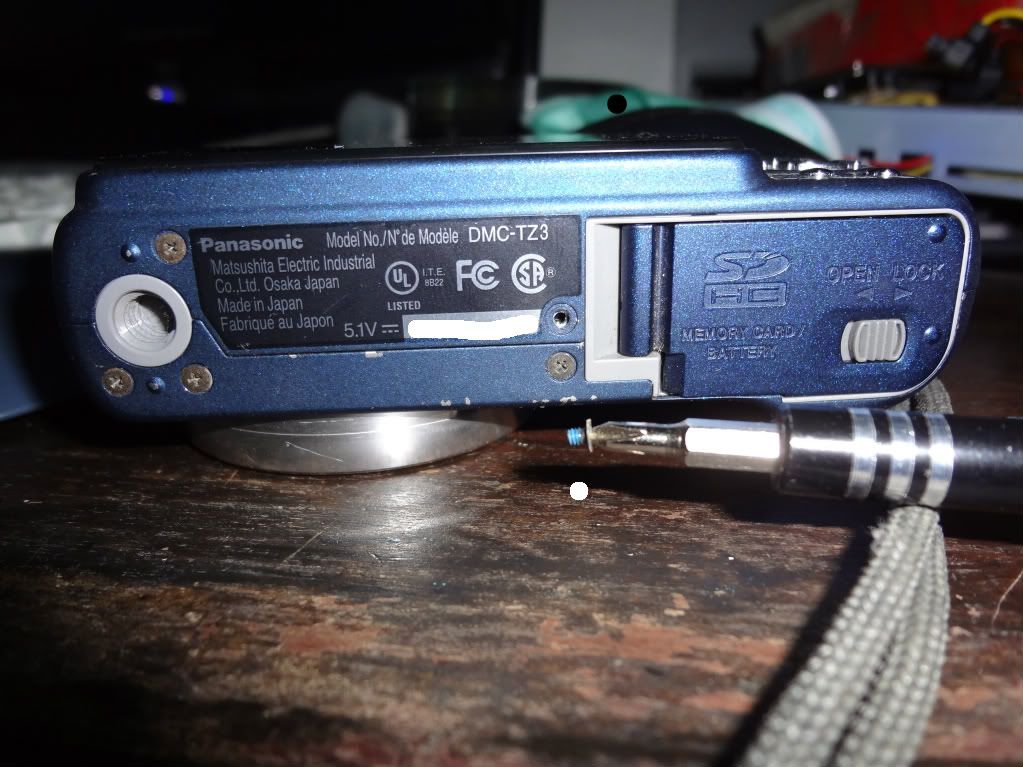 Image size reduced, original size: 1023 x 767. Click here to view the image in its original dimension.  Image size reduced, original size: 1023 x 767. Click here to view the image in its original dimension. 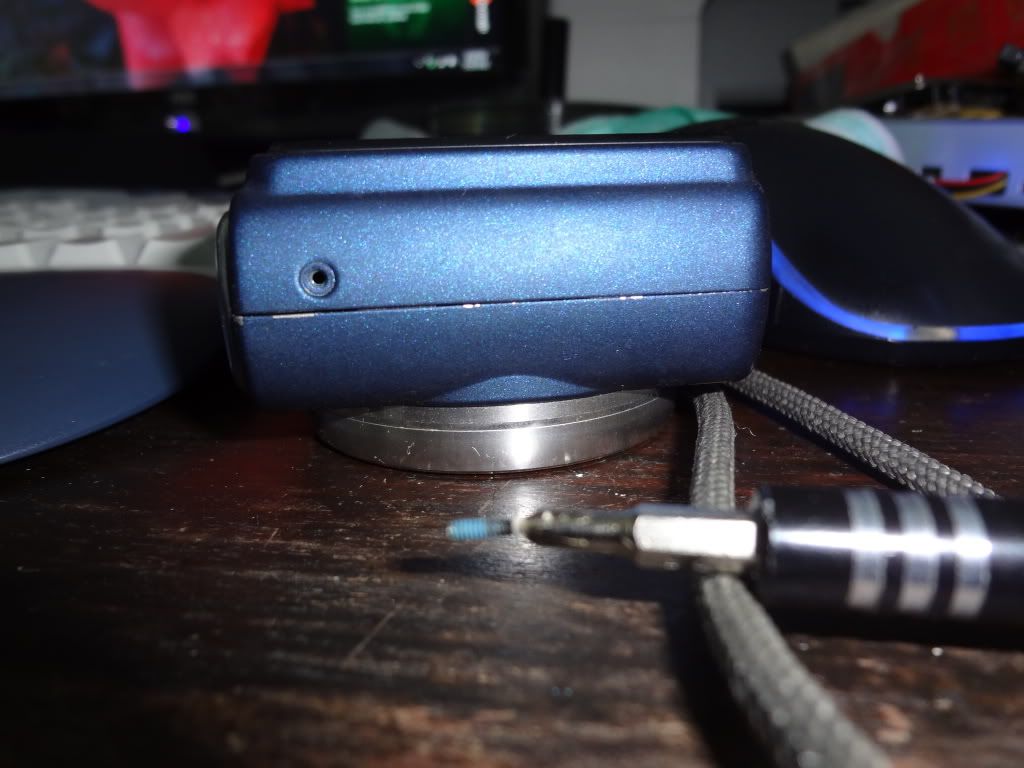 Image size reduced, original size: 1024 x 768. Click here to view the image in its original dimension. After removal, use a pry tool like the plastic ones used on cell-phones to open it up. 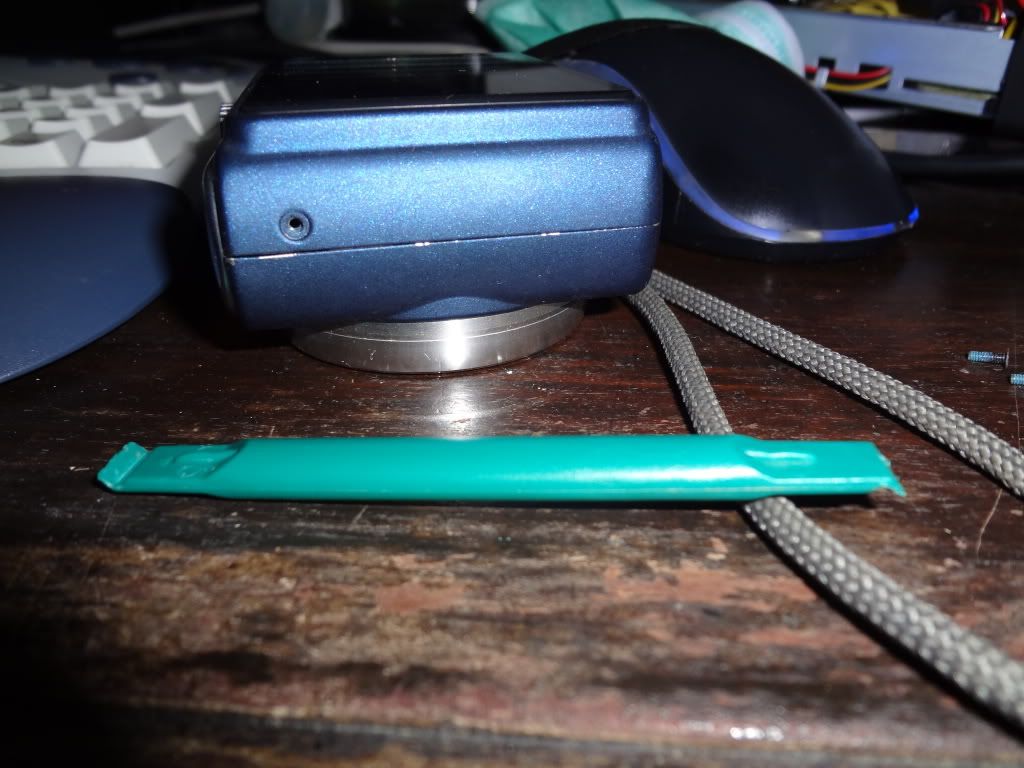 Image size reduced, original size: 1024 x 768. Click here to view the image in its original dimension. 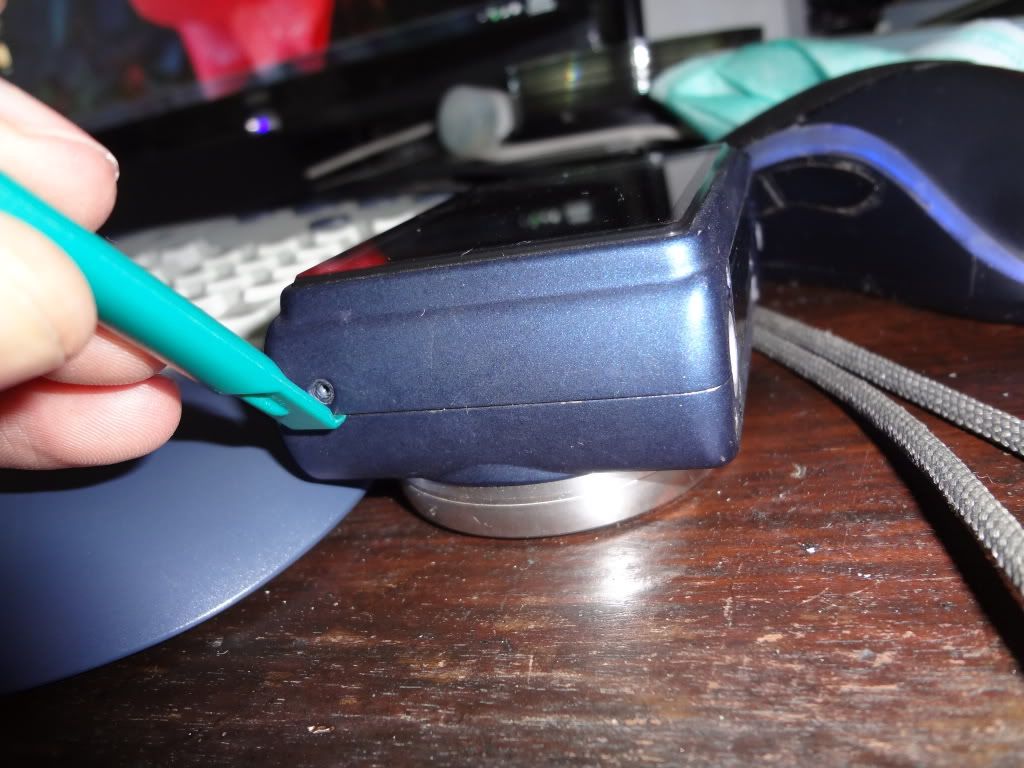 Image size reduced, original size: 1024 x 768. Click here to view the image in its original dimension. 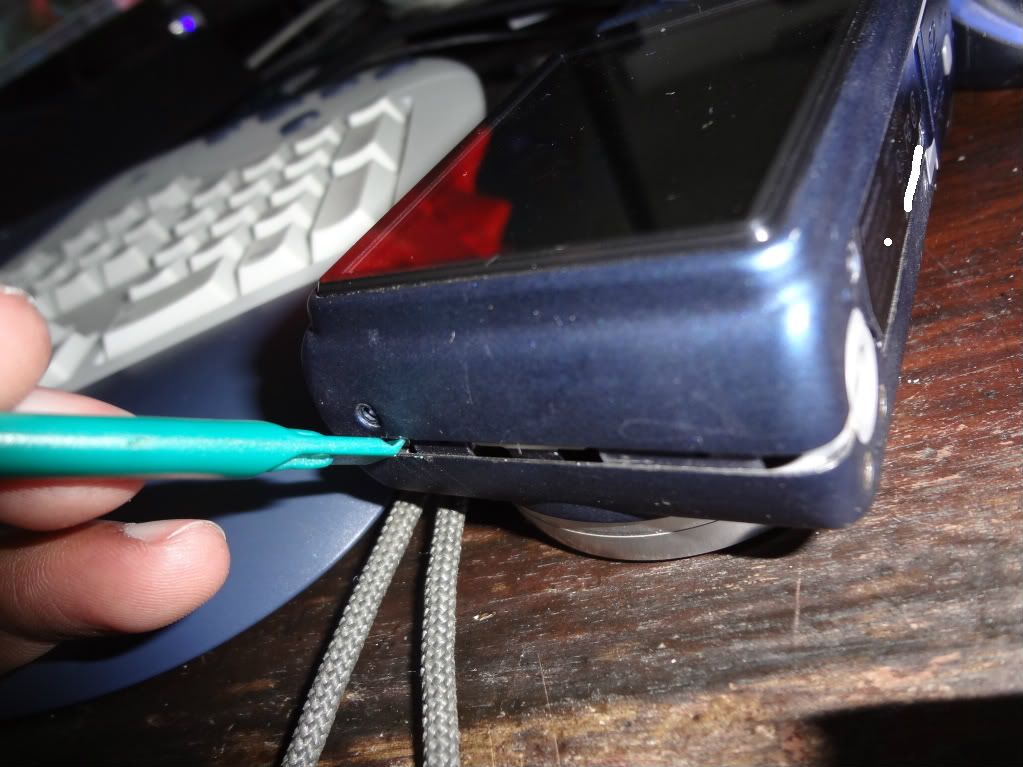 Image size reduced, original size: 1023 x 767. Click here to view the image in its original dimension. 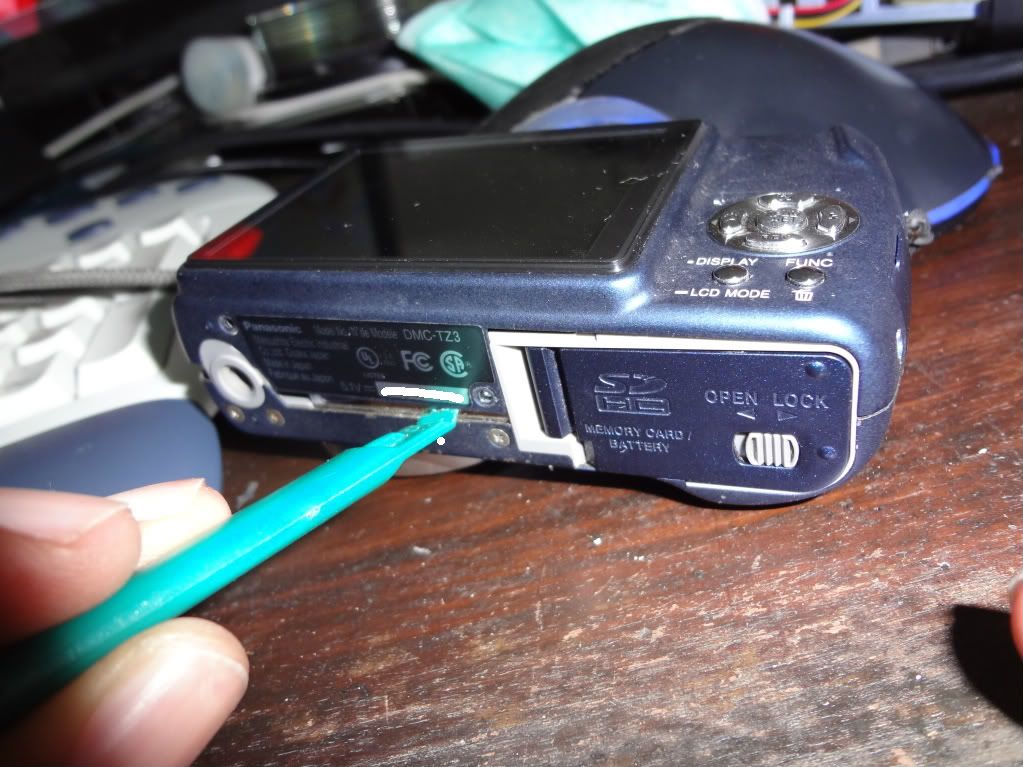 Image size reduced, original size: 1023 x 767. Click here to view the image in its original dimension. 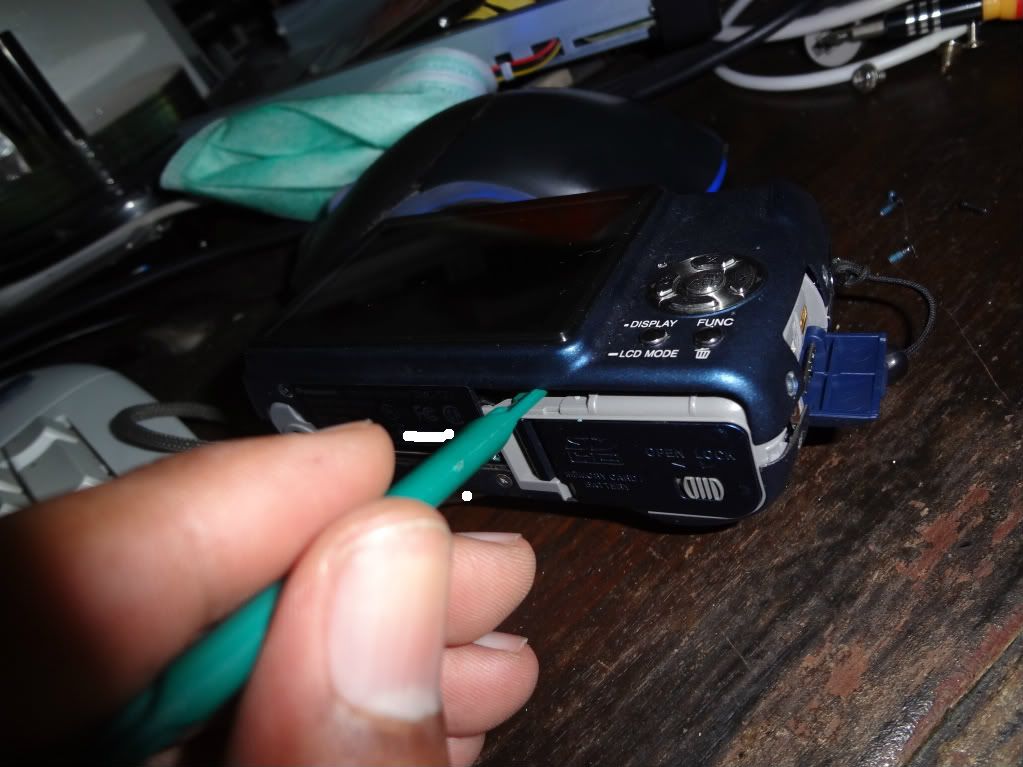 Image size reduced, original size: 1023 x 767. Click here to view the image in its original dimension. After prying it up, carefully remove the rear cover and LCD. There are two ribbon cables that need to be removed. 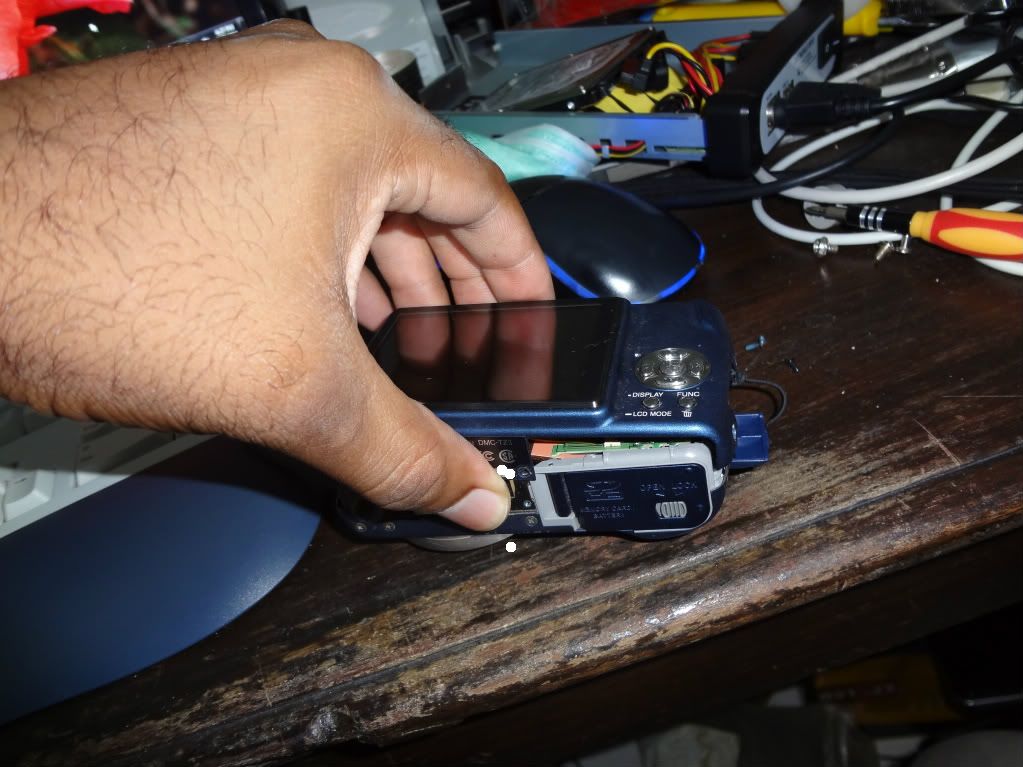 Image size reduced, original size: 1023 x 767. Click here to view the image in its original dimension. 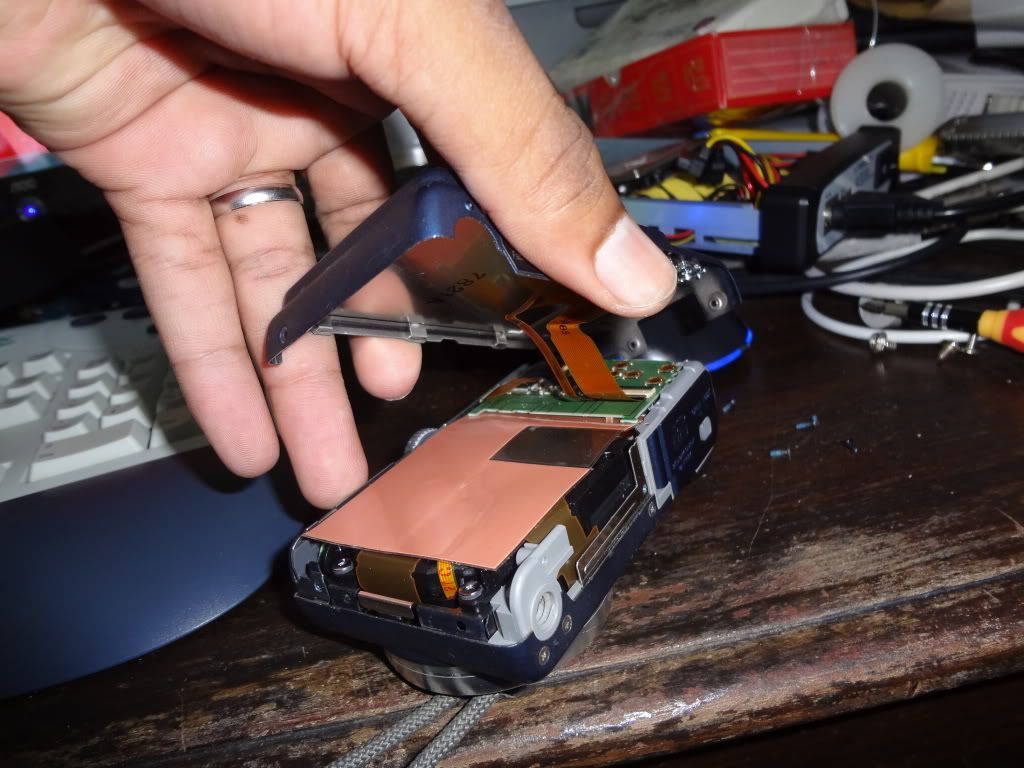 Image size reduced, original size: 1024 x 768. Click here to view the image in its original dimension. Use a pry tool to lift the indicated areas and then remove the cable either by hand or using the proper tweezers. 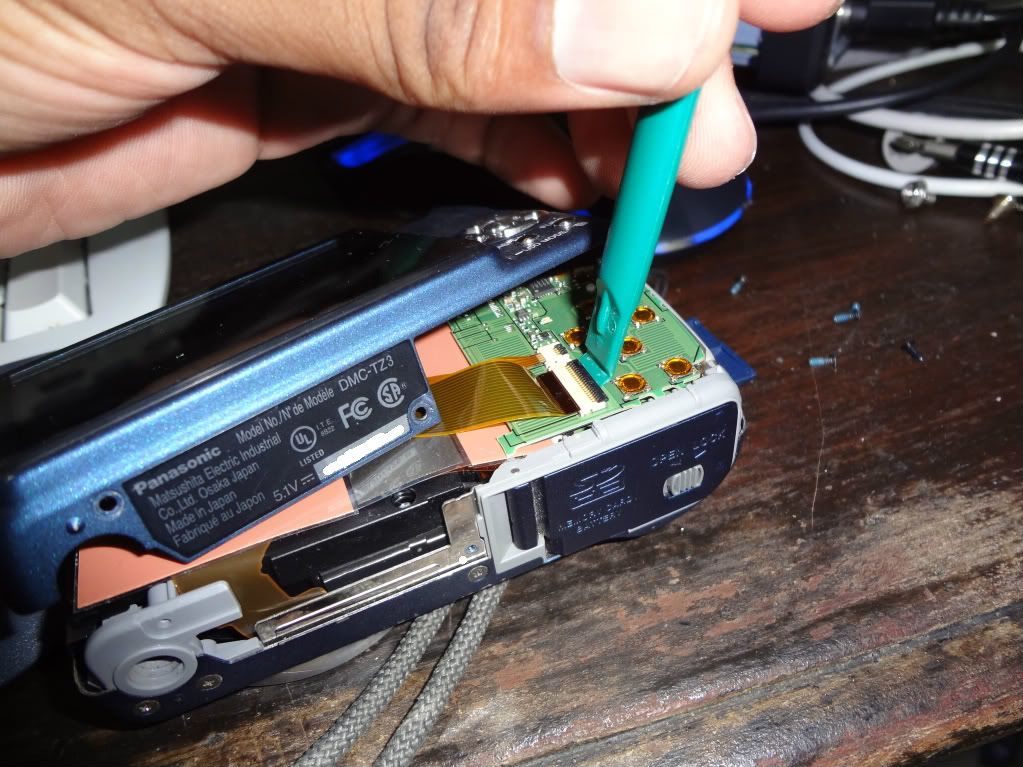 Image size reduced, original size: 1023 x 767. Click here to view the image in its original dimension. 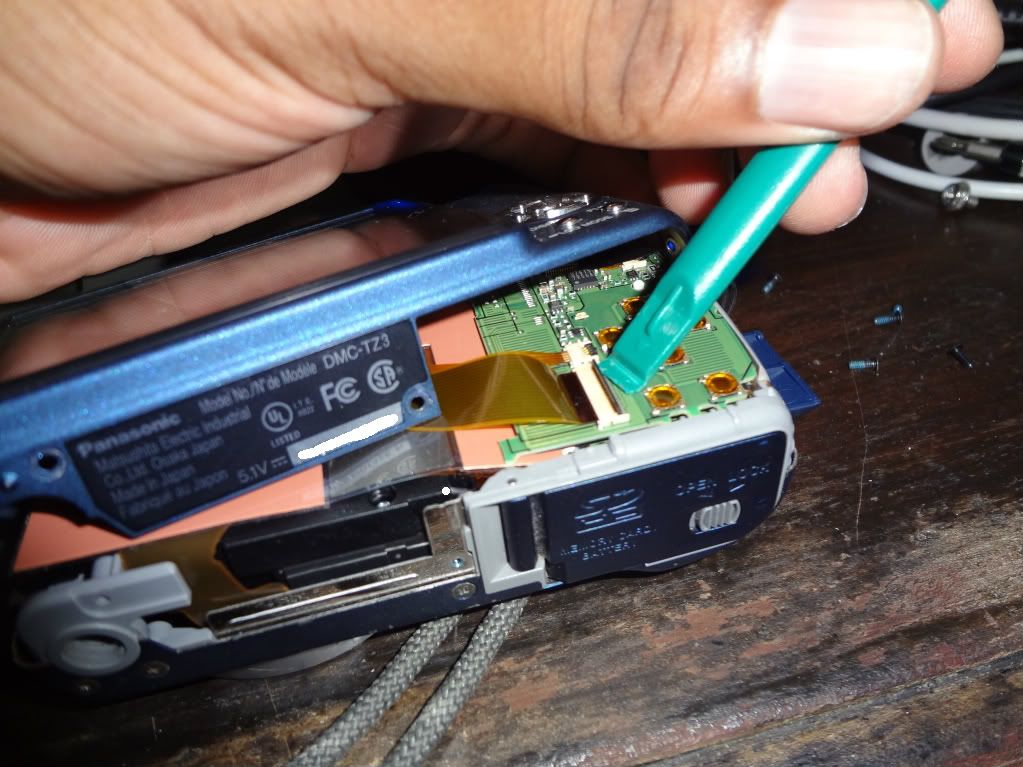 Image size reduced, original size: 1023 x 767. Click here to view the image in its original dimension. 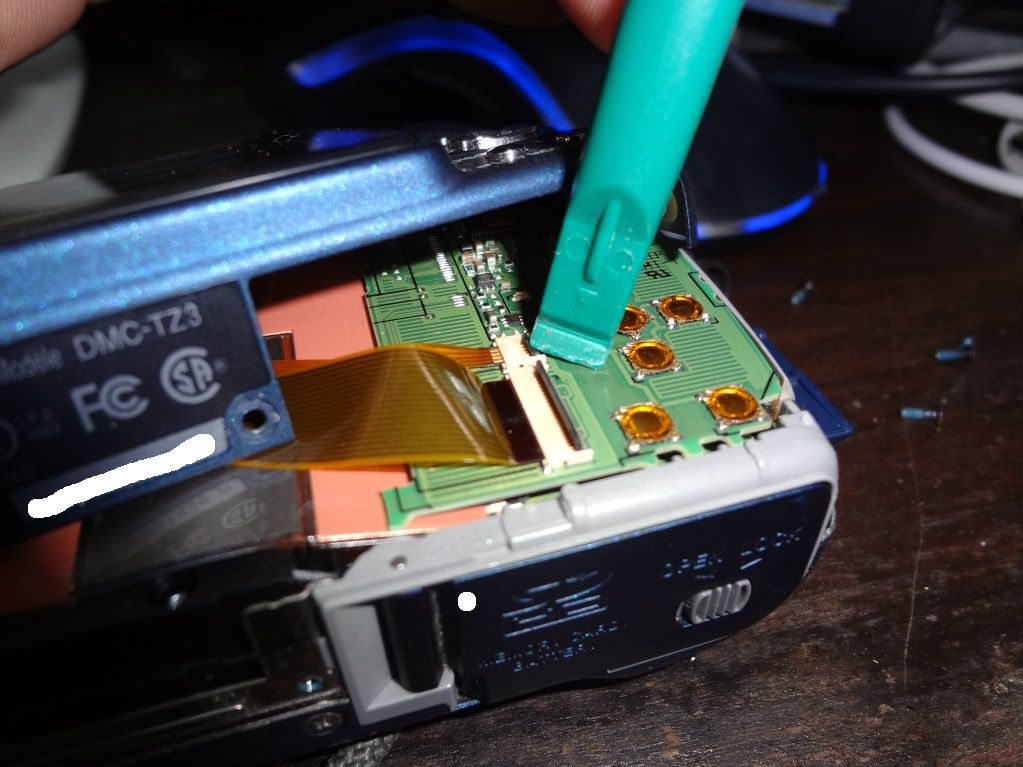 Image size reduced, original size: 1023 x 767. Click here to view the image in its original dimension.  Image size reduced, original size: 1024 x 768. Click here to view the image in its original dimension. 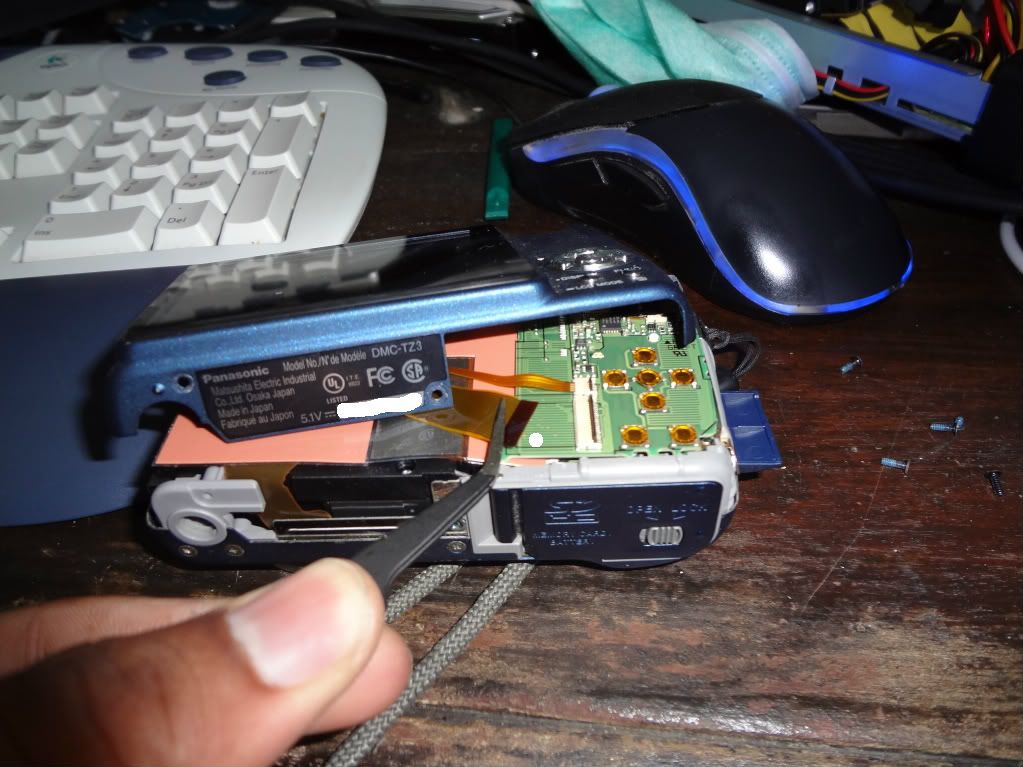 Image size reduced, original size: 1023 x 767. Click here to view the image in its original dimension. 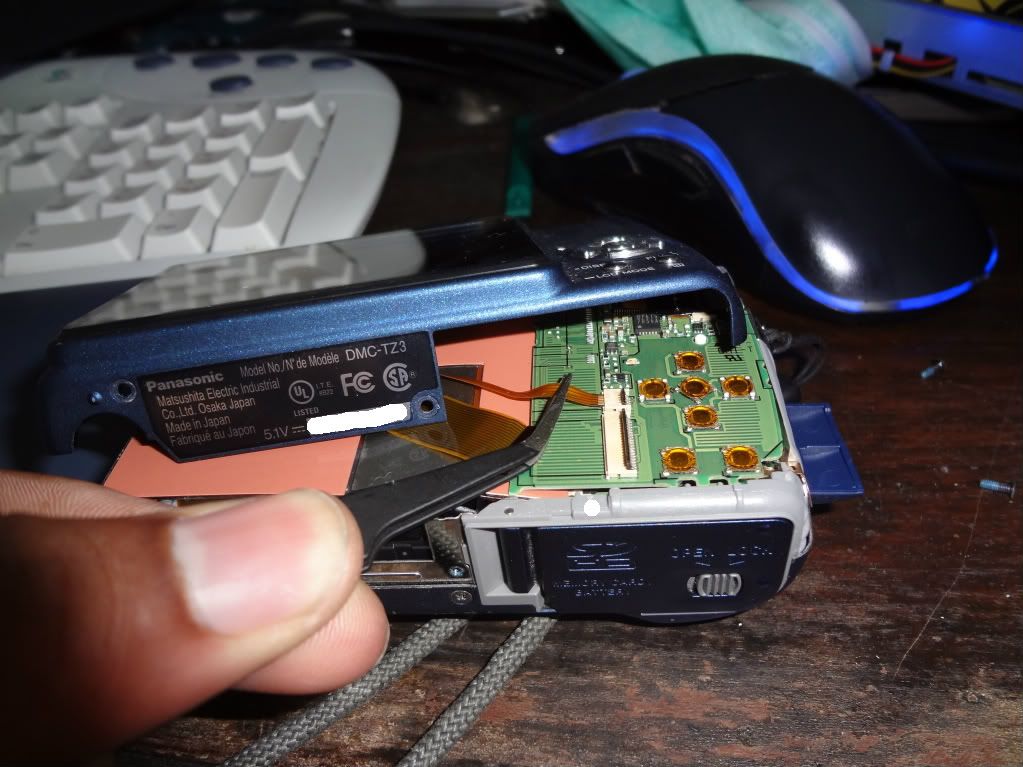 Image size reduced, original size: 1023 x 767. Click here to view the image in its original dimension. 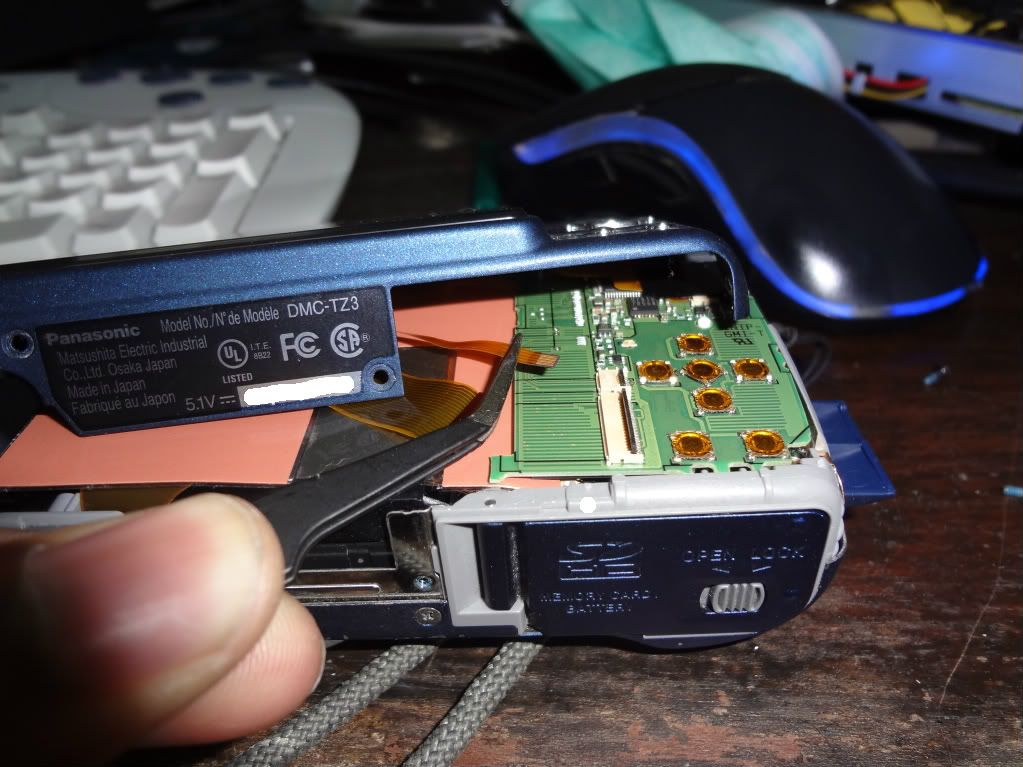 Image size reduced, original size: 1023 x 767. Click here to view the image in its original dimension. After removing the cables, lift the back and place it in a safe place. Next is the circuit board indicated. Use the pry-tool and lift from the bottom. There are no screws in this part, so don't be afraid to pry it up. 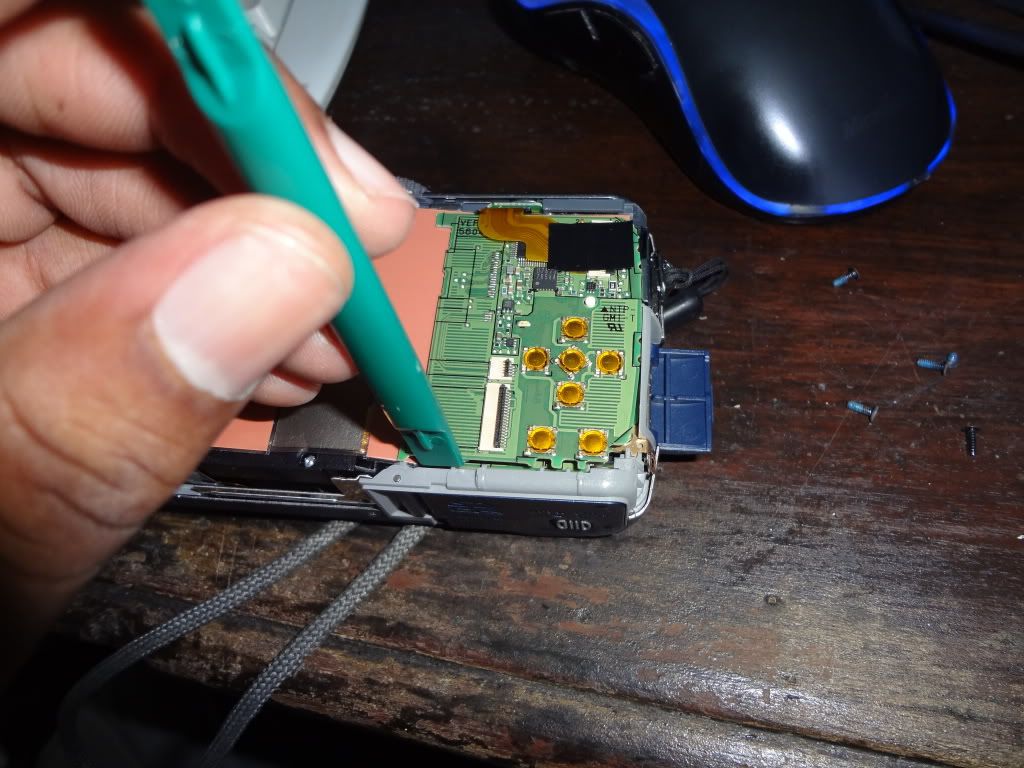 Image size reduced, original size: 1024 x 768. Click here to view the image in its original dimension. 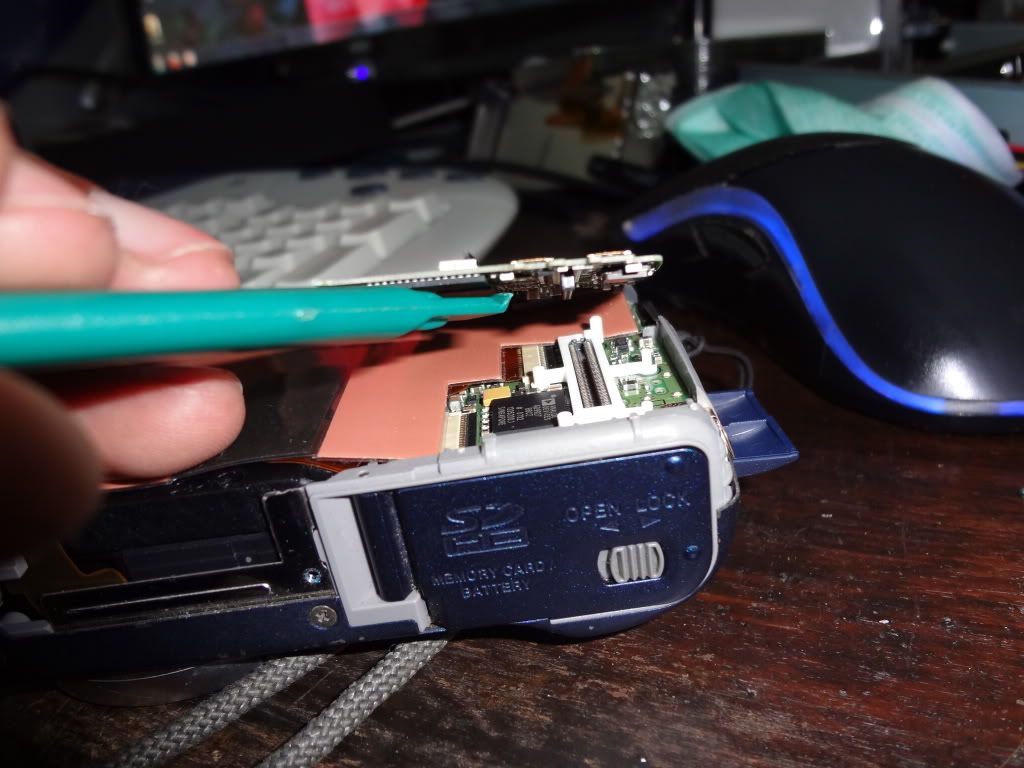 Image size reduced, original size: 1024 x 768. Click here to view the image in its original dimension. Once up you can fold it over the top of the camera. You may disconnect it if you like, but for replacing the CCD you don't have to. Also - ensure your work area doesn't look as cramped as mine  The shielding that is present can now be removed and placed in a safe place. 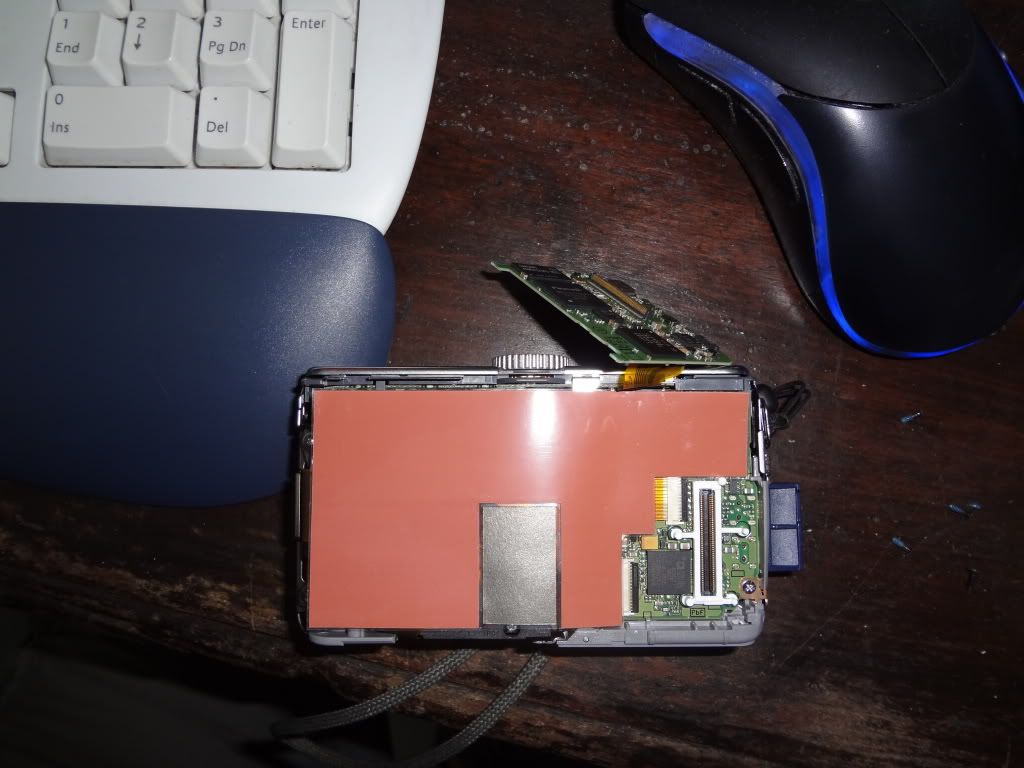 Image size reduced, original size: 1024 x 768. Click here to view the image in its original dimension. Next you need to remove the three indicated screws. 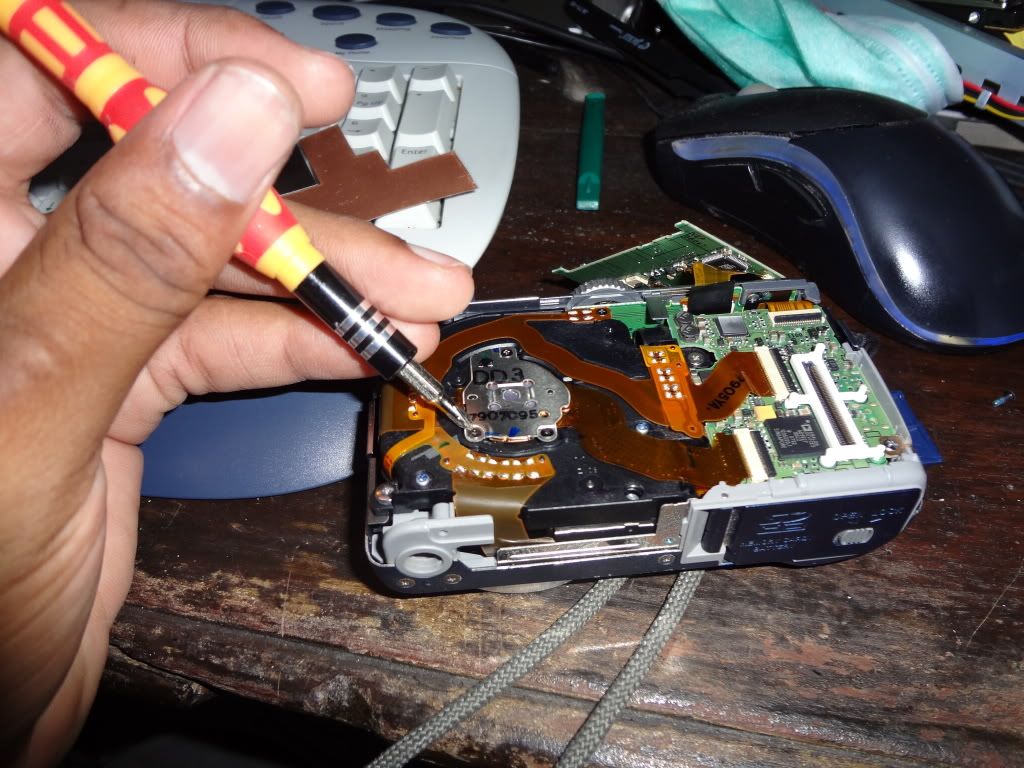 Image size reduced, original size: 1024 x 768. Click here to view the image in its original dimension. 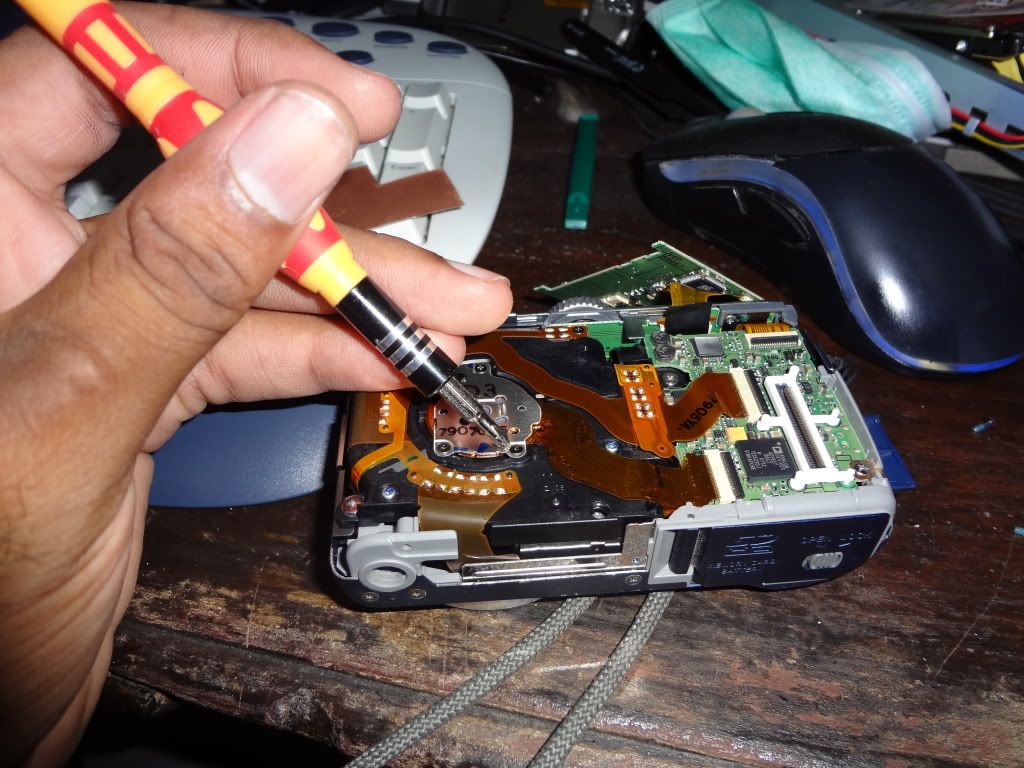 Image size reduced, original size: 1024 x 768. Click here to view the image in its original dimension. 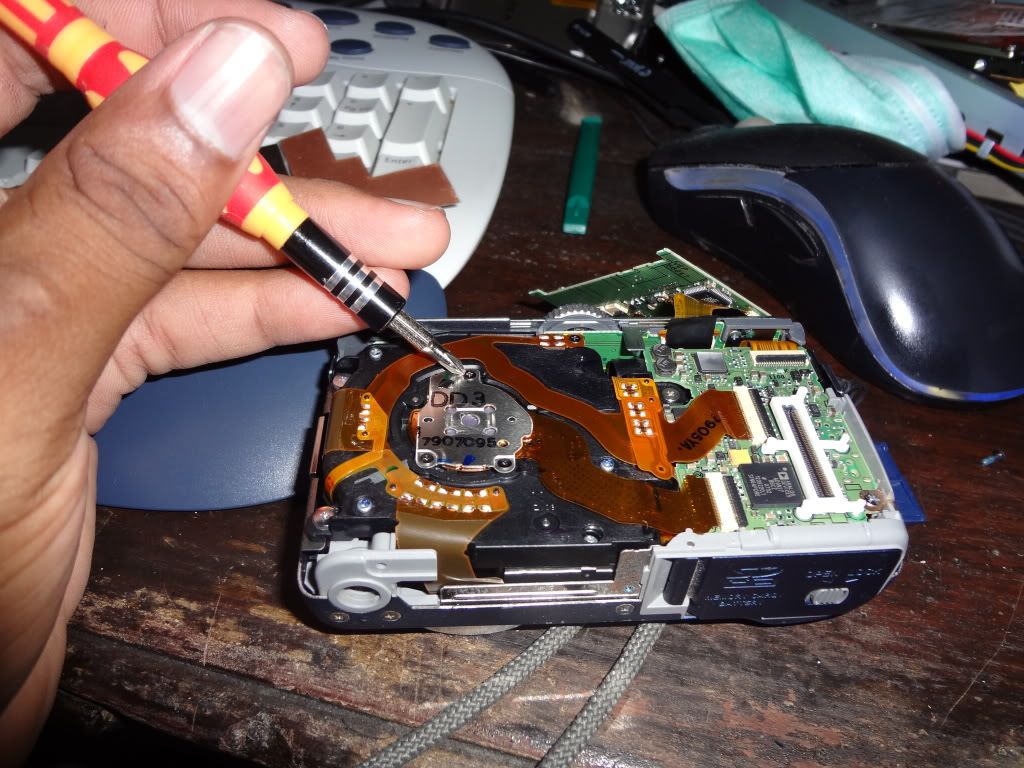 Image size reduced, original size: 1024 x 768. Click here to view the image in its original dimension. Once the screws are removed, lift the indicated tab and then remove the ribbon cable.  Image size reduced, original size: 1024 x 768. Click here to view the image in its original dimension. 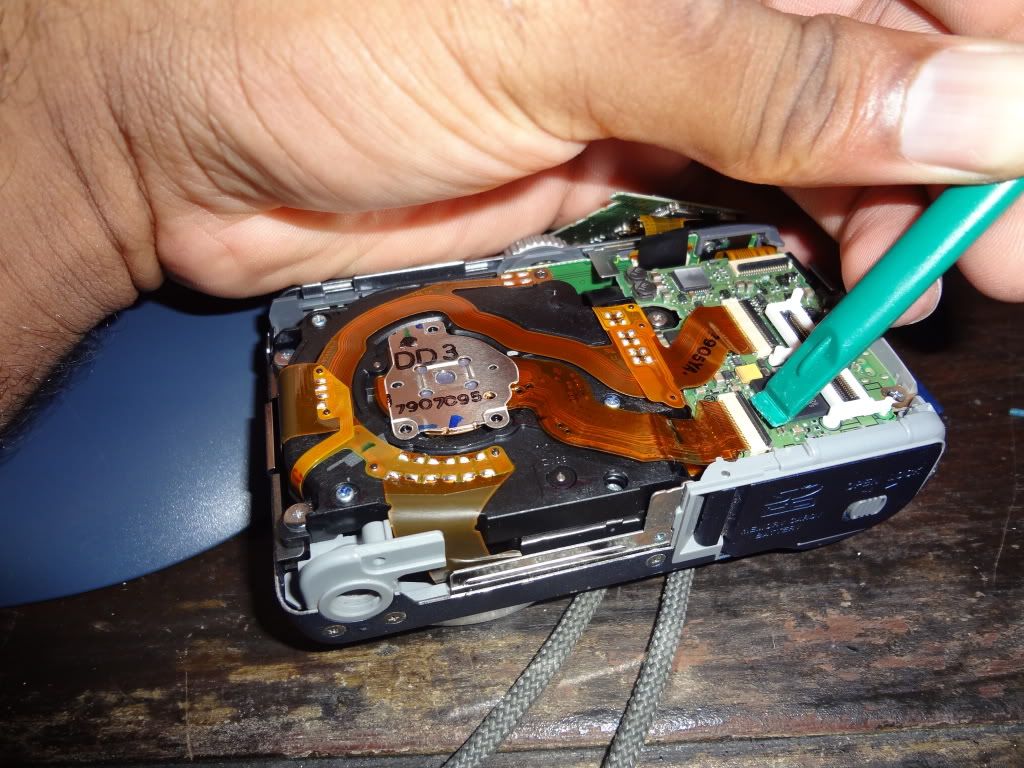 Image size reduced, original size: 1024 x 768. Click here to view the image in its original dimension. 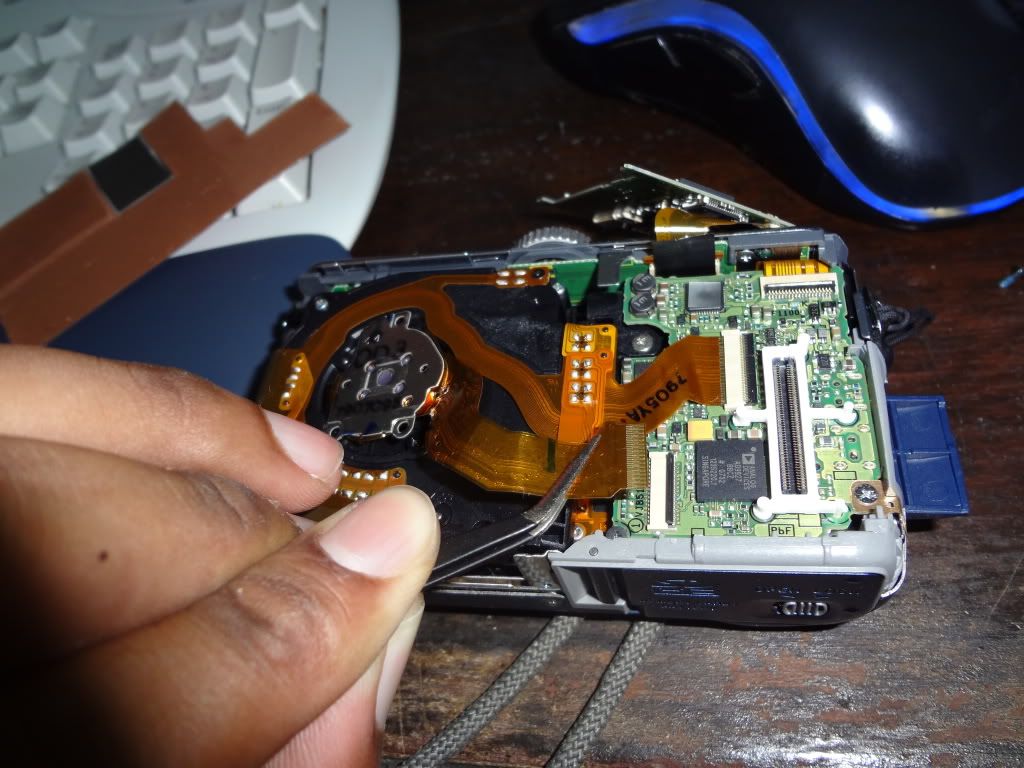 Image size reduced, original size: 1024 x 768. Click here to view the image in its original dimension. 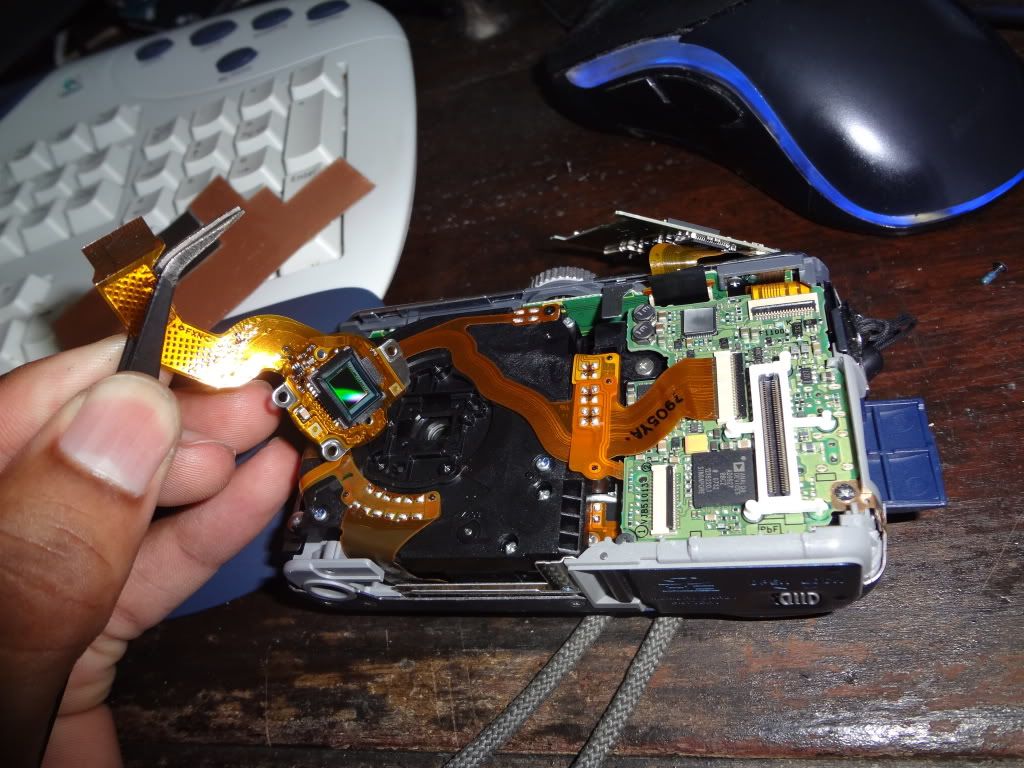 Image size reduced, original size: 1024 x 768. Click here to view the image in its original dimension. You can then use your second Lumix or CCD and replace. Just follow the instructions in reverse. 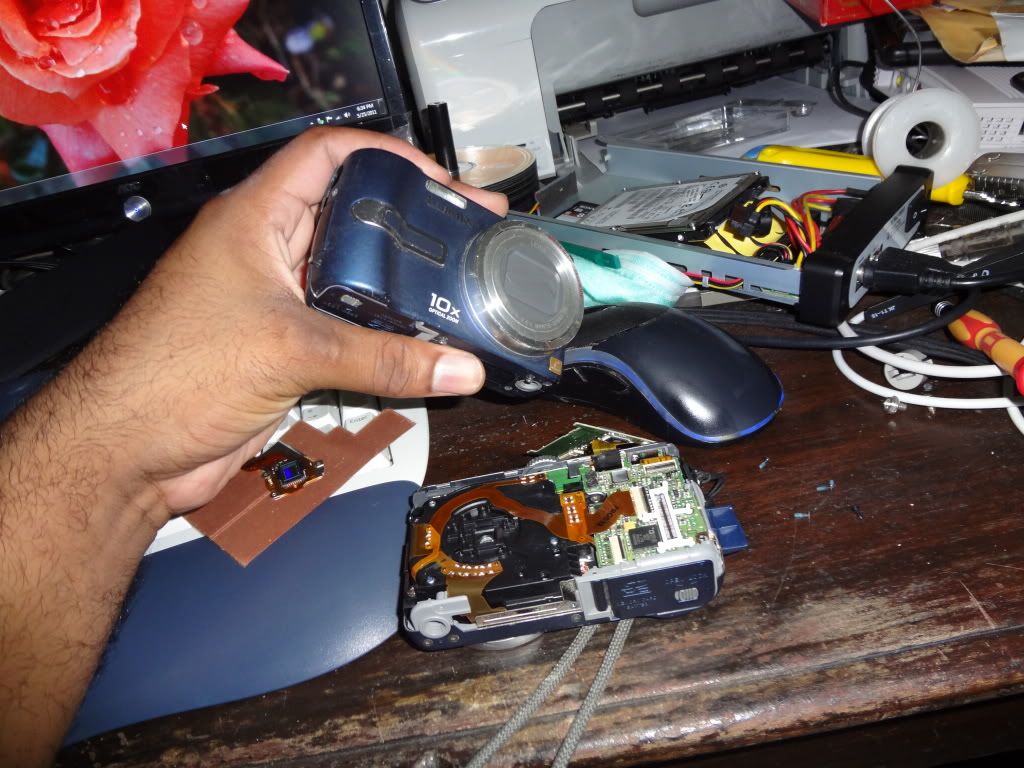 Image size reduced, original size: 1024 x 768. Click here to view the image in its original dimension. Once done your pics should look much better.  Image size reduced, original size: 1022 x 766. Click here to view the image in its original dimension.  Image size reduced, original size: 1024 x 768. Click here to view the image in its original dimension. Also - I noticed that the replacement CCD had slightly different numbers. If these make any sense to you or make it any easier for you to get the part please feel free. 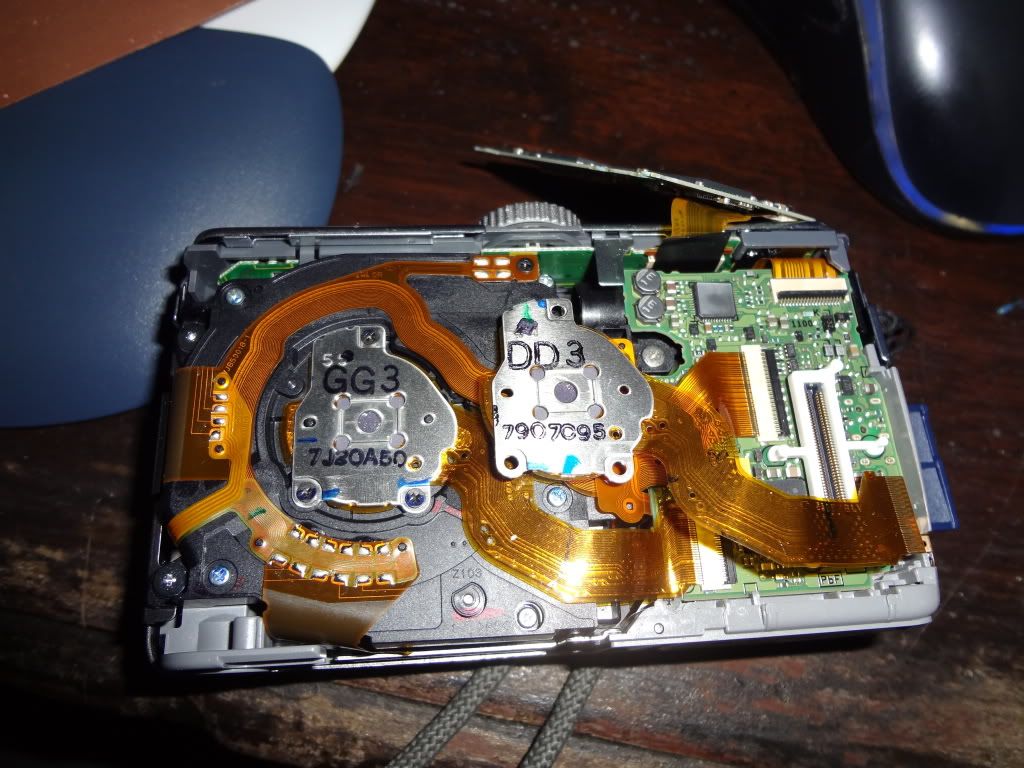 Image size reduced, original size: 1024 x 768. Click here to view the image in its original dimension. 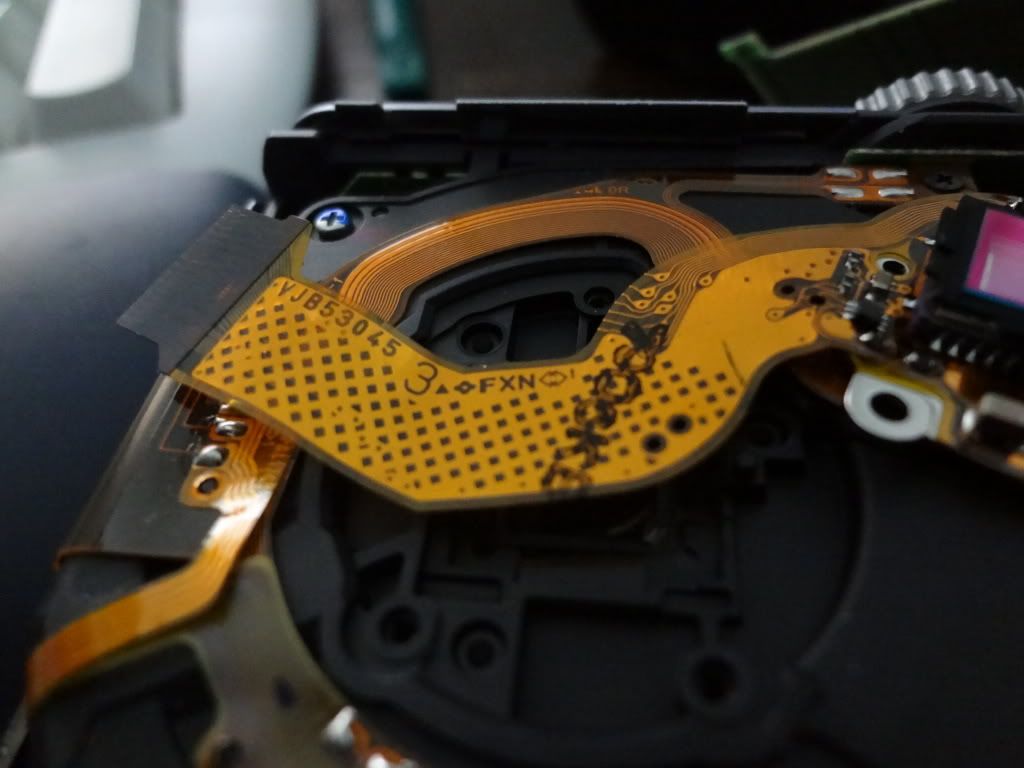 Image size reduced, original size: 1024 x 768. Click here to view the image in its original dimension. Hopefully this helps you out! Have fun! This post has been edited by khat17 on May 25 2011, 05:08 PM |
|
| coastrbreaks | Posted: Jun 27 2011, 11:15 AM |
Shmuck Group: Members Posts: 1 Member No.: 37,554 Joined: Jun 27th 2011 Location: Update Profile | i appreciate all the work you have put into this post. i have the identical problem with my camera, as well as finding the replacement part. if you can offer information where you had found the sensor I too can make the repair. |
|
| khat17 | Posted: Jul 12 2011, 03:54 PM |
IDW SIMPLETON Group: Advanced Members Posts: 1,168 Member No.: 17,668 Joined: May 7th 2006 Location: Mandeville, Jamaica | The replacement was from a used camera on eBay. The problem with the defective camera I had was the CCD - the problem with the defective camera I purchased was the lens not opening. I took a gamble on that, since the seller said it was working fine until the lens stopped opening. That's usually a broken or slipped gear. Either do a search online using Google or just check eBay for a camera "For Parts Or Repair" which is a similar model to yours. |
|
| Count de Monet | Posted: Oct 6 2012, 07:53 AM |
Shmuck Group: Members Posts: 2 Member No.: 39,048 Joined: Oct 6th 2012 Location: Update Profile | I was able to purchase a CCD for this camera on Ebay from Seller: ephom66 in Sept. 2012 for $39.00 US Camera is working!!! Thanks to Khat17!!!!! This post has been edited by Count de Monet on Oct 7 2012, 06:05 AM |
|
| kyonpalm | Posted: Oct 6 2012, 08:52 AM | ||
Professional Amateur Group: ADMINISTRATOR Posts: 10,568 Member No.: 30,882 Joined: Oct 16th 2008 Location: Laniakea |
Not sure if spambot, or person that found this post through searches and wanted to say "thank you" for the instructions. This post has been edited by kyonpalm on Oct 6 2012, 08:52 AM | ||
Proud Contributor of the Music Section Revival Project |
| Lebon14 | Posted: Oct 6 2012, 11:20 AM | ||
🎧 Group: Advanced Members Posts: 6,594 Member No.: 18,005 Joined: May 25th 2006 Location: Canada |
Yeah that's weird... and why did he buy the part in 2010 but only installed it this years  But I give him the benefit of the doubt though... unless he/it proves us wrong. | ||
Proud Contributor of IDW Forums and the Music Section Revival Project |
| Count de Monet | Posted: Oct 7 2012, 06:20 AM |
Shmuck Group: Members Posts: 2 Member No.: 39,048 Joined: Oct 6th 2012 Location: Update Profile | Date corrected to 2012..........thank you. "Dyslexics of the world untie!" |
|
| Nomake Wan | Posted: Oct 7 2012, 10:01 AM |
ShiMACHaze Group: Advanced Members Posts: 19,542 Member No.: 5,394 Joined: Feb 5th 2005 Location: Drydock | In that case, welcome to the forums!  |
Proud Contributor of IDW Forums and the Music Section Revival Project |
| khat17 | Posted: Oct 25 2012, 06:43 PM |
IDW SIMPLETON Group: Advanced Members Posts: 1,168 Member No.: 17,668 Joined: May 7th 2006 Location: Mandeville, Jamaica | Welcome to the forums! Glad that the info helped. That's what we're here for. |
|
| |
Powered by Invision Power Board 1.3.1 Final © 2003 IPS, Inc.